Friday, August 31, 2012

1,000

Today marks 1,000.  I have been blogging for almost six years, and I'm shocked to discover that I've actually sat down to post 1,000 times.  Really?

1,000! 

1,000 times we laughed, or cried, or simply had coffee together. 

Thanks for listening.

Like a mother reminisces over her baby who has grown into a teen, I look back and marvel.  So much has happened. 

So much sadness.  Enough to fill 1,000 years.  1,000,000 times.

So much happiness.  Enough to fill 1,000 years.  1,000,000 times. Times 1,000.

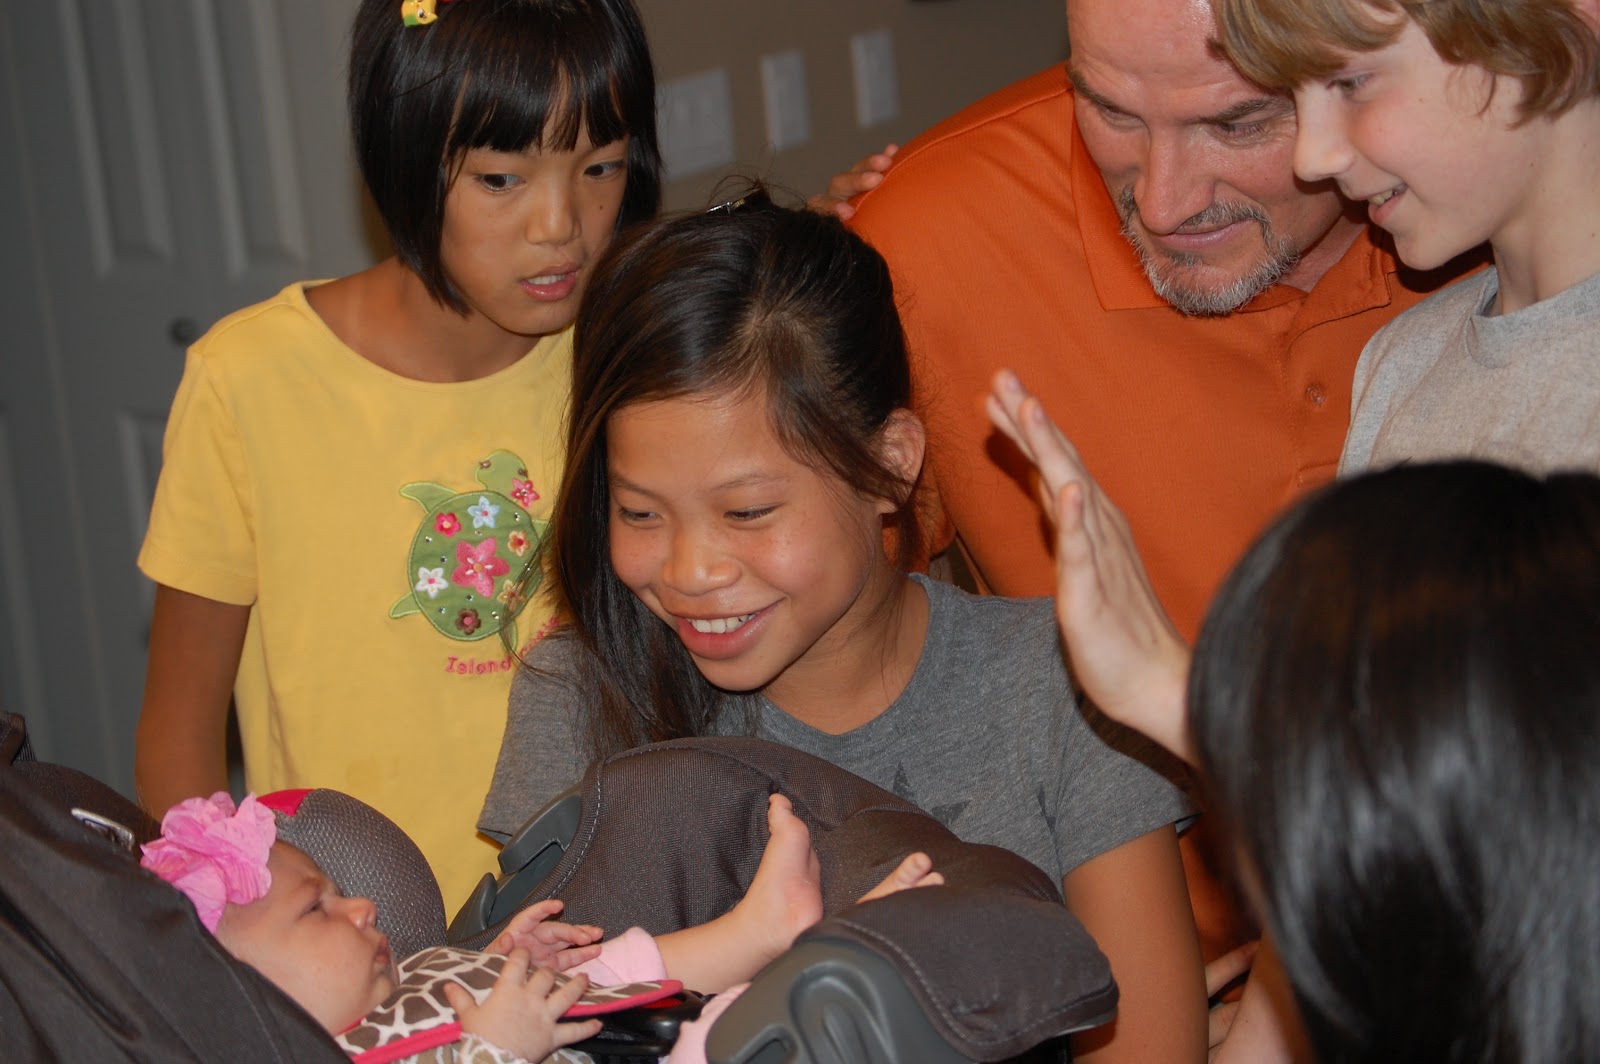
I have witnessed incredible miracles--like the birth of our first grandchild.


What amazing joy to meet this perfect gift from God.


Can I just say she's the most beautiful baby in the world?  (I'm her Grammy, I can brag if I want to!)


I have often thought about why I blog--and if I should continue.  I always come back to the same conclusions: my blog is my catharsis, history, scrapbook and social/family network.  I love to share about the joys and challenges of adoption, large families, parenting, LIFE--the laughter, joy, and hope and that every day brings. 

And I love to share about things that nobody else wants to hear--like how I once shaved my legs in the car.  Good times people!

I DON'T love to share about death and dying and loss and torment and hell and destruction and living life with a son lost to cancer.  I sometimes do.  It's always raw.  And it feels bi-polar to follow up that post with any other topic.  The Day My Son Died And Took Half My Heart With Him . . . . I Peed My Pants While Texting a Picture Of A Port-A-Potty.  (Come to think of it, I forgot to share the texting-while-peeing story--soon!)  The depths of despair to the heights of glory--all in the same day--that is my life.

Sometimes, I have so many words I can't capture them fast enough; others, I flounder for days to find anything at all to say. 

Often, I have considered taking my blog private, mostly to protect my children's privacy.  And I would like to openly discuss certain topics--many APs naively (erroneously) believe their blogs are not followed at international bureaucratic levels.  They are.  Seriously.  Not that mine is.  At least, I hope not, because if it is they must be very confused about how I got approved for adoption when I post about things like my history as a stalker.  That poor man is, no doubt, still traumatized. 

And I would like to talk about things that I just can't talk about for reasons I can't talk about.  Maybe someday. 

And the reason I decide NOT to go password protected?

Because more than anything, I pray that Jesus will find a way to use me. I pray Jesus will work through my fingers to help HIM--in whatever humble way that might be.   And you just never know when that will be--or how. 

Which is why I can't wait to share post #1,001.

In the meantime, I would love to hear from you!  My blog followers!  I know you are out there--but you are often so silent!  Now is the time to come forth!  Speak!  I demand you to speak!!!

Sorry to sound so PMSish--I'll rephrase that--please comment, pretty please?

If you prefer, you can e-mail me: r8rgr8 @ frontier (dot) com  (remove spaces)  (And yes, I know, we need to change our e-mail address to reflect our growing number of children--does my delay say anything about past experiences in changing an e-mail address?  I'd rather get a PAP smear while simultaneously having my wart frozen off and my eyebrows waxed!)

I would love to know if there is a post that especially resonated with you?  One that made you laugh, or cry, or love me, or hate me.  Surely, in those 1,000, there is a reason you are still here with me.  Humor me. 

CHEERS!  To another 1,000!!! 


Up next--an incredible story of how God can use a blog to bring about love, faith, and the miracle of adoption!

Thursday, August 30, 2012

Decor steals

**This giveaways is now closed. Winners have been emailed. Thanks!

Hello there! We are amping up for a weekend of RAIN here…and lots of it. The remains of Isaac are on their way and we can still use it after a horrible drought this summer. I hope everyone affected by the hurricane is now safe and dry!

I’m back this weekend with a GREAT giveaway from Decor Steals, formerly Wuslu.com. It’s been awhile since I’ve had a giveaway and that’s because I’m getting picky about those that I share with you. I’m always excited about this one because I’m a HUGE Decor Steals fan.

decor-steals-LOGO

I love this site and if you haven’t heard of it you’ll want to hang around and check out some of their home decor items. Decor Steals is a site that offers one fantastic decor item every day…for a steal. (Totally couldn’t resist that.) Each one goes live at 10 a.m. EST daily and they now have extended deals that stay on throughout the week as well.

Here’s just a few of my favorites pieces of late…

I love this idea for a party – this wine stand has small chalkboard labels so you can easily show everyone what’s being served:

bottle holder with chalkboard

I think that would be cute with a few flowers lined up in vases too. :)

I love these little holders and the idea of using them for utensils:

numbered storage containers

I would keep those out all the time! You know, for when I can’t be bothered to open the drawer for a spoon. ;) They’d also be cute in the bathroom for cotton balls and make up brushes.

I love these galvanized tubs and think they would be a GREAT item for a spot like above the cabinets or on a plant ledge:

glavanizedtubs

They would also look cute in a bathroom – maybe with towels rolled up in them?

Did I mention that every item, no matter what the size, is only $5 for shipping? (In the 48 contiguous states.) FIVE bucks!!

We all know if you put a bird on it, it’s cuter. And that goes for this mail sorter as well:

rustic metal mail holder

I think I would use it for our napkins on the kitchen table.

This typography bamboo rug was a HUGE hit on Decor Steals, and I can see why:

typography bamboo rug

Isn’t that cool? I would totally frame and hang that one. Wouldn’t it be great art?

And finally, but certainly not least, I love this iron warming grill:

warming grill

How cool for a party or just to keep dinner nice and toasty? I’ve never seen one so pretty!

The fine folks at Decor Steals have created a video to show how they their site works. It’s pretty darn cute:

I love when the lady screams at the computer when her item is gone. Totally me. And by the way, I do not get $5 credits for this post. ;)

Here’s the best part  -- the lovely folks at Decor Steals are giving away $100 to one lucky winner and $50 to a second winner to spend as you wish on the site! Oh. yeah.

Here’s how to enter to win one of two credits ($100 and $50) to Decor Steals:

1. Leave a comment here. What do you have planned this Labor Day weekend? We have a wedding and a concert, and although I’m pretty sure the concert will get rained out, I’m OK with it because I love cozy, rainy weekends so very much.

2. Visit Decor Steals here and check out their pick steals page. Which item do you want to see offered in the future? Come back here to let us know in a comment.

3. Visit their Facebook page and “like” it here. Let us know you did in another comment.

4. Subscribe to their email list here (you’ll get notices about the new deals) and if you do (or are already on the list), leave one more comment here.

* You can enter one, two, three or four times – it’s up to you! All options are not mandatory to win.

* Remember if you comment anonymously or you have a private blog, please include your email address in each entry, and spell it out with “at” and “dot” to avoid any spammy emails coming your way.

This giveaway is open to the contiguous US only. It will be close this Monday, September 3 at 9 a.m. EST.

I hope you have a lovely holiday weekend! ENJOY and stay safe!

Wednesday, August 29, 2012

DIY nailhead trim

Hey there! I’m back today with a quickie update that only took me a YEAR! You think I kid. ;) OK, the project only took a few minutes, but getting there took a year.

When we made some changes to the family room last year I found a new chair at HomeGoods for the space:

homegoods chair

The chair is different for me – kinda funky and I love it. It doesn’t look it but it is so, so comfortable – I curl up in it almost every evening. :)

I always thought it could use a little somethin’ though, and when I saw Courtney’s post last summer I knew exactly what I wanted to do!

I even bought the supplies last year – a few packages of furniture trim from the hardware store:

nail head trim for furniture

I got mine from True Value and it’s the only place I’ve seen this nickel color in this size. Everyone else has other colors (bronze, black) in this larger size, but not this nickel color.

And then the nails sat in the garage for…well. A long dang time. ;) A year now? I am ON IT!

Last night I got a wild hair and decided to just do it already.

I started out by eyeing each nailhead piece and then quickly realized that’s not the best idea. They were all wonky and I knew the wonky would drive me crazy.

So I came up with what I thought was a brill idea:

adding nailhead trim to furniture

I just took the tape measure and marked off inch spaces with a pencil. The pencil erased right off if I needed to move one. Smart huh? Well I looked back at Courtney’s post today and just realized she did the exact same thing. Maybe it was in the subconscious all this time? Who knows? ;)

Anyway, I used her brilliant idea and it went super fast after that:

how to add nailhead trim

Just place them on your pencil mark and use a hammer to tap them in:

Make sure to hammer them in well so they get into the furniture frame – it creates a nice “tuft.” And when they are in they are nearly impossible to get out…believe me. :) I had to move a few of them along the way.

They are SO very not perfect. But they look much better than when I just eyeballed them. This side was a little iffy:

nailhead trim to dress up chair

But if you stand back you’ll never notice.

I think the front looks pretty good!:DIY nailhead trim

I always thought you had to use the long strips of nailhead trim in order to get this look, and when I’ve looked for those at fabric or craft stores in the past they’re either out of stock or it’s not cheap.

This took four packages, about $7 total I think? Not bad for a little bling update!:

DIY nailhead trim

This project took me about 15 minutes total – once you get the marks on there it goes really fast.

Now I’m trying to figure out where else I can use this trim – I like the bronze version I’ve seen as well. I think they’d be cool hammered into a frame or wood or something. My wheels are turning. :)

P.S. You can see more about the rug in this space here and the candlestick table here!


I was one of the bloggers selected by True Value to work on the DIY Squad. I have been compensated for my time commitment to the program as well as my writing about my experience. I have also been compensated for the materials needed for my DIY project. However, my opinions are entirely my own and I have not been paid to publish positive comments.

Tuesday, August 28, 2012

Scraper sites

Well, if you read a bunch of DIY/decorating/crafting blogs you’ve probably seen the scuttlebutt over the past few days about the “scraper” sites stealing our content and what we’re trying to do to prevent it.

When I say scraper site, I mean a site that takes content from other blogs and pulls it onto it’s own…basically taking my posts and putting them word for word on their blogs. (Here’s more info on them.)

It’s been happening for a while now, but in the past six months, and especially in the past three…it’s gotten absolutely out of control.

I get two to three emails a week from bloggers who have found my content on another site. And it’s never the same site twice. :) When that happens I have four options – email the “owner” of the scraper site and tell them to stop stealing my content (which is always through a comment because they don’t have any contact info on their site). Or I can pay a lawyer to contact them, report them to Google, or ignore.

I’ve done all of them but one – I found out how much it would cost to pay a lawyer to keep up on this and about spit. I’m talking hundreds if not thousands a month (and that’s just for the ones I know about.) This is because the first contact usually results in nothing – it’s going to take more than one email to make them stop. And these blogs are made up entirely of stolen content – so unless they’re being forced, they’re not going to go through and delete hundreds of posts they’ve stolen from my site.

I’ve tried emailing the jerks who do this and that’s a joke. I’ve tried reporting it to Google and if you’ve ever tried that you know it’s just not worth it – it happens so much I can’t even imagine how many of those they get just in one day. (And when someone is stealing hundreds of your posts this option is impossible anyway – you have to link to each questionable post.)

I’ve also tried ignoring them. But lately the rate at which it’s happening is staggering, and it’s not just me. If you’re a blogger and have been blogging for a while now, you’re content is probably being stolen too. I don’t say that to freak anyone out, it’s just a fact.

Thing is, they are getting traffic. I only hear of them because a blogger searched for a project I did and the scraper site came up instead of mine. And if you’ve linked up to one of my linky parties in the past few months, if you look into your analytics you’ll probably find traffic coming from a few of them. These people take the entire post, including 400 links from you all and put them on their own site. (The entire July Before and After Party was taken.)

So. I tell you in all honesty I’ve done what I can to stop it and I’ve come to a decision I’m not happy about, not in the least. If you read my site through Google Reader, after tomorrow (Wednesday) you’ll have to click the title of the post in reader to come to my site. It’s called truncating the feed, and although I hate truncating posts (and never plan to do them on the actual blog), it’s the only solution I’ve found -- at least right now.

This prevents (or at least makes it MUCH harder – so hard I hope they’ll give up) for these scraper sites to take my content. I try to be as transparent with you all as possible and wanted to let you know before I did the switch because I know it will affect how some of you read my posts. I am fully aware that some of you who read TDC through Google Reader will not want to click over, and I get it. But I do hope you will.

I’m nervous as all heck about this because I never want to make it hard for someone to read my posts, but as a business owner it’s a call I had to make. I know I’ll lose some readers and that kills me…this is not a decision that was made lightly. I just don’t have any other choice right now – a fellow blogger told me the other day that I should get an award for the number of sites who have stolen my content this year. Nice. :)

So bear with me…it sucks for my Reader followers I know. But I have to do something and this is all I know to do for the time being.


By the way, if you don’t read TDC through a feed, then you won’t notice any change at all.

If you are a blogger and would like to see if your content is on some of the scraper sites out there, send me an email and I’ll send you links to them. I’m not about to link to them here so they get even more traffic. :) And if you’ve seen my posts somewhere else, I would love it if you would send them my way.

Thank you to those who continue to send me emails about the ones that they find, I really appreciate it. As always, I am so thankful for my readers and am grateful to each of you who choose to spend some of your day with me.

Monday, August 27, 2012

DIY wood planked wall

Well hello! How was your weekend? Ours was great – we celebrated my sis’s upcoming nuptials with a shower and then a bachelorette party. All in one day. This big sis needed a nap by 7 p.m. ;)

I’ve been working on a project over the past couple of weeks that involved a bunch of little projects and I finally got them all done this weekend. I LOVE IT.

Our basement stairway was kind of the pits after the basement finishing – the tools and drywall scuffed and dinged up the walls, the old carpet was just…well, GROSS. And I had been using the walls in on the stairs to “store” all of my extra frames that I’m saving for upcoming projects.

Here it was in all it’s glory a few weeks ago:

The guys had to tear out some of the old carpet to install the baseboard trim by the stairs, so this actually looks better than it had looked. Before there was no trim at all along the bottom.

The first project was painting that trim before the new carpet was installed. It got a coat of primer and two coats of gloss white paint, which wasn’t too bad because I didn’t have to cut in or be careful because I knew the walls were getting repainted and the carpet was out of there.

After the new carpet was installed I went ahead with the walls. I decided to wait and paint after the carpet was installed because I figured there would be a bunch of scuffs from it being taken downstairs and installed on the stairs. And I was right. :)

I am pretty good at cutting in now, after years and years of painting, but I even so I like to tape off the trim before I paint so it protects it from those little bitty annoying flecks of paint:

protecting trim while painting

I used my FrogTape and it didn’t have to be perfect because it was just there to protect the newly painted white trim. You can see that I don’t stick the tape down onto the trim, I let it stick out from the wall so it’s like a little “umbrella” for the trim. Precious. 

After the painting was done (I used the Marina Gray color from the basement that I told you about in this post), I was onto my the big idea I’ve had for the large wall in the stairway.

I had been dreaming this up for months and I was so excited to get it started. The basement bathroom still sits empty and unfinished, but I just had to focus on this instead because I was so psyched about it!

I bought five packages of these pine wood planks from Lowe’s:

wood planks tongue and groove

They are about $9 each so this project was less than $50 total. I installed them on the wall, much like I do any beadboard project – I started at the top and went down from there, making sure each one fit into the next snugly.

This tongue and groove planking is SO easy to install! I just nailed it in with my nail gun as I went down the wall. When I was done I gave it a very light sanding (this stuff is already smooth to the touch) and then taped off my walls and ceiling:

IMG_2569

I used the delicate FrogTape for the ceiling because every. single. time. I’ve ever taped off the ceiling to paint, some of the paint comes off with the paint. This time it didn’t, so that was a nice bonus. ;)

My drop cloth was cut up trash bags:

cheap drop cloth

I usually just use an old sheet for my drop cloth, but this time I was using stain, not paint. And stain is impossible to clean up – I wasn’t taking any chances with new carpet:

dark walnut stain

I used this dark walnut color and looove it. It’s close to the color of our wood floors and it’s nice and rich and lovely.

I gotta tell you, I was sweating while staining this wall – I’ve never stained anything this large or vertical and I had to work fast to keep a “wet edge.” I was also trying to watch drips and trying not to flick it everywhere as I was working.

Sweating.

After I was done wiping it down (I showed you how to stain here), I stood back and swooned:

wood planked wall stained

I LOOOOVE it. Luuuuurve. Luuuuv. Whatever.

Obsessed with it.

Before we had a one bulb light fixture in this space that I installed years ago, but it didn’t give off enough light for my liking. Since this space was getting a redo anyway, I replaced it with a new track light:

wood planked wall dark stain

I loved that I could aim a couple of the lights on the awesomesauce wall and the others off to the side.

Normally I wouldn’t be thrilled about track lighting, but they’ve come a long way. I’ve mentioned before that I’m going for a slightly industrial, but warm, look in the basement, and I think this light fits in SO well with the wood wall:

DIY wood planked wall

I had to use my jigsaw to cut the planks so they fit around that small ledge we have down there. It’s sooo not perfect but no one will ever notice it…as far as I know. ;) Oh, and the boards themselves aren’t exactly the same length. I was going to caulk the edges but after I stained I realized you can’t even tell.

I still have to paint that ledge white and then this space is DONE. Who knew a simple basement stairway would be so much work?

Here’s another quick look at the before:

And after trim, paint, new carpet, a wood planked wall, a new light and minus a cat:

DIY wood planked wall dark stain

OH, I also spray painted the brass hardware brushed nickel (after I took this picture last night) and cleaned up the railings really well. They were NAS. TY.

Here’s the bottom set of steps before:

(They had to take some of the stairs apart to install the trim, hence no carpet here).

And here’s the view from downstairs up to the wood wall:

basement stairs carpet

LOVE IT!! It’s warm and unique and I would hug it if I could.

OK, I’ve tried.

One of the many things I love about the basement is all of the wall space – it has so much potential! We don’t have a lot of wall space upstairs because our home has an open floor plan, so I’m stoked about doing some fun things with all of it.

Even the stairs have a ton of wall space. I don’t know if I’ll hang anything on the wood wall or let it be the art. If I don’t, there's a large wall above the ledge that I want to do something fun with.

What do you think, add art to the wood wall or let it be? What would you do?

Friday, August 24, 2012

Mommy, Please Don't Die

I have been quite ill this week with an influenza type chest cold. 

Apparently my immune system did not get the memo that it is summer, not winter.

My kids are not used to seeing me laying on the couch for days at a time--have I ever mentioned I'm a bit hyper?  (I always tell parents of active kids that while it may be hard to parent, it is a blessing in adulthood.) 

Anyhoo, all that lounging created a lot of angst for my kids.  Not just normal angst.

Mei Mei sat and watched me cough.  She showed great concern throughout the days, then finally, hesitatingly asked, "Mommy no die?  Mommy cancer?"

Knife in the heart.  No words for how it shatters my soul that even our newly adopted kids know the evil of cancer--and silently worry that death's tentacles linger. 

No. Words.

And yet their fears go infinitely deeper, especially for my kids adopted at older ages. 

They fear the loss of their mother.  They fear in a way that goes way beyond what most children can conceive. 

Every child's deepest fear is the loss of their mother.

And adopted kids?  They fear loss infinitely more.  They KNOW.  They've LIVED it. 

They know what it is to cry for a mother who only exists in their dreams.  They know abandonment.  They know what it is to go unprotected, untouched, unloved.  They know what it is to be alone.  THEY KNOW.  And they FEAR it will happen again, no matter how much I try to convince them that it won't. 

And really, how can I be sure?  How can I be sure I'll live through my kids' childhoods?

I reassure my children that I will do everything in my power to be safe; to live a long and healthy life.  I wear my seatbelt, go for check-ups and eat my veggies.  I even find myself being extra careful because of their precautions.  (When Hubby and I went to Hawaii, I refused to kite-sail because Vu's last words to me on departure were, "Mommy, please don't die!") 

But there are no certainties--and they know it.  They know it even more clearly in our family where cancer and death has shown its evil grasp. 

It comes up in conversations.  Lan Lan says that if I ever die she is going to be so mad at me!  Mad! Oh, my sweet, spicy girl. 

Vu says that if I ever die he is going to die too.  He has even gone so far as to consider ways he might achieve it.  When he first started asking me questions like how long it would take to die of starvation I was concerned.  In reality, I know he was simply longing for a solution of how he would possibly survive the loss of his mother--yet again. 

The only solution that really seems to help my kids is to talk about it--to quit denying the possibilities and instead face them head on.  I let them know we have a plan for the unthinkable, reassuring their tender hearts that they will NEVER be alone again.  We talk about who will care for them (especially if both parents die) and how our relatives and friends will rally around, encircling them with abundant love and devotion.

My kids feel especially surrounded by love when I remind them of ALL the people in their lives who love them; individually naming each and every sibling, relative, godparent, friend, neighbor, teacher and counselor.

And, of course, I remind them of the One who loves them more than all those people combined.  The One who created them.  The One who cried with them in their darkest hours and who will take their hurts and use it against evil, for good. 

And most importantly, I remind my kids that death is only temporary.  Eventually, we will all be together for eternity.  ETERNITY.  There will be no tears, no sadness, no loss, no devastation.  No cancer.  No death. 

"He will wipe every tear from their eyes.  There will be no more death, or mourning, or crying, or pain, for the old order of things has passed away."    ~  Revelation 21:4


Joe always loved theme parks.  At Knott's Berry Farm
we looked up at a clear blue sky, sans for this single cloud
streaked with a rainbow.  I felt like it was Joe, smiling down from heaven.
 
Ultimately, I can't heal my children's broken hearts.  Loss has been their reality.  Their hearts may be puzzle-pieced back together, but the transparent cracks threaten to shatter all over again.  I can't promise I won't die prematurely or promise they won't have more loss.
 
All I can do is make fear and death a safe topic of discussion, hold my kids close, love them deeply, and teach them to trust Jesus (regardless of what earthly life throws in their path). 
 
I can promise I will be their mommy FOREVER--for ETERNITY.  
 

(Your) beautiful bathrooms

Hey hey! How the heck are ya? I’m in major get-as-much-done-as-possible mode right now. The sister’s wedding shower is tomorrow and like the good procrastinator that I am, I waited till today to really start preparing for it.

How much can one woman accomplish in 24 hours? We’re about to find out people. We’re about to find out.

I’m good under pressure though…I get all AMPED and PUMPED and ready to get ‘er done! That is till about seven hours from now when I’ll collapse. ;)

I’m back today sharing some of the beeeeautiful bathrooms you linked up at the Show Us Your House link up back in July. I really couldn’t get over all of the lovely rooms you all shared – so inspiring!!

I loved the color, the board and batten and the window treatment in Linda’s bathroom, but I think I liked these the best of all:

numbered hooks bathroom

I don’t know if I’ll ever tire of the cuteness that is numbering things. ;)

OK, prepare yourself – Jennifer’s bathroom redo was SO gorgeous, I couldn’t decide on just one picture:

white and aqua bathroom

OH my goodness, I was drooling over each and every little bit of it!

I just had to share this cute idea too:

wash your hands sign

I must find a antique hand to hold a wash your hands sign! I must!! How cool is that?

You must check out the before of Virginia’s bathroom to truly appreciate this beautiful space:

white gray striped wall

They didn’t replace anything big though – it’s all the power of paint! And that one small striped accent wall is perfection!

I love how Jenn used mason jars for storage in her bathroom:

mason jar in bathroom

What did we do with all those mason jars before blogging? Now they are practically a decor staple. ;)

Lisa shared a brilliant idea to paint that pesky area behind the toilet:

how to paint behind the toilet

I loathe that spot. Can I tell you a secret? Sometimes I just don’t paint back there. Don’t look next time you visit. ;)

And finally, but certainly not least, a lovely navy and gold bathroom makeover:

navy and gold bathroom

Shannon used some thrifty finds to redo this space and I love how elegant and dramatic it is! That deep blue color is gorgeous, especially with the pops of white.

So what do you think, pretty amazing huh? I continue to be blown away at the talent out there in blogland! As always, if you’d like to pin any of these images, please visit their respective sites to do so.

Anything fun planned for the weekend? After the wedding shower we’ll be bachelorette-partying it up, but I doubt I’ll last as long as the bride-to-be. Now that school has started I’m out of commission by about 10 p.m. ;)

Hope you  have a great one!

Wednesday, August 22, 2012

Late summer window boxes

Well it’s been the weirdest summer, weather-wise, that I can remember in a long time. It started out absolutely GORGEOUS, with lower temps and humidity – it was fantastic. And then Mother Nature went into fits and mid-summer was full of intense drought and wicked hot temps. I know many of you had the same.

The past couple weeks it’s been lovely again – almost like September instead of August but I’ll take it! But the nice weather came too late for a few of my plants. We were under a water ban here for most of the summer, and although I could still water some plants, some of them I just could not keep up with. I almost lost a few bigger bushes, so I focused on those instead of the annuals, like those in our window boxes:

Sad, just sad. We were the envy of the neighborhood with those, we were.

When there’s not a drought, they usually look like this:

So I decided to do something about them, but the thing was, this was early August – I didn’t really want to do petunias again (and doubt I could have found them?) but I love the way they spill over when they grow out. But I knew I wanted something fluffy and spilly and low maintenance.

So I took a trip to one of my favorite nurseries, which is actually the one at the True Value I visit:

I love that they use lattice across the top – it’s like a little oasis out there. I don’t know why, but I always find different options here than I do at the bigger hardware stores I frequent. I’ve purchased quite a few plants here I don’t see many other stores. (This location is in Pendleton Indiana for you locals!)

One thing I couldn’t find anywhere else was asparagus fern:

asparagus fern

I knew I wanted to try it and this True Value had a plenty of it – at least until I got there. ;) I’ve never used this stuff before but I loved it’s delicate, spilly (yes I made up that word, go with it) look. Keep in mind how small those were – you won’t believe how fast they grow!

I picked up some coleus as well, which I’m gathering is a good option for late summer because I see them out more starting late July. I’ve used this stuff in the past and love the variety of colors and how full and hardy it is.

I hear planters need some “thriller,” as well (I had the filler and spiller) so I grabbed a few red geraniums for the back of the window boxes. A few weeks later and I cannot even believe how well these plants are doing in this spot:

asparagus fern coleus window boxes

I have always wanted to try mixing a few different plants in these boxes and never have for some reason – I just don’t feel like I’m good at figuring out what works when it comes to this stuff.

But I’m quite pleased with how they’ve turned out!:

late summer window boxes

Ack! I love all the spillage!! Looking at them now, I don’t even know if I needed the geraniums – but I did want a little punch of color.

Here’s the thing – I love the idea of using the green flowy plants and want to do it again, but they don’t offer much contrast against the azalea bushes that we have out front:

window boxes curved shutters

I guess it’s that I’m so used to having a huge pop of color there with the petunias. Maybe I’ll continue to do both every summer, who knows. I’m pretty much obsessed with how these have filled out and spilled over though. Love it!

I installed these window boxes about six years ago, maybe seven, and they’ve served us well. But this is the last summer for them, for sure:

They are barely hanging on. ;) Luckily you can only see that from the side, since the spillage hides so much.

Next year I want to go bigger with the window boxes – definitely longer and maybe deeper too so I can keep stuffing them full of lovelies like this. Our current ones are actually very small and it’s hard to put much in them.

I’m hoping the fern and coleus will do OK into the fall, because I’d love to just keep these through till the winter. I will fallify them a bit, maybe with some pumpkins and kale if I can cram those in. ;)

By the way – we have finally gotten some rain around here but I have not watered these much otherwise – just a couple times right after I planted them. They get partial sun and do GREAT in this spot – the maintenance is pretty much nonexistent!

I did a quick search to find some other examples of window boxes using these three plants – check out this gorgeous one using coleus:

coleus window box

(source)

Holy spillage! I die!!

This one is simpler but still a big impact:

coleus window box

I love the red tones in the coleus!

This one I loved because of the boxes, but mostly because of the windows:

window box with coleus

(source)

Can you blame me?

And hold on to your seats – this one is freakin’ me out it’s so awesome:

Window box with coleus, sweet potato vine and caladium

(source)

Look at all the potato vine too! Just amazing!!

This window box shows how delicate and pretty the asparagus fern is:

Asparagus fern for shady window box

(source)

I love those brackets by the way – that’s the look I’m going for when I replace our boxes next year.

Forget about the geraniums, check out that iron window box!:

geranium window box

(source)

OK, I’m totally cheating -- this isn’t a window box, but it is too cute not to share:

old wheelbarrow as planter

(source)

And finally, one more that truly incorporates the “thriller, spiller, filler” combo, WOW:

window box spiller

(source)

Those geraniums are HUGE! I’m gonna need MUCH bigger window boxes next year. ;)

So do you have window boxes? I think they add SO much character to the front of a home – for very little money (I’m pretty sure mine were under $20). I’m determined to get a little more creative with mine in the future. And in no time at all we’ll be dreaming of fall-themed planters – like, maybe…yesterday? ;)

I was one of the bloggers selected by True Value to work on the DIY Squad. I have been compensated for my time commitment to the program as well as my writing about my experience. I have also been compensated for the materials needed for my DIY project. However, my opinions are entirely my own and I have not been paid to publish positive comments.