Monday, July 8, 2013

Chalkboard art wall

Hey all! Happy almost new year!! What do you have planned for tonight? Ours will be low key, as we are most years anymore. We just eat, play and hang with the kiddo. Wild and crazy. ;)

Today I wanted to show you how I turned the new chalkboard wall in the kitchen into a gallery wall to hold the Bub’s artwork. I showed you the Christmas version of the wall a couple weeks ago:

DIY chalkboard gallery wall

The art on there started out like this:

DIY Christmas art

The small magnolia wreath didn’t make it up there, didn’t look right (I just hot glued the leaves onto a paper plate with the center cut out). The deer head was from Michael’s and I just glue the paper on like I showed you here.

The big “S” was from Michael’s too if I remember right. It stands for Sarah. I kid. It’s for our last name. ;)

I just gave it a quick stain with my dark walnut and called that done. The three felt snowflake ornaments were from Target for a buck each and I just stacked them on top of each other with a little hot glue.

The little paper poinsettia flowers were just hot glued together after I free handed the leaves and cut them out:

paper poinsettie flowers

I just did one leaf and then traced it seven more times to get enough for a flower.

So I had a plan to make this wall more function for art throughout the year too – I wanted to make it so I could use magnets on the whole wall, but did NOT want to mess with magnetic paint again. I tried that before and even with one meeeellion coats, it doesn’t magnetize well.

So I came up with an idea, courtesy of the roofing area at True Value – I grabbed a few of these small metal sheets:

magnetic metal sheeting

I have NO clue what they are for – I just know they were cheap (about a dollar each) and they were magnetic.

I learned years ago you need to find the right metal for these types of projects – magnets will not stick to so much of the metal sheeting you find at the hardware store. You need to look for galvanized metal – when in doubt, take a magnet with you (that’s what I do!).

I just put them up with tiny nails:

magnetic metal sheeting

The holes are perfect!

I centered them in each frame:

DIY magnetic art wall

They aren’t big, maybe 2 1/2 inches by four? So either direction worked.

It took just a few seconds and I was able to use my magnets to get some art up:

DIY magnetic art wall

I can use my cute DIY magnets I made a couple years ago – they’re just scrapbooking brads with the prongs pulled off, then magnets glued on (I used Liquid Nails):

DIY magnets

I kept the S for Sarah up ;) just because I think it looks cool, but I’ll probably replace it to put bigger art in there:

DIY magnetic art wall

It’s a great spot for school papers, art work, cards – I hung two cards up:

DIY magnetic art wall

The Bub is obsessed with writing us notes lately, and the other day he pulled out a few of my random greeting cards and wrote us sweet messages in them. It was too darn adorable for me to be upset about the losing the cards. ;)

So there you go, a chalkboard art wall – with magnets! The whole project only cost about $5 because I had the chalkboard paint, the frames and the magnets. I LOVE this new wall! And we still have plenty of room to write our lists and notes and the kiddo can still draw all over it too.

A little fun, a little art, a little organization – that’s what I’m talkin’ about!

Happy New Year to you!! Please stay safe and have fun!! See you next year! HAR. :)


I was one of the bloggers selected by True Value to work on the DIY Squad. I have been compensated for my time commitment to the program as well as my writing about my experience. I have also been compensated for the materials needed for my DIY project. However, my opinions are entirely my own and I have not been paid to publish positive comments.

KOHLER K-482-BN Memoirs Robe Hook with Classic Design, Vibrant Brushed Nickel


Features
  • Memoirs accessories with Classic design have a rich, fluted style that brings pure sophistication to bath and powder rooms
  • Completes Memoirs Classic design solution with KOHLER faucets and fixtures
  • Solid brass construction for durability and reliability
  • Tools included for installation

List Price: $111.45
Special Offer: check this out!

Product Description
Memoirs Robe Hook with Classic Design - K-482


used kohler engines - ShopWiki ShopWiki has 493 results for used kohler engines, including CH26 : Kohler Engines and Kohler Engine Parts Store, Genuine Kohler Engine Parts, Kohler Engines 25 883 03 ... Amazon.com: KOHLER K-487-CP Memoirs Towel Ring with Stately Design ... Inspired by the sophisticated design of the 1920s and 1930s, this Memoirs towel ring with Stately design blends the elegance of yesterday with the performance ... Kohler Memoirs Stately Towel Bar - Home & Garden - Compare Prices ... Kohler Memoirs Stately Towel Bar - 80 results like Kohler K-485-CP Memoirs Stately 18" Towel Bar, Kohler K-486-CP Memoirs Stately 24" Towel Bar, Kohler K-485-BN ... Kohler towel rings Bath Accessories Bizrate Kohler Forte Better Accessory Pack 2-BN Brushed Nickel Forte 18" Towel Bar Towel Ring Tissue. Kohler, Forte Better Accessory Pack 2, Bathroom Package,Brushed Nickel ... Shower Handle - Buyplumbing.net discount plumbing supply - Kitchen ... Kohler K-262-TC-0 Antique Oval Handle Shower Valve Ceramic Dial Plate and Handle Inset with Crimson Topaz Design White: Kohler K-262-TL-0 Antique Oval Handle Shower ... Shower Light Fixture - Bathroom Fixtures - Compare Prices, Reviews ... Shower Light Fixture - 247,091 results like Premier 120187 Brushed Nickel Sanibel Sanibel Tub and Shower Trim Package with S, Newport Brass 3-2044BP-08A ANTIQUE ... KOHLER Memoirs Collections Bathroom Richly detailed architectural design in a classic style. Explore the Memoirs bathroom collection. KOHLER K-490-CP Memoirs Toilet Tissue Holder with Stately Design ... Inspired by the sophisticated design of the 1920s and 1930s, this Memoirs toilet tissue holder with Stately design blends the elegance of yesterday with the ... KOHLER Bancroft Collections Bathroom Don't Have an Account? Registering for a My Kohler account allows you to save, organize and share your design ideas and product selections online. Kohler K-394-4 Devonshire Widespread Bathroom Faucet with Ultra ... Buy Kohler K-394-4 Lavatory Faucet at FaucetDirect.com. In stock & on sale now for $168.00 - $284.06. This item ships FREE. Shop today and save up to 25%.

January Before and After!

Hellooooo there! Are you all starting to get back to normal around your parts? My hubs went back to school today for meetings and I have the Bub home one more day…real life starts again tomorrow. I’m a little happy and a little sad about that! I’m so confused. :)

Today we’re kicking off another year of before and afters! I’m keeping these monthly shindigs going because it’s always fun to see what you all have been up to. And I love being able to share some of your awesomeness every month too!

First up from last month’s party is a super smart project Christina did – she needed a runner but could only find a smaller rug (that worked with her colors), so she sewed three together!:

sew rugs together

I LOVE that rug too! It would look pretty awesome in my mud room…

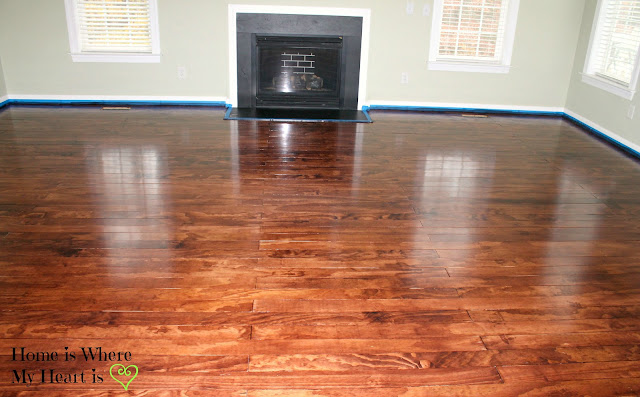
It’s hard to believe by looking at pictures of Linda’s gorgeous floors that they are plywood!:

plywood hardwood floors

Gorgeous!! And for a fraction of the cost of hardwoods!

I loved Lisa’s paint transformation – she shares how she painted this laminate (yes, laminate!) bookcase and made it shine:

painting laminate with chalk paint

Love that dark background too, especially with those white dishes.

Maria found a little nightstand on Craigslist and gave it a fabulous makeover:

two tone stain and paint

So well done, I love that stained wood!

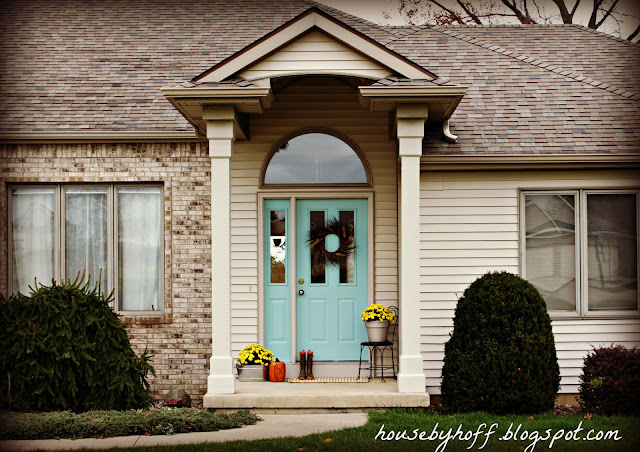
Want a pop of color on the outside of your house? Paint your door a fun color like April!:

light blue front door

Makes me ready for spring! :)

Cheryl did a fantastic job on her daughter’s room redo and I was especially taken with the nightstand:

steel dresser

How cool is that overlay on the front?

And finally, but certainly not least, I loved Cassie’s hallway to mud room transformation:

mudroom hallway

She calls it a mudroom hall and it’s totally functional and fun with that striped door and cool light!

As always, I’m blown away with your projects! Can’t wait to see what you’ve been up to this month!

If you’d like to be considered in the next highlight, please include a link back to me or use this button code in your post:

<div align="center"><a href="http://www.thriftydecorchick.blogspot.com/" title="TDC Before and After" target="_blank"><img src="http://www.homestoriesatoz.com/wp-content/uploads/2012/03/beforeAndAfterButton_thumb1.gif" alt="TDC Before and After" style="border:none;" /></a></div>


Now, link it up -- the linky will be open for a week!


The French Reflection Etoile Long Arm Reflect 71/2" Cosmetic Mirror Chrome 3X


Features
  • Magnifications: 3x, 5x, or 7x, - AND - 3x or 7x, each with Optically Ground Glass.
  • The mirror glass is backed with pure silver.
  • Solid Brass frame, heavily plated, can never rust, even in the most humid environment.
  • Your choice of finishes: Ivory, Chrome, Nickel, or Titanium/Matte Nickel.
  • Black casing.

List Price: $620.00
Special Offer: check this out!

Product Description
Etoile in French means "star" in English. A And the Etoile series is like shining stars modern in design and a little smaller and more sleek than the main series.The mirror itself is 71/2" in diameter and pivots up and down and left and right, while the extension arm pivots left and right at the mounting plate. A Select finishes from Chrome, Nickel, Gold, or Titanium (Matt Nickel) with Black Casings. A 3x, 5x, and 7x Magnifications are available with regular silverbacked mirrors or with Optically Ground Glass silverbacked mirrors for the 3x and 7x magnifications. See the tab below for a full explanation.Mirrors are shipped via 3rd day Air at no cost to you. A Returns carry 15 restocking fee.


.org . . Klipy.org. WILLOFTHEPEOPLE.NET: Project 2,996: Honoring Joseph A. Ianelli ... WILLOFTHEPEOPLE.NET: Project 2,996: Honoring Joseph A. Ianelli - July 6th, 1973 - September 11th, 2001 Full text of "Dictionary of French and English, English and French" Full text of "Dictionary of French and English, English and French" Google Pubsubhubbub Hub Welcome to the Google PubSubHubbub Hub! This hub conforms to the Pubsubhubbub 0.4 specification. In addition, this hub conforms to the Pubsubhubbub 0.3 specification ... All about Hawaii. The recognized book of authentic information on ... All about Hawaii. The recognized book of authentic information on Hawaii, combined with Thrum's Hawaiian annual and standard guide. [1883] YouTube Search or upload videos. Popular on YouTube: Music, Sports, Gaming, Movies, TV Shows, News, Spotlight. Browse Channels. ... .org! ... ... dirurl - Free Backlink Builder Create up to 113 backlinks from high PR sites pointing to your website and ping them all for FREE with dirurl - Free Backlink Builder Tool. The Maritime provinces: a handbook for travellers : A guide to the ... The Maritime provinces: a handbook for travellers : A guide to the chief cities, coasts, and islands of the maritime provinces of Canada...with the gulf and river of ... Full text of " - Internet Archive: Digital Library of Free Books ... See other formats

:USE Square Bollard Console, Satin Nickel


Features
  • Right angles make a bold statement in the Square Bollard line
  • Distilled to the essence of pure geometry, it is presented in both polished chrome and satin nickel for a dynamic addition to any contemporary environment
  • Matching items available
  • Simple to install
  • Ideal for residential or commercial use

List Price: $195.00
Special Offer: check this out!

Product Description
Square Bollard 22" Console in Satin Nickel. clean lines and geometric forms of Square Bollard make a bold statement. It is presented in both polished chrome and satin nickel to enhance today's contemporary environments.


Towel Bars - Decorative Bathroom Towel Bars, Towel Racks, Towel ... Sale! (You save 30%). FREE Shipping! Shop for Towel Bars - Designer Quality Bathroom Towel Bars & Towel Rails, Towel Racks, Towel Stands, Chrome Towel Bars, Polished ... Ceiling Fans - Fans and Fans with Light Kits by Progress Lighting Providing cooling and warming for all seasons, Ceiling Fans not only impact your home's fashion but function. We offer a variety of blade designs, finishes, sizes ... Copley Square, Dining Rooms Havertys Furniture Combine modern comfort with a passion for history. The rich coffee bean finish, turned legs, natural linens and custom designed satin nickel hardware hint at the West ... Hickory Hardware P2163-SN 1-1/2-Inch Euro-Contemporary Knob, Satin ... Cosmas 4391SN Satin Nickel Cabinet Hardware Knob - 1-1/4 Inch Square - 25 Pack Categories Progress Lighting Bar Lighting; Bathroom Lighting; Bedroom Lighting; Dining Room Lighting; Great Room Lighting; Hall & Foyer Lighting; Kitchen Lighting; Outdoor Lighting; Sitting Room ... 2-Tier Satin Nickel Shelf with Towel Bars - Bed Bath & Beyond Shop for 2-Tier Satin Nickel Shelf with Towel Bars at Bed Bath & Beyond. Also shop for Bath Furniture,Bath. Stylishly fashioned with a square silhouette and finished ... brushed nickel kitchen faucet eBay - Electronics, Cars, Fashion ... Find great deals on eBay for brushed nickel kitchen faucet and brushed nickel cabinet hardware. Shop with confidence. Brushed Nickel Towel Bars - Decorative Brushed Nickel Bathroom ... Sale! (You save 30%). FREE Shipping! Shop for Towel Bars - Designer Quality Nickel Bathroom Towel Bars & Towel Rails, Towel Racks, Towel Stands, Polished/Brushed ... Schlage Merano Passage Lever, Andover Rose, Satin Nickel Manufacturer SKU: FA10 MER 619. Handle Type: Lever. Non-locking interior for use on hall or closet . All Metal Chassis for Strength and Durability . Brushed/Satin Nickel - Bathroom Hardware - Bathroom Accessories ... Tell us about your search experience. Your comments will help make our site better.

Chalkboard gallery wall

I am sure we were all doing the same thing this past weekend. Grieving for the families in Connecticut. I felt pure horror when I heard the news and just could not stop crying, for a long time.

I hugged and kissed on my (newly) six-year-old boy a ridiculous amount, we did family things, we carried on through our weekend, but especially when I would look at my son, I was overcome with grief. Grief and joy. A weird and uncomfortable mixture.

Saturday evening, I sat in my office with my face in my hands, crying again, when I realized I had to figure out a way out of it. I was at a low I’m not sure I’ve ever been at before and I made a decision right then that I needed to do something.

Because I could. I am a lucky one who gets to function right now. So I decided to.

I tried watching TV, but the first movie I came to, the first scene, was a teacher in a room of kids. I tried surfing the net, but I was pulled to news sites instead. So while it may sound trivial, I decided to DIY. And it soothed my soul.

It was a project that had been sitting half way done for weeks, and I finished it. It was the only thing that quieted my mind. So I am posting about it today and will be posting this week. It doesn’t mean I’m not grieving, it just means I need to do something normal and I think others do too, simple as that.


I actually started this project the day after Thanksgiving, late at night. It had been tumbling around in my brain for a while and I had one of those it’s-ten p.m.-why-not-start-now? moments.

We have a little wall in our kitchen that I have BIG plans for in the future – until recently it held a couple Goodwill shelves and a small magnetic chalkboard for my son:

kids chalkboard in kitchen

There were a couple of problems with this cutie wall though – one, the magnetic chalkboard, although painted with no less than ten coats of magnetic paint, didn’t hold magnets well. They had to be supersonic and it’s hard to find supersonic magnets suitable for a little one.

That’s the thing too, the little one is getting bigger. He’s getting a little too big for that chalkboard – not in the way that he doesn't use it, but in that it was getting too short for him.

I liked putting his art up there, but you can see that it became either an art board or a chalkboard – it couldn’t really be both.

The other biggie was the shelves – they were becoming a bit of a hazard. We’ve had more than one visitor bang their head as they came around the corner, and I prefer to have my visitors unharmed, so the shelves had to go.

That left a great little wall with a light switch right in the middle – and we all know how light switches can mess up art for a perfectly good wall. :) So I took it all down and started prepping the wall for paint:

chalkboard in kitchen

This little space had a TON of holes – I’ve had two different frames around that chalkboard and I’ve hung numerous things on that wall over the years. I think I must have filled 100 holes:

Finally it was time to paint – three coats of chalkboard paint, that I already had from the original one on that wall.

I tried the whole foil in the paint tray thing and it worked beautifully. Doing this again for sure!:

foil lining paint tray for easy clean up

No mess, no clean up. Awesome!

When it was dry, I started the priming of the wall. Priming with chalk that is – I never did this with the smaller chalkboard and it always cleaned up fine, but I kept reading you were supposed to do it. And I’m a good blogger so I did it:

priming a chalkboard priming a chalkboard

I started with small pieces of chalk, which was a little maddening. Those ran out fast, and then I remembered I had sidewalk chalk in the garage. That worked like a charm – but no white chalk left for the Bub come spring. :)

I wiped it off, it felt like six or seven times to get all the chalk off, then we started playing – making list, drawings. And it sat like that for weeks, until I finished it up this weekend.

I knew I wanted to have the chalkboard, but I also knew I would want more than just the plain wall. I still wanted a spot where I could display the kiddo’s art too, so I came up with a plan that involved empty frames.

Usually I just start hanging things and don’t worry about holes in the walls, but this is such a narrow spot, I knew I needed to plan it out a little. So I grabbed my delicate FrogTape and put the dimensions of the wall on the floor:

planning a gallery wall

I added the light switch, but forgot the plug, which messed me up a little later. I picked out some frames from my stash in the basement and played around with placement:

planning a gallery wall

I had some small projects in mind to fill them so I picked some of the frames on purpose, others just because the size worked. I ended up moving things around a bit for the final result, but putting it all on the floor first helped tremendously.

I painted the frames with leftover chalk paint – both Annie Sloan (the aqua) and the CeCe Caldwell gray I used here.

I absolutely LOVE how this wall turned out!:

chalkboard gallery wall

I didn’t want to fill it up too much because I wanted the kiddo to have room to use it. I’ve already started using that area above the switch as a spot for the grocery list.

It’s functional, fun and pretty, and I just love it!:

DIY chalkboard gallery wall

I know chalkboards are SO trendy and the thing and are everywhere, but I’m always late on trends. And actually, if I think about it, I created the original little chalkboard five years ago, waaaaaay ahead of the trend. So I’m both in front and behind of the trend…yeah, that’s it! :)

Here’s a look at this spot, before and after:

chalkboard gallery wall   

I loved the before too, but it just wasn’t working for us anymore. Now the Bub still has a place to draw, I have a spot for lists, and I can showcase art and fun stuff (like during the holidays).

And I’ll share how I’ve made it into a gallery wall for the Bub’s art soon too! It’s so easy to change the art out and I love having the whole wall to show off his schoolwork and pictures.

So there’s the project I finished up this weekend – it made me smile a real smile and my boy helped me along the way. Both very good things.

Are you on the chalkboard wagon? They really are too fun and I don’t see them going anywhere anytime soon.

Sunday, July 7, 2013

Bright basement bathroom (done!)

Good Monday to ya! How was your weekend? I was fighting a cold all weekend but managed to fit in two movies and plenty of DIY, so that’s a good one for me. :)

I’m continuing my no-spend August by wrapping up a HUGE project. I love the no-spend idea – not only do I save money when I do this (no impromptu trips to HomeGoods!) but I get a lot done. Stuff I’ve been putting off for months!

Our basement bathroom is one of those projects. It was thisclose to done anyway, and I had everything I needed on hand…so this one is checked off the list! WHOOT.

Let’s look back at how it looked a few months ago:

unfished basement bathroom

If you’ve been around for awhile you know we finished our basement last year. We did it slowly so we could pay cash and it took about six months total. The basics are in and everything is coming together beautifully, but there’s still a LOT we want to do down there.

So we had it finished but the basement bathroom was still incomplete, as you can see above. The floors were installed earlier this year, along with the main fixtures – the toilet and vanity. Then I showed you how I installed some storage in the form of DIY floating shelves:

DIY floating wood shelves

I LOVE those shelves – I’m still so happy with how that came together.

But there were a few things left to do – back when I painted all the doors black in the basement I pooped out and didn’t do the back of the bathroom door. Soooo…I got that done:

painting interior doors

Three coats and done!

Back when we had the electrical work done for the basement I knew I wanted two lights above the sink, so we guesstimated where the vanity was going to go. Well the outlet for that room ended up being right in the middle of the sink (right where the mirror went) so the guys came out a few months ago and moved the outlet (and one of the lights) for me.

They patched up the drywall and I just hung the mirror back over it and left it:

patching drywall

So yesterday I sanded it down and touched up that paint and a few other spots in the room. I also caulked the rest of the baseboards down there as well. OK, maybe I wasn’t thisclose to done. ;)

I used the mirror that used to be in our upstairs powder room -- it was shimmery brown so it needed a redo bad. I taped it off to prep for spray paint:

taping off a mirror

I’ve seen a lot of people not taping off and just using a razor to clean up on mirrors, but with spray paint that’s too messy (for me). So I covered it with newspaper, taped it all down and checked out my spray paint stash to decide on what to do:

nickel spray paint

I started with the satin nickel color and it was pretty, but when I got it down there it was so…boring. ;) The lights, faucet and mirror were all the same. Then I took it back outside and just went with a basic white – but, duh, that was pretty boring too. I wanted a pop of color on that wall and kept looking to my spray paint to find the right color (not spending money on DIY and all.)

Well I finally found the color I wanted in my regular paints:

light and bright bathroom

It’s the same aubusson blue color I used on this project:

aubusson blue chalk paint

It was PERFECT. And it only took three tries. ;)

The blue brings the color in the towels and shower curtain over to that side of the room:

DIY floating shelves

You can see all the sources for these items in this post (most was from Target).

Originally I planned on using our pedestal sink from upstairs in this space, but when it came time to install it I realized I really wanted something more substantial and something with storage. So I shopped around and found a really inexpensive vanity at Lowe’s that worked perfectly:

bright basement bathroom

It’s really shallow but the sink juts out so it’s still a great size. It’s perfect for this skinny bathroom. (You can find it here online.)

I’m pretty thrilled with how this little space came together! Well…it’s not exactly little -- it’s just long and skinny:

black interior doors

It’s about 11 feet by four feet -- there was no other way to set up the room with the beams in the basement and the rough in plumbing. Also we had to make it this long to incorporate a support column into the wall. When the door is open it goes right near the vanity so there’s actually not much room to spare.

I had a mantra in my head the whole time I was finishing off this space -- “It’s just a basement bathroom.” :) So I went pretty basic with the finishes – the faucet, shower head and lights were all basic, inexpensive finds. We spent a little more on the toilet since this is in the basement – we wanted something that will hold up well (since the plumbing down here has to work against gravity).

Even though we didn’t splurge on much, I think the space turned out beautifully. One thing I don’t regret at all in the building process – I made sure we had a TON of lights in this space. Early on I thought it may be overkill but since I’ve realized it’s a great thing in a room without natural light:

blue green bathroom

We have a total of five lights in this space – recessed lights in the shower and by the door, the light in the fan and two over the sink. I love the look of the two lights over the sink – I did the same in our upstairs powder room. :)

I do have one more thing to do in here – paint all the trim (baseboards and door trim). But I have to do that in the entire basement so I’m going to wait till I can knock it all out at once. (That will be a fun day. Want to come over and help?)

Here’s a look at the before and after side-by-side – my favorite. ;)

bright basement bathroom

I’d still like to add some art or something to that big wall at some point. I have an idea in mind but for now I’m just thrilled to have this space done! I’m knocking things off the to-do list and it feels so good! I may do these no-spend months more often!! (Although I’m starting to get a HomeGoods itch.)

If you have any questions about this space that I didn’t answer, let me know and I’ll get you info in the comments!