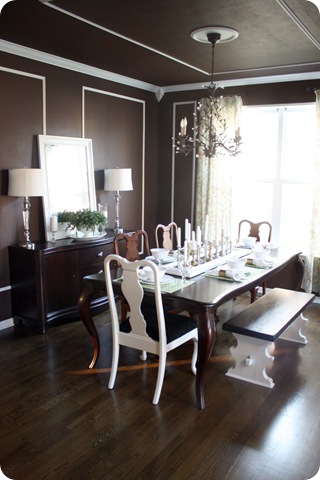
Showing posts with label est. Show all posts

Friday, August 17, 2012

Painting tips (and the laundry room walls)

Hey there! I’m back with another update on the basement laundry room. When we started finishing our basement in January, we decided to move the washer and dryer to a dedicated room down there. Some people thought I was crazy, but I can now tell you from experience, it’s freakin’ awesome. ;) (You can see the reasons why I did it here.)

I told you about the paint color plan for the basement a couple of months ago, and I knew I wanted to paint the laundry room this Pebble Beach color from Benjamin Moore:

pebble beach, benjamin moore

I got these matched at Sherwin Williams because I’ve fallen in love with that paint, and I got it for a great deal during one of their sales.

Since I was painting the laundry room, I figured this would be a great time to recap some of my favorite painting tips. I use these pretty much every time I paint and they keep the process as cheap as it can possibly be!

First up, the dreaded preparation. If I can avoid this part, I do. :) I showed you how I fill holes in the walls here and that’s still my method. But if there are small nail holes I’ll just quickly fill them with spackle and wipe away the excess (don’t even need to sand) or just leave them alone – paint fills them in if they are small. ;)

I saw an idea in Family Handyman a while back that recommends using nails to make holes in the rim of the paint can to prevent the paint from filling up that area and dripping all over the sides:

preventing drips on paint cans

I have tried it and honestly it didn’t do much good. I used large nails and lot of holes too – it just didn’t drain well. So I stick by my easy (but messier) method, which is just wiping the paint from the rim with my finger and onto my paint t-shirt:

painting clothes

I wear that one pretty much every time I paint. If I don’t have it on, I just grab a rag and use that. I always find it’s impossible to keep my hands completely clean while painting anyway, so why not just use them. ;)

I saw a tip from Sabrina Soto on HGTV once a while back that I still use – before I paint I grab painters tape and use it to clean off the roller:

frogtape clean off roller before painting

(You’ll be seeing a lot of that green FrogTape around here by the way, I’m one of the members of their new Blog Squad, whoot!!)

This way the fuzzies end up on the tape and not your walls! (And the cheaper your roller, the more fuzz you’ll get off, in my experience.)

Here’s another tip – it took me a while to realize this, but even if I’m painting a regular room with normal ceiling height, I put my roller on a pole, instead of holding the roller. It is SO much easier on your body to stand back and let the long pole do the work. My back and shoulders used to ache when I used just the roller. Now it doesn’t bother me much at all because I use the pole.

By the way, please don’t buy a pole at the store just for painting!! Any standard broom that comes apart (and most do) will attach to your roller:

use broom pole for paintinguse broom pole for painting 

You can’t tell from these photos but that red broom handle is covered with paint. ;)

As far as trays go, I just use the plastic liners as my tray, without a metal tray underneath. You don’t need it. I’ve tried the metal paint trays where the paint is supposed to peel right off and uh, it did not happen for me. Maybe it was the fault of the operator, but it was ridiculous. Save your money. :)

When it comes to small jobs where I’m just using a small foam roller, I will either just dump some paint on a couple paper plates:

cheap paint tray

Or I will skip the plastic tray all together and use up some of my plastic shopping bags and line the metal tray with it:

plastic bag paint tray

If you do this, make sure to turn the bag inside out if there is print on it. :)

I don’t buy the little handheld paint trays specifically made for cutting in with a brush. Instead I use coffee cups and wash them out after each use:coffee cup as paint tray

If you don’t have any (we don’t drink coffee so we don’t have a ton), you can get them for about 25 cents at Goodwill. They hold just enough and are the perfect size for a paint brush. The handle makes them easy to hold on to and carry around the room.

One more tip I learned years ago – if need to stop mid-painting and have wet brushes, stick them in a Ziploc bag or a plastic grocery bag (tied up) and they will stay wet for days.

Some say to put them in the fridge but I’ve never found it necessary – they stay wet just as long left out as well:

store wet paint brushes for later use

If I have paint left in a tray I’ll wrap it up in a bag and tie it up to keep it till I’m ready – that way I’m not trying to get all that paint back in the can (you’ll always lose some). You can keep used rollers ready to go that way as well! (Although I find they dry out quicker than the brushes.)

And when are ready to wash the brushes – you’ll love this little guy:

paint brush cleaning comb

This brush comb is about $5 but has saved me a TON in new paint brushes. You just brush it through while washing them out. It gets all the bits of paint out and leaves the bristles nice and straight while they dry out. I LOVE this.

So there you go! A few of my favorite painting tools and tips! If you have never painted and are nervous about it, don’t be. I hadn’t put a drop of paint on a wall in my life before the day we closed on this house. And that first day I painted our family room and it’s still the same today…so I did OK. ;)

Back to the laundry room -- here’s the space before we started:
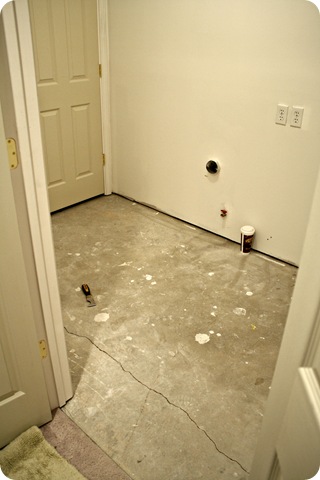
And here it is after the tile was installed, Pebble Beach was painted on the walls, and baseboards and quarter round were installed:

light gray laundry room light gray laundry room white tile

I was up at the crack of dawn one morning scrambling to get that trim down so the washer and dryer could be installed! By the skin of my teeth, I tell you.

I thought this color was going to be much lighter than it was – but there isn’t any natural light so I think with that it would read MUCH lighter. I love it though – it’s coming together just as I had imagined! I’m going for a “rustic elegance” look in there – that term came to me after I started the shelves in here and I think it’s fitting. I’ll show you those soon! 

So do you use any of the tips I mentioned? Do you have any painting tips I missed here?  I love hearing new ones so share away!

**Don’t forget -- the next Show Us Your House party is next week and it’s time to show off family rooms! That one will go up Monday morning this time – probably around 10 a.m. EST. I know that will be different from my past link ups that go up at night so I wanted to make sure to let you know!

Have a great weekend!!

Monday, August 6, 2012

How to build built ins

Hello hello!! I’m back today with an update on the dining room redo. Remember looong ago in January when I talked about turning our rarely never used dining room into a library kind of space?

I realized today that this will be a year-long transformation. ;) It’s not been hard, it’s just time consuming. Dad and I have been doing it together, but today I finished up a big chunk of it myself. And I’m getting really anxious to keep moving on it…I can really see the light!

The last time I updated you on this room, I mentioned the bookcases that Dad and I built. They were more of a “shell” then, but I finally got actual shelves installed today so I figured this would be a good time to share the how to.

We started with a really long board that would be the top of the bookcase. The base cabinets are exactly 12 feet long (four 36 inch cabinets) so we got a 1x12x12 board.

To figure out exactly where the supports would go, we laid it down on top of the butcher block first:

That way we could mark exactly where each support would go (between each 36” base cabinet).

See the mark?:

We constructed it laying down on the floor by screwing each support into the top 12 foot board:

Here’s a little drawing that shows you how it looked when we were done:

How to build a bookcase

We marked the EXACT middle of each board and screwed a long screw in the middle of each support (where you see arrows above). I screwed them in while Dad held the “vertical” boards and watched that the screws weren’t going off to the side or something.

Then we lifted it up on top of the bases:

how to build bookcases

I secured it to the ceiling beams and the side (where it is against the wall) with more screws to keep it stable for the time being.

Then it was time to do the shelf supports. I showed you how I did these in the pantry as well:

shelf supports bookcase

The back supports are screwed into studs in the wall, and the side supports are nailed in to the vertical boards. We started out by installing the side supports with screws, but then they would hit the support behind it and mess the leveling of the shelves up. We went to long nails with the nail gun instead and it went MUCH faster that way.

The trick is trying to get each set of supports exactly even with the next:

supports for bookcase shelves

Some are not perfectly perfect, but we felt pretty good with how they ended up. Trim will cover the supports and boards eventually, so they will (hopefully) hide all sins. :)

Then it was time to grab some more 1x12’s to make the shelves. I cut them down to the right sizes (each one is a different length – this thing is not exact) and nailed them into the supports:

A piece of trim will go vertically and horizontally to hide all the unfinished spots, and a thin piece of wood will finish off each shelf underneath:

I hope that makes sense!

Like I said, it’s not difficult, just time consuming. I always find that I try to make things much harder than they need to be. Dad always knows how to break it down to the easiest (and best) solution. :)

Annnnnd this is where we are now:

how to DIY built ins

You can see that we made the bottom shelf taller, so I can put bigger accessories and books down there.

There’s still SO MUCH to do. At least it feels like it. I am painting the back of the built ins a different color, so I’ll do that next. Then we need to install the header across the top, pull the wiring through and install the lights. Then the trim will go up (basically everywhere) and after that the JOYUS job of priming and painting. :)

Seriously can’t wait for that. Yay.

Considering where we started, I guess that to do list isn’t too bad:

chocolate brown dining room

I’m already more in love with it this way than I was as an unused dining room:

DIY built ins bookcase

It’s coming together! It’s going to take 12 months, but it’s coming together!! It would be so lovely to decorate these (finished?) bookcases for fall! But I’m realistically shooting for Christmas. :)

I’m sure I forgot some of the details, so if you have any questions on the progress so far, let me know and I’ll answer them in the comments.

Speaking of questions, I’ll be answering them all day long (until 5 p.m. EST) over at the True Value Facebook page tomorrow!

true value blog squad

Come on over and ask away! I’ll do my best to help you out! :)

Holla!

Friday, June 8, 2012

Giveaway Weekend!

**This giveaway is now closed. Congrats to winner Doreen at House Honeys! (Email me to get your winnings.)

Hey there! Welcome to the weekend! :) I am ready!

I’ve got a lovely giveaway for you all – the folks at Saffron Marigold are back!

Saffron Marigold sells a selection of hand block printed home linens that are just beautiful. I love that they continue the hand block tradition without the aid of mechanization or computerization – these are truly hand made pieces.

saffronmarigold

So lets check out a few of my favorites first shall we? :)

They sell a number of pillow shams and throws, and you’ll notice I’m a little smitten with this dark blue color:

Actually the one on the right is described as purple, but it looks like a beautiful rich blue to me.

Saffron Marigold also carries a variety of table linens, like tablecloths, napkins and runners:

peacock runner

I thought the blue batik napkins would be perfect for a Fourth of July picnic!:blue star napkin

Stars and stripes – love! :)

They sell a number of colorful shower curtains as well. I thought this one would be just adorable in a girls bathroom:

butterfly shower curtain

Orange is making a comeback in a BIG way in decor and I love it paired with that pretty blue.

Their curtains come in two to four different sizes, which is awesome. It can be so hard it is to find 96” and 108” inch lengths!:

blue morracan curtain

Again with the blue, but isn’t it gorgeous?

I loved all of the color, but when I saw their new Vanilla Glace line, I was smitten:

So light and airy and pretty, yes? Love it!

The kind folks at Saffron Marigold are offering one of you $50 to spend as you wish at their online shop!

Here’s how to enter to win $50 to Saffron Marigold:
1. Leave a comment here. What do you have planned this weekend? We’re kicking it off with Madagascar 3 and I’m so excited it’s just stupid.

2. Visit the Saffron Marigold site here. Check out their products and come back to let us know which one you love the most.

3. “Like” them on Facebook here. Come back and comment to let us know you did.

* You can enter one or all three times – it’s up to you! All options are not mandatory to win.

* Remember if you comment anonymously or you have a private blog, please include your email address in each entry, and spell it out with “at” and “dot” to avoid any spammy emails coming your way.

This giveaway is open to US residents only and will be open till this Monday, June 11 at noon EST.

Hope you have a lovely, fun weekend!

Sunday, July 10, 2011

One more day!

image
Hey there! I just wanted to make sure and remind you that you have one more day -- till Monday (the 11th) at 5 p.m. EST -- to enter the HGTV Design Star giveaway. One lucky winner will get a $100 Amex gift card to spend as they wish! Yay!

Also, because of the holiday last week, I moved the July Before and After Party to this week. Get your posts ready to link up tomorrow (Monday) evening – I hope to have it up around 7 or so.
beforeAndAfterButton
Hope you had a great weekend and I’ll talk at ya tomorrow! :)

If you missed my last post, check it out here.