Remember that one time, back in January, when I had that idea to transform our dining room into a library? And then, back in March, when we started the process of building bookcases for the new library?
Yeah, it was eight months ago, so I don’t blame you if you can’t remember. ;) Well, they are finally done!!!! And I’m thrilled!!
I have worked my butt off over the past few days to get them done. Seriously, my butt should be a third of it’s size.
There was so much to do to finish up, I didn’t realize how long it would take. There was a TON of painting – I had done one coat of primer on the bottom cabinets before, but then I dropped a can of blue paint that splattered all over them (fun times) and I got a recommendation to use an oil-based primer instead anyway (more on that later). So, I reprimed the cabinets and taped off the baseboards and cabinet trim with my Frogtape:

I did one more coat of primer and two coats of semi gloss white paint.
I primed the cabinet doors and then sprayed them with the semi gloss two times:

The finish is impeccable! I’ll show you more of that process soon too!
I used a TON caulk. It was insane. I used this trick I saw on a DIY show. Or maybe it was a blog? Pinterest? Who knows anymore!:

And found an awesome tool that helped this process immensely that I’ll show you soon too!
I installed the crown molding in the room and caulked the top and bottom of that:

I originally picked out hardware that was a nickel finish, but I realized after I got the lights in that I wanted the hardware to match it, so I went back to Home Depot and picked these out:

I love their clean lines – they say “library” to me:

I installed some lattice wood on the side of the cabinets just to add a little detail:

And THEN I could really start decorating the shelves! I’ve had most of them (mostly) done for awhile now, it was those taller shelves on the bottom that were hard:

Sometimes accessorizing is the easiest thing and everything just falls into places nicely. Sometimes it takes FOREVER to get it right. These took for.ev.er:

I’ll share more detail on all of the accessories soon, but for now, let’s just enjoy the final result shall we?:

The dog likes it too. I swear I don’t stage him like that – our animals are just obsessed with being in each photo. I had just shooed the cats out of the shot. ;)
I know I say this a lot, but they turned out EXACTLY how they looked in my head. I really don’t think I could be happier:

I love how the shelf spacing turned out – we made the bottom one bigger because we had to deal with the light switch and thermostat. We have a ton of bigger books that I wanted to have room for on the bottom, but I ended up laying them all flat anyway. ;) At first I was a little nervous about the bigger bottom shelf but I really like how it came together.
By the way, we asked two heating and cooling guys about the thermostat – I thought we’d have to move it. They both said it’s fine as is, which was a nice surprise. I’m even more surprised that they don’t bother me much. I hardly notice them.
We have a column in the room that prevents a good straight shot of these, so here’s a couple that show more detail of the bookcases:


I didn’t want to lose much floor space in the room, so we used upper cabinets for the bases – they’re only 12 inches deep. It worked perfectly – I didn’t want the shelves to be any deeper than that:

The cabinets were just the unfinished kind you can find at most big box hardware stores. Even at 12 inches deep they hold a TON! I’ll show you that soon too! ;)
Obviously it took me waaaay longer than I thought it would to build these. I’ve never done something this large. Dad helped me a TON by coming by a day or two a month to help me create them -- but I otherwise it was (mostly) me. We had help on one part – adding the trim to the front of the shelves.
Now I can’t wait to get moving on the rest of the room! Most of it won’t be too bad – I’ve had a new light sitting in the garage for months (this one is too ornate for what I’m going for in here – it’s moving elsewhere). The drapes won’t be too hard (just have to find the perfect fabric!). I’ve already got a coffee table that will go in the middle of the room that will get a redo.
The chairs are going to be the biggie – finding four, super comfy, pretty, affordable chairs will be interesting. :) My plan is to put the coffee table and four chairs in the middle of the room for another comfy spot to sit:

We never ever, I mean, never used the dining room. Ever. I do think a dining room table would look lovely in front of the built ins, but I just don’t want to go back to a space that we don’t use. For now, the chairs are the plan!
Since I’m obsessed with before and afters, let’s take a look at the room earlier this year:
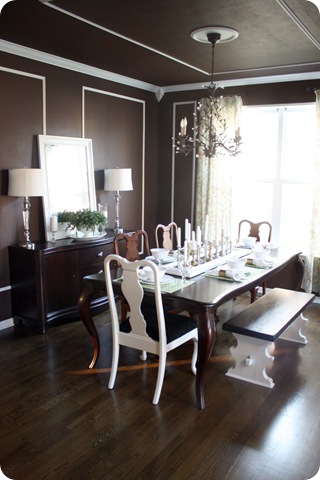
This was a result of my dark and dramatic phase. ;) I really did love this room, but when I painted it chocolate brown the floor was light carpet. The addition of the hardwoods made it feel like a cave.
I’m so thrilled to have a much brighter, useful room now!:

And for all that is good, I am SO GLAD this part is done!!! :)
Can I get a WHOOOOO??
Thanks so much for coming along on this ride with me – and thanks for your patience. I hope you love them and are inspired!
For more on this project, check out these links:
We started out with adding toe kicks to the cabinets and fitting them in place here.
I pulled down all the trim in the room, had the lights and outlets wired (we had help on that too) here.
I installed and primed the cabs, painted the walls (twice, ugh!) here.
I showed you how we built the bookcases (frame and shelves) here.
The trim was added and shelves beefed up here.
And finally, the library light drama was covered here.
Whew!! MAJOR props to my Dad for all the help, and my hubby and son for being patient with me for the past few days so I could get ‘er done!
Now I’m off to create a new Halloween costume for a cute little boy. The ninja now wants to be the Headless Horseman and I’m determined to make it happen. And then…I’m taking a nap. For a few days. ;)





 The pillows and coffee table have transformed it yet again…for $80. And yet again…I have ensured that Pottery Barn will never advertise on TDC. ;)