Showing posts with label huge. Show all posts

Thursday, October 31, 2013

Start small

Well THANK YOU for all the comments on my mouse post. :) I’m serious, it helps that I’m not the only one who has dealt with it. I mean, I knew we weren’t the only ones, but it helps to hear that I’m not the only person who was completely overwhelmed with the situation and the messes they left behind.

I’m about a third of the way through the storage room clean up so far but I’m at least through the worst of it (I think), so that’s encouraging.

So speaking of conquering messes, you know how you look around some days and all the sudden it feels like NOTHING is organized, everything is out of it’s place, things are overflowing everywhere? OK, maybe it’s just my house. ;)

Well it feels like that around here lately, and without fail it happens when life is crazy – we’ve had so much going on over the past few weeks that I feel like I’m playing catch up in the house.

I mentioned last month I’m determined to get the house better organized this year, one little project at a time. The thing is, I feel like we’re thisclose to truly having a place for everything (OK, well that’s just crazy – most everything) in this house. The new basement cubbies are a HUGE step in that direction. But I have storage projects to finish up in the basement bathroom, the laundry room, the dining/library – and of course the storage room. It’s like I can’t get one spot just right until I get another one just right, you know?

So it gets overwhelming – I’m only one person and can only tackle so many projects and decrapify so much in one day. :) The other day I walked by a spot in our family room for the 50th time that week and decided I just needed to start somewhere. It was just a little mess but at least it was something!

I told you about my slight magazine/catalog obsession here – and I’ve been much better about them since! MUCH. Well, you may not think so after this photo, but really, I have:

ugh

We have a little Target basket on the subwoofer in the family room (an effort to hide it a bit) for magazines. Well, we started adding more than magazines – like school papers, books, random mail and of course, a treasure box. Why not?

So I went after it. I tackle big messes the same way every time. Sit on the floor and make piles. I’m a piler, but sometimes that’s a good thing. ;)

I started sorting them out – there was a TON of stuff in there (and spilling out the sides), but keep in mind it had built up for the past six months or so:

organizing the clutter

Lego books went to the basement, the Bub’s books and workbooks went upstairs, the trash went to recycling, shred stuff to the shredder, and my small “keep” pile too. Believe it or not, I hadn’t read some of the magazines in there. ;)

And of course, there’s that I-don’t-know-what-to-do-with-you pile. I hate that pile. But I always make one just so I can get through it all quick. I address that one after the rest is put away.

What’s funny is it took no time at all – maybe 30 minutes or so? Now the only things in the magazine basket are -- get ready for this…magazines!:

magazine basket

OK, and catalogs. I can’t quit them.

Isn’t that a beautiful sight? So clean and decluttered and you can almost see the bottom!

It was just a little spot, but getting it in order cleared up my mind a LOT:

magazine basket

Paper and magazines and mail and booklets and manuals continue to be my biggest clutter issue. I’m making progress, slow but sure. What’s your’s?

Now, you’ll find me in the basement for the next few hours. I power on!!

Monday, September 16, 2013

Basement built in cubbies!

Hello and happy Monday to you! Oh my goodness, there has been a lot of activity around our house in the past week. It’s (mostly) wrapping up today, and I may have mentioned one time or 45 how giddy I am about the progress.

So here’s the thing – the biggest project I’m excited about is something we weren’t planning on doing just yet. Actually, it’s been planned forever…I’ve had it in my head for a year now. I have been thinking all that time about how I could make it happen, myself. Or at least with Dad’s help.

You see, there’s a HUGE wall in our basement that has been crying out for some awesome storage since day one. Well, since before day one – I imagined it even as we were finishing the basement last year.

It’s this big honkin’ wall that the TV and toys are on:
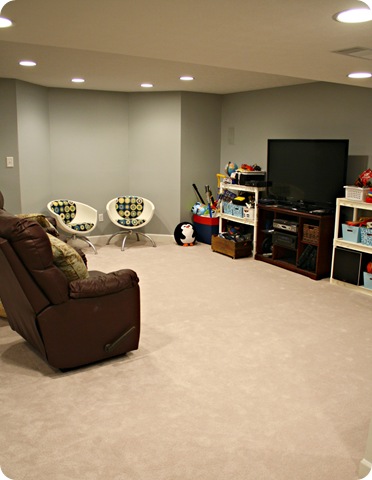
basement carpet

I eventually moved the two plastic shelves together off to the side so the toys were all in one spot. We’ve been planning to move ALL of the toys in the house down to the basement (there’s still a few upstairs and in the family room) but it’s been stalled out because there was simply no place to put them. There wasn’t a good spot for the ones we have down there and it has been a thorn in my side for months.

I got donate-happy when we finished the basement and got rid of those plastic shelves that had been all over the basement for years. I donated one too many, and I didn’t have a spot for the toys.

Well you know how you feel like “If I could just ‘X’ space done and organized, I could get ‘Y’ space decluttered” and it goes on and on? That’s how it is around here anyway, but that’s a whole other post.

This spot was one of those for me, in a BIG way. I had been dreaming of ways I could DIY a wall of built ins, and first was leaning toward trying to make something from IKEA work, like Jen did on her family room wall. But when I measured, the bookcases weren’t going to fit right, even with some trim added in.

I figured Dad and I could do it, but considering how fast we work (NOT. If you were along for the library built ins ride you know how funny that is.) I knew it would take FOREVER.

So the guys who finished our basement were here working on a project and I just kind of threw the project out there…and they they were low on work for the week so they made me an offer I couldn’t refuse. I tried. :) I mentioned it to my hubby and he even said sounds good, let’s go for it.

There are no more romantic words coming from my man, let me tell you. Happy Valentine’s Day to ME!

So the process started, first with a base:

built in cubby storage

At this point I was thinking that maybe Dad and I could have done this project…but then they kept going.

When they took three trips to their workshop to cut down everything on a huge table saw, I knew it was best we hired this one out:

built in cubby storage

I wanted the built ins a certain depth to hold the TV components, so every piece of wood had to be cut down to custom measurements.

It took three guys working and they got it done by the middle of the second day:

built in cubby storage

Next up was priming and painting, but I had a little project I wanted to do to the top. I wanted a butcher block look like we have upstairs on the big built ins, but I reeeally didn’t want to drive two hours to IKEA to get them, or spend the cash.

So I came up with a new plan. I took a trip to the hardware store and grabbed some one by six’s – which aren’t really one by six, I’ll never get it. :) I needed seven of the eight foot boards total because this beast is 17 feet long.

I cut them down into three, four and five foot lengths (give or take) and started by figuring out the layout – I wanted them to be staggered across the top:

DIY butcher block counter

I grabbed my wood glue and put some down (I added a bit more at the edges):

DIY butcher block counter

And then used my nail gun to nail them all down. The majority of the time was spent figuring out the layout, and even that wasn’t too bad. Actually installing them when supafast.

I gave it all a quick sanding (I think I used a 180 grit?) just to knock it all down a bit, especially where the boards met up:

DIY butcher block counter

I never fill holes by the way, you can’t see them when you stain anyway (if you get the stain in there).

I may have mentioned along the way that this spot was going to be a GREAT one to display all the Bub’s Legos, so the boy was happy to help the process along.

We wiped all the dust off together:
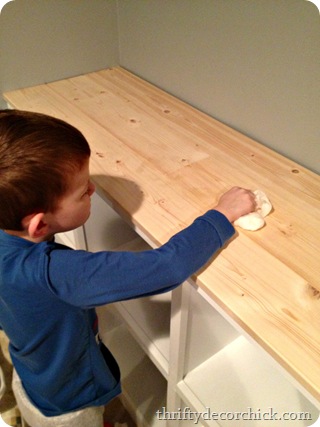
DIY butcher block counter

And then it was time for the stain! Ohhh, the glorious, rich stain. The folks at Rustoleum had me and a few other bloggers out for an event a couple weeks ago that I still need to tell you about, but I tried out their stain there and was hooked.

I used the dark Kona color and went with that for this project:

rustoleum kona stain

They promise one coat coverage and being able to poly over it in an hour…and I’m the most impatient DIYer ever so this was right up my alley.

I applied it like I showed you here, with a foam brush:

rustoleum kona stain

It was then that I realized just how HUGE this thing is, because I had to go back and start wiping it down at one end before I was done staining. I never have to do that -- it really does dry fast!

Isn’t that color beautiful? One coat and done!

We finished it off the built ins with three coats of paint and primer:
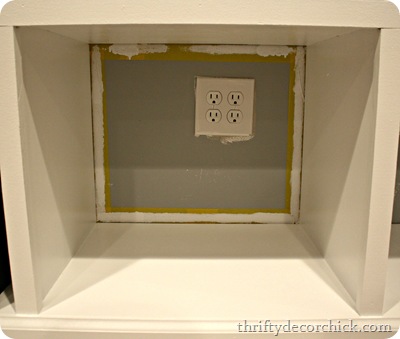
And then I got busy prepping it for the TV stuff. I drilled a few holes in the bottom and sides of a few cubbies:

drilling holes in wood for plug

See all that dust back there? Yeahhhh. It’s insane.

Here’s a quick tip if you’re ever taking apart your TV components – use painters tape (I used my trusty FrogTape of course) and write down where each cord goes. I do this every time and it SAVES my sanity, fo sho:

label cords with painters tape

We have a sound system down there and I marked those cords long ago:

label cords with painters tape

It only took me about 15 minutes to put everything back together, which is much better than the two hours full of pouting, foot stomping and perhaps crying that would have happened if I hadn’t done it. Maybe those things would have happened. Who knows?

I also put the TV bracket up last night and we got that hung:

installing tv mount

I just love the look of a TV up on the wall instead of the stand. It’s cleaner looking to me – I’ve done it with all of our TVs.

I am SO STINKING EXCITED about this being done!! Here it is as it looks right now:

 built in cubby storage with DIY butcher block top

It still needs baskets and lots of organizing (and hiding those cords, eww!) before I’m calling it done, but I couldn’t wait to show you!

Here’s the lovely dark top – I forgot to mention I finished it off with a coat of satin polyurethane:

DIY butcher block

This sucker is LONG and it is GLORIOUS. Seventeen feet by about 16 inches deep:

 built in cubby storage Isn’t it AWESOME???

Here’s a look at the whole room a few months back:

Mohawk carpet honored tradition

And here it is with all the beautiful storage!!! ACK! I die:

 built in cubby storage

Now we are going through the toys and purging big time. They will go in baskets, and then games will fill the shelves too. Ugh, I am thrilled about this!

You can see the Bub already started displaying his Lego creations. ;) That wall will get a huge redo too – I have big plans for it that include floating shelves, stenciling and fun art.

Can’t wait!! For now, I’m hugging my big cubby built ins every chance I get. For real, if I knew I wouldn’t fall off I’d totally sleep on it. Love.

Monday, August 20, 2012

Show us your family spaces!

Good Monday to ya! Hope your weekend was lovely! I’m kicking off the week with our next room in the Show Us Your House series of linky parties – this one is family rooms and I’m really looking forward to seeing these links!!

First up, I’ll share our space. This is one room that just did not work for us for years…and it’s completely my fault. ;) When we built our home I chose a corner fireplace instead of the normal spot between two windows. I’ve gone on and on about what an AWFUL IDEA THAT WAS, but I won’t blabber on anymore about that. You’re welcome. ;)

I finally figured out a way to make that corner fireplace work better in the room last year and I am SOOOO much happier with it: wood treatment above fireplace

Last summer we also moved the TV stuff to a different spot in the room and that one change opened up the room tremendously.

We finished paying off an insane amount of debt early last year (I can’t believe that was only last year!) and our first real purchase (paid for with “cash” of course), was a super nice sectional from Arhaus:

small sectional

This is hands down one of our best purchases ever…if not the best. This sofa is so darn comfy and has held up great! The cushions aren’t flat, spills wipe up easily…it’s fantastic. I swear it looks like the day it was delivered!

You can see by that pic that I put the Rugs USA rug back in the family room – that old rug was in such awful shape I decided to try this one again. At first I didn’t think the drapes and pillows worked with it, and I still don’t think the drapes work great…but they are fine for now, I’m not worrying about it. I wasn’t about to try to rework the whole room for the rug. Maybe later, but not now. :)

I found a couple new pillows from Target (earlier this summer) that incorporate a lot more of the colors of the room. Before I had solid red pillows in here – these pull in the rug much better. I also pulled some knit pillows from our bedroom, because let’s be honest…we all know I never make our bed. I mean…really.

So at least they are being used in the family room instead of sitting in a pile next to the bed:

contemporary rug blue gray

Last summer our fridge went kaput (almost exactly a year ago!) and when it went kaput our laminate floors went with it. So insurance paid for new floors and we kicked in a little extra for real hardwoods throughout our main level:

jacobean stain floors

OH MY GAH, I love them so very much. So. very. much. There’s no way we would have been able to do this without that lovely fridge melting down on us, so now I’m not nearly as upset about it. ;) Living in a mess for two months was not so fun at the time though.

When we moved the TV stuff last summer, I turned a Craigslist dresser into our entertainment center:

dresser as entertainment center

(That rug is showing as bright blue there and I’m not sure why, it’s really more of a charcoal blue color. See pics above.)

The components under the TV work great by the way! I LOVE having them out of the way. I loathe electronics and cords and stuff…I am always trying to figure out ways to hide them if possible.

I do have some plans for this room – new art, new paint and perhaps a new wall treatment? I’ve got the color picked out but I’ve been mulling over the wall treatment for awhile now. It will happen as soon as I want to do all that work. Which could mean about a year. ;)

I love how this space has been transforming over the years but my favorite part is how much more open than it used to be. Moving that TV (it used to be to the left of the fireplace) over across the room has made a HUGE difference.

You can find all of the posts about our family room here!

Now let’s see your family spaces, your living rooms – whatever you call the room where your family chills and relaxes!

Don’t forget the schedule for the rest of the year!:

September (basements/rec rooms), October (bedrooms), November (foyers), December (mud/laundry rooms)

I ask that you link back to TDC in your post, especially if you’d like to be considered for a feature in a recap:

Show Us Your House
<div align="center"><a href="http://thriftydecorchick.com/" title="Show Us Your House" target="_blank"><img src="http://www.homestoriesatoz.com/wp-content/uploads/2012/03/image34.png" alt="Thrifty Decor Chick" style="border:none;" /></a></div>


Go ahead and link it up and have fun!


Wednesday, April 4, 2012

Dining room transformation, part 2

Hello all! I feel like everything around here is in a state of in between – so many fun projects on the horizon, but some dirty (and not as fun work) that needs to get done first!

I am NOT complaining – I’m just trying to be patient, and it is not my virtue. ;)

One of those projects is our dining room turned library that I first told you about in January. My plan was to get rid of the never-used dining room and turn it into cozy library-type space that we would actually USE.

My inspiration came from Emily’s wall of bookcases:

Wowsie wow, that is is awesome.

It’s been slow going so far, and even though I whine about it sometimes, I actually like taking projects like this at a snail’s pace. It helps me to figure how out I want things along the way.

The first step of this transformation was to get the bases (I wanted closed storage at the bottom instead of shelves like Emily’s). But we couldn’t do much with those until a big step was done – and that got done today! WHOO!

Over the past few weeks I wasn’t able to do much else in here, other than take down all of the moldings:

I ended up taking down pretty much every bit of it – the crown had to come down anyway (it will eventually wrap around the top of the bookcases) but I took down other stuff as well. I want to redo ALL of it.

I took the IKEA butcher block to get cut down a few weeks ago at a local lumber place. They cut the piece down the middle and in half:

The one piece is the PERFECT size for the base of the bookshelves (after it was cut down). That was awesome.

I plan to sand them down and stain them the same color as the floor. Once we get the cabinets installed I can get that step done!

Today the BIG project was completed – the one I had to wait on. My plan all along was to add more light to this room (we have only had the overhead light and a couple lamps in here). Because the buffet and lamps are gone, I needed to figure out a new additional light source.

I decided on four lights that will hang from the fronts of the bookcases at the top – shining down on the fronts of them. In order to do that, our electrician had to help out:

I know. Don’t you want to visit right now??

And this is how I feel like our whole house has looked for the past two weeks, as we work on the basement:

I’ve given up on cleaning until the basement is drywalled. There’s no point in trying until then. :)

Anywhoo, it looked much better by the time they were done – the guys doing all of our work are GREAT. They put everything back and went ahead and installed temporary lights so we could use them and get an idea of how they would work:

The lights are set up to hang at the middle of each bookcase – there will be four total. They will come forward a bit and the new fixtures will hang from the front of each one.

I LOVE it!! Ack! They are bare bulbs and I am already so excited.

The guys also got rid of the outlet behind the cabinets and installed two above instead:

Perfect for future Christmas decorations! And the rest of the year, they will be hidden behind books and accessories.

It’s coming together now! We’re still a long, LONG way off, but I feel like there’s been some real progress:

On a side note – I cannot believe how big this room is without that massive table! It’s HUGE.

Next up – I need to paint the ceiling. I’m so so so over the dark brown drama ceiling:

I took down the molding that used to be up there too. I want to simplify things a bit. The ceiling is going to be much brighter, but hopefully will still have some contrast with the moldings.

I’ve had the paint for two weeks and have said every day for two weeks that I’m going to paint the ceiling…and you can see that hasn’t happened.

Tomorrow…really. ;)

Dad comes later this week and we’ll attach the cabinets to each other and to the wall, then install the counters. After that, the drywall finishers are going to fix all of my drywall issues and I can PAINT!

The backs of the bookcases will be a different color than the walls. I have NO clue what color I’m doing yet. I may check out some fabric stores to see if inspiration hits me in the form of drapery fabric. :)

After all that, we can start building bookshelves and then start the superfun process of painting. Oh, and we need to move the thermostat too. WHY do they put those in such odd spots? I’ll be sure to keep you updated as we go!

I am SO excited about this room. And I am so glad we decided to take a chance and make it a space we will use!! Hang in there…hopefully it will start looking like something soon. :)

Sunday, March 18, 2012

Show Us Your Kitchens!

Hey hey! Well, first, I have to say THANKS for making me feel a little less weird. ;) I loved your comments on my last post. So either I’m not weird or I am and a whole bunch of you are too. ;) Either way we’re golden.

It’s time to show off more of your houses and I’m really excited about this one! This month we’re sharing kitchens at the Show Us Your House party:

image

If you’ve been around for awhile you’ve seen pics of our kitchen, but here are a few more recent ones and a couple before and afters too!

I’ve made a LOT of changes in here over the past few years. I’ve been trying to add more color and more light to the space:

black island white chairs

Before everything was dark and cherry. Cherry (really maple but they look cherry) cabinets, cherry laminate floors, cherry island, black backsplash. It was too much!

The fabric and accessories add the color:

cherry cabinets white backsplash

The dog adds some cuteness. ;)

And the beadboard backsplash and spray painted island chairs add some brightness:

beadboard backsplash

The new floors are darker, but make the room feel lighter, in a weird way. The fact that they don’t match the cabinets exactly anymore may be why.

I have a few more changes in mind for our kitchen – some fairly easy (like painting) and some much harder (like moving plumbing).

Needless to say it’s going to stay like this till after the basement is finished. Maybe long after. ;)

kitchen bay window

Here’s what the room looked like a couple years ago:

Not bad at all, it was just getting busy and dark for my changing tastes.

Here’s a similar view now:

butcher block island top

Just a simple thing like taking that pot rack down made a HUGE difference!

Here’s the kitchen before from a different direction:

I added a round (outdoor!) rug from Pottery Barn under the table, repainted the bay window area, and replaced the pantry door. Among other things. ;)

Oh, and painted the back door. You might remember how that went. Yeahhh:

So! Let’s see yours! I can’t WAIT to see your kitchens – I truly believe they are the heart of the home and can say a lot about their owners. ;)

I will highlight a few of your rooms on an future post – so if you’d like to be included, please do include this button or a link in your blog post:

image

Here you go! Link it up!