Showing posts with label ikea. Show all posts

Sunday, October 27, 2013

IKEA table turned farmhouse table

DIY farmhouse table

Hello hello! Hope you had a lovely weekend! I’m back today with a DIY project that I’ve been SO excited to show you! It was a LONG time coming – it took me a few weeks to finish and a couple years to even make happen.

So here’s the thing. I love our kitchen but the table area has been a thorn in my side for years:

round table kitchen

It looks innocent, I know. :) But it was so cramped. I mean, our kitchen isn’t huge by any stretch, and the spot for the table always felt too small for me. And we added the bay window when we built, which made it even bigger.

The problem was, even with the chairs pushed in (which they hardly ever were, all at the same time), we kind of had to schooch through next to the island, over by the pantry and when we went outside we had to make sure the chair was pushed in to open the door.

I was always, constantly, numerous times a day PUSHING IN CHAIRS.

I was so tired of it, really, I mean, total first world problem here, but it was driving me crazy.

So I came up with a solution in my head. One I never even mentioned to the hubby because it involved knocking out a wall and expanding the kitchen. I had it perfectly planned out. You see why I didn’t mention it to the husband though. ;)

Obviously that wasn’t going to happen, so about a year ago I came up with a new plan – ditch the round table.

I love that table (it’s an antique but not a family antique) but once I did some measuring I realized the round shape was ALL wrong for that spot. But the size for the new table I was looking for needed to be less than 60 inches long and do you KNOW how hard it is to find a kitchen table that size?

I guess I should mention I had a “look” in mind that I wanted. And Dad and I did consider making something, maybe even using the base of the table I already had, but when I showed him tutorials online we determined we didn’t have the tools needed.

So for months and months and did I mention months? I looked on Craigslist. Then I tried places like World Market, even Walmart – just looking for something I could change up if needed. No one had a smaller table with the look I wanted.

And then, one night it came to me.

IKEA. Duh. Duh duh duh!

I found exactly what I wanted:

IKEA Norden table

Well the shape and size and mostly the look I wanted. It is the Norden kitchen table and it’s something like 35 by 59 inches. Perfect.

So I planned a trip to IKEA (it’s a two hour trip one way so I picked up some other stuff). I met up with these cuties:

That would be Beckie and Traci doncha know. ;) We got to spend the day shopping and chatting and goofing off in IKEA, it was SO nice. When we found the table the girls solidified my ideas and thought it would work.

It wasn’t till a week later that I finally put the table together. I was crossing my fingers the size would work – sweating a little bit actually. ;) But it fit GREAT. I was SO stinking excited.

So originally I had planned on building a new top for the table, to make it more farmhouse looking. But once I got it together I was kind of hoping for an easy fix, so I tried sanding the top to see if it would take a stain. (It comes with a leaf to expand it so I experimented on that.)

The top is supposed to be real wood and I still think it is, but man, they put some supersonic protective stuff on there. It would NOT sand off. So I got a wild hair and just tried staining over it to see what would happen.

I was really, really pleased with it actually – the stain actually took and turned it a lovely grayish brown color:

IKEA Norden table

I was so excited that maybe this would work with less work on my part than anticipated. I still didn’t know why that finish took the stain like it did – it was so odd. (Do you sense the foreboding here?)

It wasn’t the look I had originally planned on, but I liked it OK. I did the rest of the table and it still wasn’t my ideal, but it was pretty!

I went ahead with the rest of my plan to paint the base white – originally it was that blond wood color:

IMG_5134

I got busy with some white chalk paint:

IKEA table to farmhouse table

I used that simply because I didn’t want to have to sand down all the legs and everything. I was able to just put it right on which saved me a ton of time.

So everything was almost done, and like I said, I liked the top just fine. But then, later on the same day, after I had put a coat of poly on (that had dried) I put something on the table and heard a sound I know all to well – the sound of a finish being scratched off. You just KNOW it after a while. ;)

UGH.

Yep. I knew it was weird that that stain seemed to take so well. It didn’t. :) It scratched right off. I mean, it took some effort, but I could do it with my finger nail and some force.

Sooooooo…my plan A that became plan B became plan A again. It was time to build a new tabletop.

I’ll let you pause here to grab a snack, I know this is a long post.

Get some Doritos for me.

OK, it was time to make a new top. I gathered some wood and had plywood base cut down to the size of the original table top, then started figuring out my cuts:

DIY farmhouse table

I went with the same design as the small end table I did for the basement.

I used wood glue, my nail gun and a clamp – starting at one end and gluing, clamping and nailing as I went across:

long clamp

Some of the boards were slightly warped so I used hand weights to put some pressure on them. And even though I clamped as I went (a good, patient carpenter would have clamped them together with numerous clamps and let each row set before moving on. I am not a patient carpenter.) there were still some small gaps between the boards.

Because I didn’t want to worry about food or liquid falling down in there, I used a stainable filler and filled in ALL the cracks and holes:

DIY farmhouse table

And then I sanded and sanded and sanded. I’m sure my neighbors were like, WOMAN! It’s smooth! I sanded so much. And then some more.

But I wanted to make sure I got the putty residue off (turns out I could have sanded even more) and the sanding was knocking down any of the warping issues too – when I was done it was SO stinking smooth.

I’ll show you more about my new sander soon:

bosch sander

It made this part SO easy! I love this thing!

Just before dark we brought it in and set it on top of the table:

DIY farmhouse table

I stained it two times with the same dark stain (Rustoleum Kona) I used here. Then I gave it two coats of a gloss poly:

DIY farmhouse table

And in the end it turned out JUST as I had imagined for all those months:

DIY farmhouse table

I am SO proud of this piece, I just can’t even tell you. I think it turned out so beautifully:

IKEA table to farmhouse table

To hide the plywood base of the table top and to finish it off a little more, I added another “apron” around it – it’s glued and nailed into the plywood base. (I went with a thicker plywood knowing I would do this.)

I needed something thin (I made the tabletop just slightly bigger than the IKEA top so we didn’t lose any space in here) to trim that out, so I ended up using door framing trim. I love how it looks!:

IKEA table to farmhouse table

I have zero patience so didn’t wait as long as I should have to stain after doing the putty (I’m five years old, I swear). You can see a couple spots where I didn’t sand well enough and the stain didn’t take as well at the end:

IKEA table turned farmhouse table

But I don’t mind it – I didn’t want it to look perfectly perfect. The wood is just pine – I went with the slightly more expensive kind that doesn’t have knots – and it stained up just beautifully!

The table is way bigger than our old one, but the shape works SO much better. SO. MUCH. With the table and chairs and the rug before it was taking up a space about 70 inches around. This way works because the ends where we saw the most traffic don’t have chairs:

IKEA table turned farmhouse table

And I know, there’s no chairs in the pics – those are for another post. This one will continue. The light is a surprise too. ;)

I think it is one of the smartest changes I’ve made in our house. I seriously don’t know what took me so long. We LOVE it. Loveity love lurve:

IKEA table turned farmhouse table

I’ll show you the seating soon (I’m still tweaking).

I gotta say, I’m a little excited to have a pretty table to decorate for holidays again too. When we got rid of the table in the dining room I figured I would miss that part and I did. It’s not the reason for the new table obviously, but it’s a nice little bonus. ;)

The great thing is, I made this so the top can be lifted off. So the one or two times a year we need a large table we can pull that off, put the leaf in the table and then seat eight easily (six at the table and two on the ends).

I am SO thrilled with it! All together it cost about $350 -- $270 for the table and about $70 for the wood. Worth it for a custom piece that fits our kitchen just right! 

So there you go, phase one of three, where plan A was B than A again…but it’s done. I’ll show you the rest soon!

Friday, September 13, 2013

Splurges

Hey hey! Did you get snow where you are? We got a ton and a two hour delay, WHOO! It’s so wet it’s melting pretty fast, and our temps are moving up later this week so hopefully it will be gone by the weekend. And then bring it spring!!

So I was going to update you on the bathroom redo projects today, but a fun purchase came home with me yesterday that I just had to share cause I LOVE it.

Here’s the thing – I’ll always be thrifty at heart and a DIY girl, but sometimes it nice to splurge, you know? Like last year I started using this Benefit mascara and I’m hooked:

benefit they're real mascara

Pricier than the drug store? Yes. But it grabs every single little bitty lash and I LOVE IT.

I’m not a foodie by any means, so mac and cheese is just fine with me most days, but there are a few splurges we make when it comes to food and drink. Wine is one, and these Trader Joe’s Macarons are my JAM:

Trader Joes macarons

Ohhhh my dear goodness, they are so dang good. The problem is, I only really like the vanilla ones. I mean, I’d eat the chocolate ones if you forced me, I’m no fool, but the vanilla ones are sheer delight. Seriously, I have some in the freezer now and it’s killing me to not go grab one.

So anyway, every once and a while I do splurge, and it happened yesterday. If you’ve been with me for a while you remember the Hemnes sofa table I brought home a few years ago, after my first trip to IKEA. (Sniff. I remember it well.):

ikea hemnes sofa table

Excuse the poor photo – this was back in my I-take-pictures-at-night early days of blogging. ;)

So yeah, I’ve been stink-eyeing the sofa table for a while. I still liked it just fine, it’s a great table, it just looked so simple in there. I was craving something a little prettier, I just didn’t know what it was.

Till a couple months ago I walked in to World Market and saw this beauty:

everett foyer table world market

It’s the Everett foyer table, but I always saw it as a sofa table. The first thing that struck me about it was how long it was – I loved that! Since that photo above we have replaced the sofa and loveseat with a sectional and rearranged the room. So the part of the sectional that is right there is super long.

Thing is, the first time I saw it, I walked around it for a good ten minutes, finger to lips, stalking it. I decided to go home and measure to see if it would work.

It worked. :) I didn’t go back to get it yet, I wanted to think on it some more. So a few weeks later I was back, and stalked it again, this time with a couple other ladies. ;) I asked if it was in stock, just to see (or something) and it was wayyy out of stock. People loved it, of course, cause it’s beautiful.

They asked if I wanted a rain check and I said no, I wanted to think some more. If it’s not there for me to just get right then I feel like it’s just not the right time. I’m weird that way.

Since then I’ve gone in at least one more time, caressed it, checked again and it was still out of stock. Fast forward to yesterday afternoon when I decided to pop in. I said to myself if they had it I was going to do it, I had the money, if it was meant to be they’d have it in stock. The guy didn’t think they did, but checked anyway and then came back out with my lovely table rolling behind him.

I was all high-pitched squeal, “You HAVE it??” and he was all yeah! And I was all, load. it. up. man!!

I put it together late last night cause I have the patience of a gnat. Assuming gnats have little patience. Whatever:

everett foyer table world market

It was so fast – maybe 20 minutes to assemble it.

I am in LOVE. It’s hard to tell, but it has two skinny drawers for a little bit of hidden storage. We have animal stuff in one:

everett foyer table world market

My only complaint is that one of the drawers is too small, you can see the gap in this pic:

everett foyer table world market

So when I pull it out it falls off the track and nearly falls out. I may call to get a new drawer but I’m not taking this back after assembling the thing. I think I can fix it pretty easily if they can’t send a new drawer.

I took what had been on the old Hemnes sofa table and put it on here, and added one thing just to fill in space for now. This is probably not how it will stay but I just had to share, remember the patience thing:

everett foyer table world market

Gorgeous, huh?? I just adore it.

I think I’m going to look for some pretty hardware for the front of the drawers – you can’t really tell they are drawers and I’d like to show them off. (There’s a little cut out underneath so you can pull them out):

rustic long sofa table

The games will stay – not the prettiest accessories but we like having some up in the family room/kitchen for easy access. Stuff needs to be functional for me foremost, at least most of the time.

I like that it’s not too deep too, it doesn’t stick out any further than the IKEA table did:

everett foyer table world market

I cannot believe the difference it makes – it’s so pretty and I love those legs! I even considered trying to make this for awhile with some table legs, but after putting it together I realized I couldn’t have done it in a way that would have been sturdy enough. (At least with the tools I have.)

I’m so glad I finally just got it!! I consider it my treat for all the purging I’ve been doing over the past few weeks. And I did use a coupon, so that helped a little.

I just think it’s lovely:

everett foyer table world market

The color on that photo is wonky, not sure what’s up with it. But this shot shows you why I want to paint these walls so bad – they match the sectional exactly. It is too much tan for me! I’ve already decided on a color similar to the Sherwin Williams Analytical Gray we used in a lot of the main floor last year.

So there you go – my splurge. I thought long and hard about it and I usually go with the “if it’s meant to be” mantra – I’ll leave something and come back. If it’s meant to be mine it will still be there. If not I just go home and cry. OK, kidding. ;) I do have a plan for the IKEA table – if it fits in the spot. I’ll let you know.

Have you splurged on something for the house lately? For yourself? Do tell!

I’m off to finish off this. My last vanilla. Drats:

Trader Joes macarons  ;)

Monday, March 19, 2012

The Moon Chairs

Sooo, I don’t go into Goodwill nearly as much as I used to. I was going a couple times as week there for awhile and it contributed way too much to my crapification problem. ;)

Now I am dropping off stuff a lot more than picking up. I probably go in once a month now. And last week I went in and found a couple really fun items.

There were six “moon chairs” for $15 each and I kept walking past them, stalking them. I even tweeted a pic, but I just couldn’t figure out where I could use them in our house.

I walked around some more, stalked them some more, then sat in one.

It spun people. Round and round.

That sealed the deal. I had to have them. I sat in one, spinning around like a five-year-old, trying to think of where I could put a couple funky chairs, and it hit me.

Duh. Basement. Play area.

So I got two:

I had been thinking that maybe, just maybe, they were actual vintage moon chairs…how cool would that be? I was all congratulating myself that I had just found the deal of a lifetime.

Then I turned one over and saw the IKEA tag. ;) I laughed at myself for a good five minutes straight.

They were in decent condition, just some nicks in the metal legs and they needed some cleaning. But I had bigger plans in mind for these, so I started by taking off the bottom and back pads:

It was then that I realized they had zippered covers, so I took them off and threw them in the wash:

IMG_0542

I rarely buy anything upholstered second-hand, but I could tell these had been taken care of pretty well.

Then I took the seats off the metal bases using a socket wrench:

Look! A picture of the blogger!!

With a socket wrench!

And sweaty nasty from a workout with no makeup!

And a headband to accentuate the big ears!

:)

Anyway…

After the covers were clean and dry, I put them back on the cushions, then laid them out on the new fabric I found at Joann’s:

covering cushions

I used about a yard for this project and it was perfect.

Some of you might be thinking I made new covers, and you’d be wrong. ;)

I just hot glued the fabric around the back of the cushions:

Oh yes. Hot glue could heal the world.

No one will ever see the backs, except for me. And after some scotch guard, they’ll hold up great. I kept the black covers on so the new fabric would have something to glue to.

I made sure to cut around the holes for the screws:

While I was working on the cushions, the legs were out in the garage drying. They were dull and more of an aluminum finish. I wanted something a little flashier, so I spray primed them and then used some leftover silver spray paint from the dining table centerpiece.

I put everything back together and I couldn’t be happier with how they turned out!:

IKEA moon chair redo

I was looking for a fun fabric that would work well with these funkalicious chairs. I wanted something kind of mod, but that would hide marks and would hold up.

This upholstery fabric was PERFECT!:

moon chairs

Each chair came in at $35 each when I was done – for the fabric and chairs.

It was a fun, quick project and I can’t wait to see them in the Bub’s play space in the basement! They may just stay up in the living room till the drywall is done cause the colors work pretty perfectly in there. ;)

Did I mention they SPIN??

:)

Don’t you love a great Goodwill makeover?

P.S. Next time I decide to include a picture of myself (six months from now) I’ll wear makeup.

Friday, January 27, 2012

Pretty work spaces

Well happy Friday and weekend to YOU!!

I gotta say, your responses to my last post made me feel SO MUCH better. I certainly do not feel alone, especially since so many of you feel the way I do.

There were SO many great suggestions (yes, I read every comment) and a couple of you mentioned the Sleep Cycle app on the iphone. I had heard of it before and decided to give it a try.

You see, I don’t usually have a problem falling asleep – it’s getting my booty up that’s hard. I LOVE the sleep part. ;)

It’s totally freaky, but this thing works. I’ve only used it two mornings but it’s kind of blowing my mind. It somehow keeps track of your sleep patterns and wakes you during your lightest sleep phase. So if I set it between 7 and 7:30, it goes off when I’m sleeping the lightest during that time.

The first morning it went off and I felt fantastic. I didn’t even hit snooze! Today it went off and I snoozed it, but then realized right away I felt fine. So I got up within seconds of it going off both mornings. That’s happened…uhhh. Never?

It’s freaky. I can’t believe that a little dollar app would make that big of a difference, but so far it has. I’m going to keep using it to see if it keeps up, but I thought I’d mention to my fellow owls so you can try it out. :)

Anyhoo, today I wanted to share some of the amazing spaces that were linked up at the first Show Us Your House party here at TDC! This month’s room was the office or craft space. Since I shared my office redo this month, I thought it would be appropriate.

There were so many awesome ideas I just had to share!

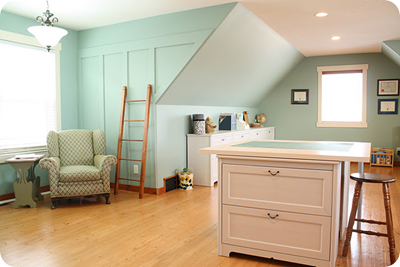
Andrea’s space is so serene and pretty, and the cutting table in the middle of the room is ingenious:


Willow Wisp Cottage

She used two dressers and two dresser tops from IKEA – for less than $150! I LOVE that! And what great storage. I am SO doing this someday. If only IKEA would move closer, darn it.

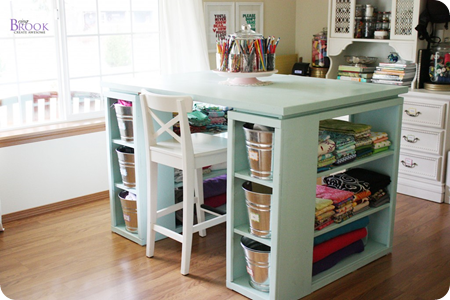
Brook’s hubby made this a table for her craft space:

 
Being Brook

And again, only $150 to build it! If you’re handy, it’s a great option. I could see doing something similar with two short bookcases and a butcher block countertop – now my wheels are really turning!! ;)

Janel uses chicken wire all along one wall as a larger than life inspiration board:


Hating Martha

What a fun idea!

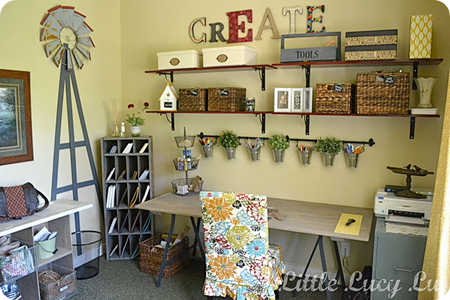
I love Bec’s wall of beautiful organization:


Little Lucy Lu

The shelves, brackets and buckets were all from IKEA (I guess it’s a good thing it’s two hours away) but you could totally recreate this with supplies from the hardware store!

There were some perfectly organized spaces throughout the links, but I wanted to share a few using pegboard. It’s is supa cheap – and I think it’s a brilliant way to organize!

Kellie makes it look easy with her pretty blue pegboard:

 
Nest of Posies

And Hayley uses it all over her walls in her basement craft room:


Mouse House Creations

You won’t even believe this space is unfinished! Bravo!

I love how Liz changed up a beat up dresser into a shelving system:

 
Liz Marie

The beadboard covering the top of the dresser was brillz. And this is a great option for when you want to store TV components in a dresser as well!

Carrie has one of the most organized spaces I’ve ever seen!:


Saving for Six

The girl makes plastic baskets and wire shelving look so good, for real!!

I love seeing how people make the most of awkward spaces! Jen had an unused spot in her dining room and you won’t believe everything she fits behind that wall!:


Jennifer Rizzo

This side looks pretty amazing too! ;)

Joanne used an unused closet and made a (pretty darn spacious) office out of it:

 
Double Wide in the Sky

Love it!!

Let’s end the officepalooza with a couple of pretties, eh?

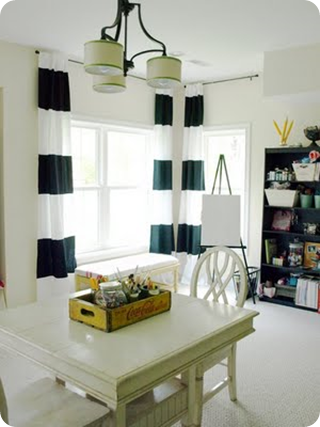
I loved Julie’s bright craft room with the graphic black and white striped curtains:

  
Less Than Perfect

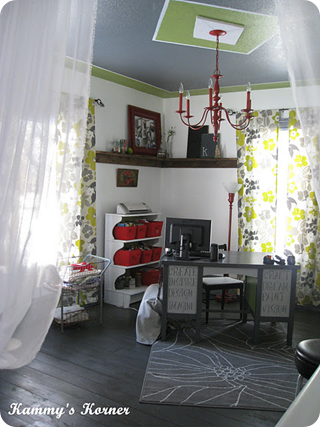
And all of the beautiful colors in Kammy’s craft space:

Kammy’s Korner

Love the ceiling and how she mixed all those colors!

So there you go! Some organization ideas and pretty pictures to inspire you! This week I moved my craft space to a different spot in our basement and I LOVE how it’s turning out. These links are making me even more excited for a finished room to decorate someday!

Hope you have a wonderful weekend! Holla!