Thursday, August 9, 2012

Tired

We are home!  Home, home, home!  Home from our trip and home from camping. 

It feels so good to be home.


I am tired.  So . very . very . tired.

I want to hug and kiss my hubby, and chat with Lizzy, and skype with my new grandbaby, and have lunch with James, and see my parents, and go school shopping, and COMPLETELY reorganize my house in ALL the ways I thought up while driving, and clean, and do piles of laundry, and start lists upon lists, and I want to blog.

Blog and blog about so very much.

I want to sleep.

I want to read.

I want to blog.

I want to stay within the confines of my home forever and ever and never come out.

I want to get my kids on a schedule, and feed them healthy food, and let them sleep in their own beds, and give them a condensed version of the summer school and swimming lessons I had hoped for.

I want to sleep.

And sleep.

And sleep.

And . not . drive.

And blog about things like how jealous I am of my friend E.

Who has a pot the size of our mondo adventure.


I am jealous of that pot.  Very jealous.

But not jealous enough to be googling mondo pot--where to buy?

Which, come to think of it, might not be a good idea.

I am so tired I am delirious with dumb jokes that are not funny.  Don't judge me.  I am tired. 

And in all honesty, I really am jealous of E's mondo pot. 

And in all honesty, I really am tired. 

So . very . very . tired.

Zzzzzz.


Wednesday, August 8, 2012

Back to school fun

Well.

It’s almost here. (Sniff.) My boy starts kindergarten (all day!) very soon and I’m trying to deal. (Sob.) On one hand I’m so excited for him, and he is too. I’m also not exactly opposed to our family getting back on a schedule and having some routine to our lives. And then I consider having the whole day to myself…oh. my. Whatever will I do?? Eat bon bons all day? ;)

But I do know that this year will change our lives forever. It’s never going to be like it has been again (unless he comes home and lives with us after he graduates college…hmmm) and it’s going to be a big transition. Although it’s definitely more about me letting go of my “baby” and letting him become a little man than it is about him – he’s ready. (Choke.)

Anyway. Whew. As you can tell I’m kind of all over the place right now and can’t quite figure out how I feel. I’ve seen some adorable back to school ideas lately that are getting me kind of ready – and I thought I’d share a few of them with you!

First up, some supacauuuute gifts for the teacher. I loved both of these as a gift for the first day – one with flowers or one with chocolate dipped Oreos:

back to school teacher giftOreo Apple pops

(source) (source)

My hubby is a high school teacher, so obviously this wouldn’t be for him. ;) My BFF teaches first grade, and although I know as a teacher the themed “school” gifts can get overwhelming sometimes – as a first day surprise I think this is just too sweet. Love them both!

So many fun ideas in this one – if you do a special breakfast for the kids you could use some of these ideas. Or if your street or neighborhood does a first day celebration you could use some of these too:

Back to School party

(source)

How stinkin’ cute are these “pencils” for the kids in the class on the first day?:

Back to School student gift

(source)

How about a cupcake apple for the teachers?:apple cupcakes

(source)

Or wait to give them on Friday of the first week to congratulate them? ;)

I loved this teacher’s survival kit too – I would add a Starbuck’s gift card to treat themselves after the first day:

first day teachers kits

(source)

How cute is this for a back to school breakfast?:

first day of school breakfast

(source)

My son looooves Goldfish, so this one really tickled me:

(source)

Of course there’s a ton of printables available out in blogland – I love this simple one from How Does She:

First Day of School- FREE Printables for Every Grade

(source)

I wish I did something like that for other pics with the Bub – so often I forget the date of big events. I think I’ll remember and then days or weeks later as I go through pictures it’s just gone, poof, out of my brain.

I also really loved this idea – you could change the little details year to year, like what they want to be when they grow up:

first day of school pix

(can’t find a source for this one, share it if you know!)

My son’s future job would be ninja – and I’m guessing that won’t change for the next five years.  He wants to be a ninja that bad. ;)

Wow, so many fun ideas. I love this stuff! They almost have me ready. Almost.

Any advice for this Mama? Did you cry the first day? Do you still? Or do you dance in the streets? ;) When do your kids go back? If you’ve shared back to school traditions on your blog, feel free to share them in the comments!

Tuesday, August 7, 2012

Home Sweet Home

Oh me, oh my!  Yes, we are home sweet home!  What a wonderful, memorable vacation!


Now we are heading out camping--in a few minutes! 

We arrived home delayed due to sick kids--tales to tell--luckily they are all feeling better. 

We then unpacked and repacked for our annual camping trip. 

Living on a lot of this right now:


What a crazy life--living the dream!  Lots of thoughts on traveling with newly adopted kids, vacations and attachment, traveling in general, and LIFE!  Soon peoples, soon!  Thank you to everyone who hosted us and loved on us--amazing people!!!

Monday, August 6, 2012

How to build built ins

Hello hello!! I’m back today with an update on the dining room redo. Remember looong ago in January when I talked about turning our rarely never used dining room into a library kind of space?

I realized today that this will be a year-long transformation. ;) It’s not been hard, it’s just time consuming. Dad and I have been doing it together, but today I finished up a big chunk of it myself. And I’m getting really anxious to keep moving on it…I can really see the light!

The last time I updated you on this room, I mentioned the bookcases that Dad and I built. They were more of a “shell” then, but I finally got actual shelves installed today so I figured this would be a good time to share the how to.

We started with a really long board that would be the top of the bookcase. The base cabinets are exactly 12 feet long (four 36 inch cabinets) so we got a 1x12x12 board.

To figure out exactly where the supports would go, we laid it down on top of the butcher block first:
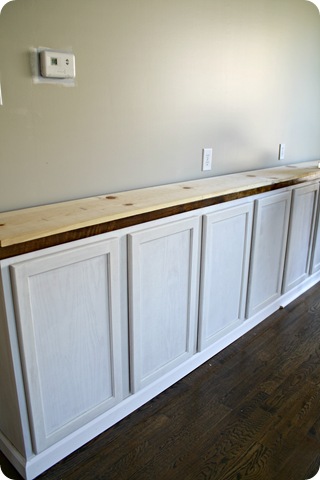
That way we could mark exactly where each support would go (between each 36” base cabinet).

See the mark?:

We constructed it laying down on the floor by screwing each support into the top 12 foot board:

Here’s a little drawing that shows you how it looked when we were done:

How to build a bookcase

We marked the EXACT middle of each board and screwed a long screw in the middle of each support (where you see arrows above). I screwed them in while Dad held the “vertical” boards and watched that the screws weren’t going off to the side or something.

Then we lifted it up on top of the bases:

how to build bookcases

I secured it to the ceiling beams and the side (where it is against the wall) with more screws to keep it stable for the time being.

Then it was time to do the shelf supports. I showed you how I did these in the pantry as well:

shelf supports bookcase

The back supports are screwed into studs in the wall, and the side supports are nailed in to the vertical boards. We started out by installing the side supports with screws, but then they would hit the support behind it and mess the leveling of the shelves up. We went to long nails with the nail gun instead and it went MUCH faster that way.

The trick is trying to get each set of supports exactly even with the next:

supports for bookcase shelves

Some are not perfectly perfect, but we felt pretty good with how they ended up. Trim will cover the supports and boards eventually, so they will (hopefully) hide all sins. :)

Then it was time to grab some more 1x12’s to make the shelves. I cut them down to the right sizes (each one is a different length – this thing is not exact) and nailed them into the supports:

A piece of trim will go vertically and horizontally to hide all the unfinished spots, and a thin piece of wood will finish off each shelf underneath:

I hope that makes sense!

Like I said, it’s not difficult, just time consuming. I always find that I try to make things much harder than they need to be. Dad always knows how to break it down to the easiest (and best) solution. :)

Annnnnd this is where we are now:

how to DIY built ins

You can see that we made the bottom shelf taller, so I can put bigger accessories and books down there.

There’s still SO MUCH to do. At least it feels like it. I am painting the back of the built ins a different color, so I’ll do that next. Then we need to install the header across the top, pull the wiring through and install the lights. Then the trim will go up (basically everywhere) and after that the JOYUS job of priming and painting. :)

Seriously can’t wait for that. Yay.

Considering where we started, I guess that to do list isn’t too bad:
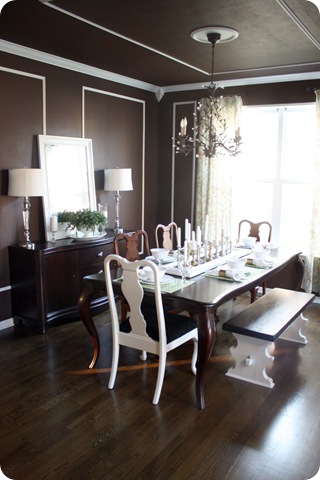
chocolate brown dining room

I’m already more in love with it this way than I was as an unused dining room:

DIY built ins bookcase

It’s coming together! It’s going to take 12 months, but it’s coming together!! It would be so lovely to decorate these (finished?) bookcases for fall! But I’m realistically shooting for Christmas. :)

I’m sure I forgot some of the details, so if you have any questions on the progress so far, let me know and I’ll answer them in the comments.

Speaking of questions, I’ll be answering them all day long (until 5 p.m. EST) over at the True Value Facebook page tomorrow!

true value blog squad

Come on over and ask away! I’ll do my best to help you out! :)

Holla!

Sunday, August 5, 2012

August Before and After Party!

Hello all! How was your weekend? We took a little family trip to Chicago for a few days of shopping, eating, Legos (the store and Legoland!) and just enjoying each other. It was just lovely. Perfect way to end our summer, cause both my boys (the hubs and the Bub) go back to school very soon.

And I told you I don’t want to talk about it!

;)

Anyway, it’s time for the August Before and After Party, and I always love to see what you’ve been up to! First, let’s check out a few of the projects that caught my eye last month.

Lina prettied up her pantry in a big way, and made it super organized as well:

I must find more things to put chalkboard labels on. They make everything cuter. Ever.y.thing.

The exterior of Erin’s townhouse got a paint job, and I LOVE how both her front and back doors are painted a bright yellow:

Yellow front doorBack porch after

How fun are they? I also love the simple globe light fixtures with the modern colors. You can see more about this big redo here.

Laura’s dining room underwent a HUGE transformation, all thanks to the power of paint. Check out the dark before and the beautiful after here:

That buffet is just gorgeous too, and the styling is divine.

Kim gives a great how-to on trying out Annie Sloan paint for the first time here. Her formerly beige dining room side table looks so fresh and pretty!:

Chalk Paint table

And again, aren’t the accessories lovely?

I’m so excited for Jenna and her staircase redo. Tearing carpet off of stairs is just about one of the best feelings ever:

Ah, so fresh! So clean! Love it! :) You can see more about this project here.

And finally, I was swooned over Jessica’s colorful living room:

The live edge coffee table, the dark blue gray walls, the pops of red everywhere – I just love this space!

(If you’d like to pin one of these projects, I ask that you visit their blogs and pin from there!)

Beautiful projects and spaces all around, and now it’s time to do it again! Remember, if you’d like to be considered for a highlight, please link to TDC using this button:

<div align="center"><a href="http://www.thriftydecorchick.blogspot.com/" title="TDC Before and After" target="_blank"><img src="http://www.homestoriesatoz.com/wp-content/uploads/2012/03/beforeAndAfterButton_thumb1.gif" alt="TDC Before and After" style="border:none;" /></a></div>


Here you go – the linky will be open until Sunday the 12th!


Thursday, August 2, 2012

Mondo Gift

So much to share on the Mondo Adventure (currently one day behind schedule due to sick children).  Pulled into the motel at midnight--but can't let another day pass without sharing the joyous news!

Will and C. had their baby!!! 

I'M A GRANDMA!!!!!

I'll never forget anxiously waiting for news through the day, getting the big call while driving through South Dakota, then pulling over in a lightning storm to access McDonald's wifi and see her picture.


What a beauty!  Truly a gift from God!

We are so in love!

Red, white and blue? (Chip It powder room)

Hey hey! I’m back with an update on the plan for the powder room redo. It’s been a long time coming and I told you about the sorry state of this room back in this post.

I showed you how I used the new Sherwin-Williams Chip It! tool to find colors from this artwork the Bub painted:

It’s serving as my inspiration for this room. Thing is, the colors are definitely outside my comfort zone – they are brighter than I usually go with, but that’s kind of the point. I want to do something different in here and I think small spaces like a powder room are the perfect opportunity to do that!

To sooth my color jitters a bit, I did a search of blue and red rooms on Pinterest, and it definitely helped. :) I am going for a classic (not necessarily Americana) but fun look in this space and seeing these spaces calmed my nerves.

They are lovely!:

Isn’t that a sweet, comfy room?

This is one of my favorites – check out those gorgeous drapes:

166492517444724831_ZEtrBEBn_f

(source)

I love the way all of the prints work together too.

The walls in this space are close to the current walls in our bathroom:

(source)

My plan is to keep the light blue ceiling in here to tie everything together, and this shows me it can work!

This blue is a little brighter but also works:

And here’s yet another light blue wall with the red touches and it doesn’t scream Fourth of July to me at all:

(source)

I think this color combo is just a total classic and I’m getting really excited to make it work in our powder room!

Here’s a reminder of the colors that Chip It picked out from the artwork:

Sherwin Williams chip it

They were actually spot on – they matched the art perfectly. The Fireworks color was a little more pink than I wanted for this room, so I went to the paint chip and the next darker color was perfect.

It’s called Heartthrob and it is FUN! I thought I would test it out first to see what I thought, so I grabbed the one and only accessory I currently have in this space, my little tray I use for extra TP:

I sprayed it down with a quick coat of primer (to hide the print) and then did two coats of Heartthrob. Against the light blue wall, with the white toilet, it gave me an idea of how this color scheme will work look in this room:

I dig it. :)

The Bub’s art will go in the room somewhere, and you can see how well it works here:

IMG_2363

The Heartthrob color picks up the darker tones in the art, the Fireworks color matched the lighter ones.

So are you seeing my vision?? Maybe I’m not so crazy after all! :)

(We’ll see about that…)

You can check out the Chip It tool yourself if you haven’t already! Just drag this little button next to your tool bar on your computer screen:

Chip_It

And that’s it! You’re done! You can click that button whenever searching the net to find Sherwin Williams matches from any photo. You can also upload your own picture like I did.

I’ve already started the painting and wall treatment in here and I can’t wait to show you. It’s bold but I love it! (You can see my plans for this room at my powder room Pinterest board here.)

I’ll update you soon on the progress! Have a GREAT weekend!! Enjoy the summer, it’s slipping away! :)