Tuesday, July 24, 2012

Stick a fork in it (The basement is done!)

Well, almost. :) Done enough I tell you! Today was the day – the carpet was installed in the basement and we have been so excited about it! I know I’ve said it about every big part of the basement reno, but the carpet made such a HUGE difference.

I talked about our plan for the basement flooring back here when we had a different carpet picked out. Since then a new one came available that was SO much softer and only $200-something more than our original option.

It’s a Mohawk carpet, and the design is called Honored Tradition:

Capture

We went with a lighter carpet with a gray tone to it. I chose this one because our upstairs carpet has a really slight gray undertone and I LOVE it. I brought this sample upstairs to match that color as much as possible – but this one is much grayer (and a bit darker).

It has a slight design to it, but in my pics you really don’t notice it. I’m so glad I changed the plan at the last minute cause this is soooo much softer than the first one we had picked out! We upped the thickness of the padding too so it’s super cushy down there.

LOVE. And by the way, it is not lost on me that I couldn’t wait to get rid of the carpet on our main level last fall (for the hardwoods after a leak), and now I’m thrilled about carpet. :) We were just so tired of those cold, dusty cement floors. So. tired.

Here’s some before and after pics of the basement – it’s come a long way in the past seven months!! Bear with me though because things are still very basic and I kinda just threw toys on the shelves. I spent the whole day putting the room back together. :)

Here’s a shot of my craft area before:

And that same spot now:

Mohawk carpet honored tradition

Little different, eh? :) OH my goodness, I am so thrilled!!

Those who are super observant will notices my DIY craft table got moved. I changed things up a bit, and I love it so far. I’ll talk more about that soon!

This was a shot of the basement last year, into what is now the family room area:
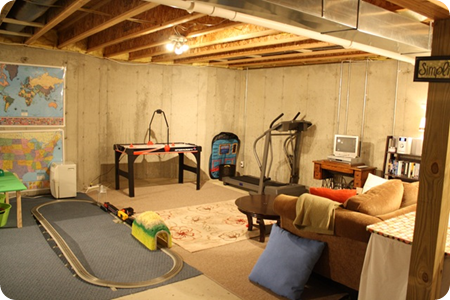
This is that same spot now:

basement carpet

One of my favorite parts of having a finished basement? Getting rid of all those random rugs and carpet remnants. I think we had eight of them down there and they were so gross from the drywall dust!

The Bub’s toys used to line the “wall” of our storage area:

plastic shelving

And now that area (to the right) has an actual door and walls. ;) Best. things. ever.:

Mohawk carpet honored tradition

I got rid of so much stuff, there’s not many places to sit down there. :) We have a solution for that, but we have to figure out if we can get it down the basement steps first. (Crossing fingers.)

This was a picture of the length of the basement before, and it shows how how far back it goes:
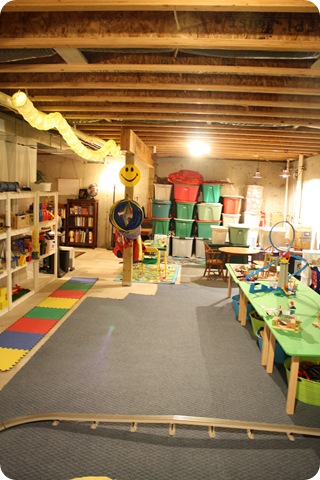
That area is segmented into rooms now – most of which are still awaiting finishing. :)

Mohawk carpet honored tradition

Those doors still need to be painted – I’m going dark!

Here’s another photo of the opposite direction:
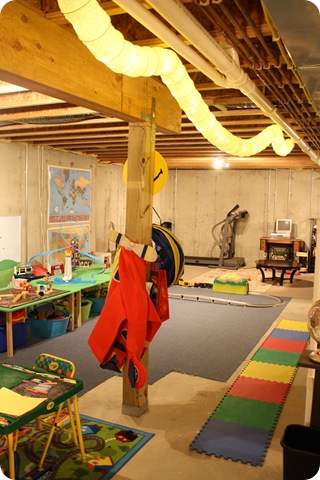
basement play area

And how it looks today:

Mohawk carpet honored tradition

It keeps striking me that the space looks so much bigger with walls, ceilings and flooring. You would think they would make it feel smaller? But I think it feels massive now! Of course that will change as we fill it back up with items, but I do want the family room to feel cozy and warm so I’m good with that.

I can’t believe it’s (pretty much) done!! There’s still a very long to do list. Lots of painting yet to do, tiling two rooms, moving the washer and dryer, lighting in the laundry and bathroom, a sink, toilet, trim work…and I haven’t even started all the fun decorating projects I have planned for this space. I cannot wait to have some fun with it instead of constant DIY projects. ;)

Once I compile all the receipts I’ll do a final post about the whole basement finishing process and how the costs came out. And there’s one final BIG project that we’re working on this week that I can’t wait to show you!

So what do you think? Big changes huh?? It feels like forever since we started but it’s only been about seven months. I think it will be a good nine or ten months before it’s completely finished, but having dust-free, cushy flooring underfoot feels like the final frontier. I have been fighting the urge to roll around on it all day. ;)

Sunday, July 22, 2012

DIY art (reusing an old canvas)

Hello there! Happy start to another week! Can you believe it’s almost the end of July already?? Unreal. Today I’m sharing another project that I’m TOTALLY in love with. I’m totally in love with the price too – FREE. Awww. yeah.

When we had some of the downstairs walls repainted last month, I had to figure out what I was going to do with the large rectangles I had created with molding above the living room sofa (sorry about the old pic, I couldn’t find a newer shot):

I’ve had it up there for years so I was kind of feeling like a change, but I wasn’t sure what kind of change. Thing is, I knew if I left it as is then I did take the trim down later, I would end up with the pinkish wall color behind that molding that I would have to paint.

So to avoid that, I took all the trim down before they painted – I figured I could put it back up pretty easily if I wanted.

After the wall painting was done, it wasn’t long before I couldn’t handle the empty wall, so I went ahead with an idea that had been growing in my head for awhile. ;)

I had a large canvas art print I had purchased years and years ago on clearance that wasn’t really my style anymore. I almost took it to the consignment shop a while back, but decided to keep it with ideas of reworking it.

So rework it I did. :) I started by priming it a couple times:

priming canvas

Then I grabbed as many colors as I could find in my stash that worked with that room. I wanted mostly aqua and blue tones but also wanted to pull in the wall color in the room.

So the Bub and I opened them all up (I think we used seven colors total), and I would pour paint on the canvas (totally randomly) and he would paint:

DIY canvas art

At first I thought, what in the heck am I doing?? But then…the more we poured and brushed, the more it came together.

And I tell you what – it was FUN! We were making art! :)

I figured out about half way in that I needed to keep a “wet edge” on my paint brush –- otherwise the paint was pulling a bit the more I added to the canvas.

So I got a cup with water, and I would dip the brush in, then paint, and it went so much better. It kept the paint really smooth and easy to work with.

When we were done (and it was hard to stop!!), I couldn’t have been more pleased!

You can see on the left where it was pulling a bit, so the paint wasn’t as smooth. On the right, it’s more flowing:

And when all was said and done, I actually like the combo of the two textures. I totally meant to do that. ;)

I was trying to have the colors continue onto the sides perfectly, but I just ended up painting them when I was done:

reusing art canvas

I LOVE how it turned out – we are arteests!! ;) DIY art blue cream

The Bub thinks it looks like clouds (he kept telling me as we were working on it, which I thought was adorable). I think it looks like waves – either way I think it turned out pretty darn beautiful. :)

I love that the texture of the original art still shows through too:

blue DIY art

Of course it’s not nearly as wide as the molding was, but I think it works well on that wall. At first I was going to make another large rectangle around it and paint it out white, so it “frames” it a bit. But now I’m not sure – I’ve decided I’m going to live with it as is (by itself) for a while and see what comes to me:

DIY art canvas

I may go ahead with the trim, I may do a couple large sconces? I’m not sure, but I know with time the right thing will pop in my brain. It may be years. ;) But until then, I’m enjoying it as is!

I can’t believe we created this – it’s so fun to tell people we painted it. :) I know I say this a lot, but this could NOT have been any easier to do this. There was absolutely no rhyme or reason to it – we just swiped the paint back and forth, added more, painted back and forth, over and over till it was covered. (And it’s not even covered perfectly.)

When there was too much of one color in one area, I just poured on another and brushed it in. Like I said – it was a BLAST. I truly enjoyed it. And may do it again. ;)

Have you ever created your own art? Did it turn out how you hoped it would? Better? Worse? :)

Saturday, July 21, 2012

Update

Oh my!  We are living in the fast lane, but having a true mondo adventure!  Our time in California and Arizona was nothing short of amazing--thank you to all our family and friends who spent time, money, patience, adventures and floor space with us! 

Long day of driving, currently in the great state of TEXAS!  Lizzy flew home from Phoenix today--we miss you already Lizzy!  The kids are traveling well (thank you inventor of DS)--they do miss their daddy--how we wish he could have joined us on the trip! 

A few pics from Kim's camera (I haven't yet downloaded off my own):


Thursday, July 19, 2012

Chip It! (And the powder room plan)

Soooo…remember that loooong list I made weeks and weeks and WEEKS ago? Well, it’s still not done. Mostly done, kinda. But not done. I did get some big things off the list, and one of them was the powder room that’s been in shambles for well over a year now.

Shambles my peeps. A YEAR. Year and a half now? I thought it was less, but no. A good 18 months.

It started out like this:

It was fine for a while, but geesh, it was SO dark. And brown. With more brown.

And then one day I could not handle it anymore. The trim in here was never done to my liking (more on that in another post), and I was just SO OVER the chocolate brown.

So I decided to take the trim down and paint it. And I got as far as the ceiling:

It’s sat like this (notice the fan cover missing?), with meeeellions of holes in the walls, random stencils and curiously enough, those chocolate brown walls I couldn’t stand anymore (hmmm), for about six months.

This is because I came up with about 50 other things I want to do in this little room…so I kept putting it off.

Then last fall I was having a party and freaked out and slapped a coat of paint on the walls. And by “slap0 a coat,” I mean no cutting in, brown bleeding through, painted around the mirror and didn’t even take it down, “slap.”


And I thought that was better than the dark brown??? Oh my.

I liked this look so much, it stayed like this for nine more months. Did I say this room has been a mess for 18 months? I meant two years.

Anyway,  a couple weeks ago we had another party and I was SO fed up, I finally cut in and then took the mirror down and finished the first coat I started eons ago:

blue powder room

I didn’t even do the second coat though, because as I was painting I was deciding I didn’t want to keep it this color. That’s what it’s like living with me people…aren’t you glad you don’t have to? :) I mean really, it’s been two years, it’s time for a change.

Yes, I’m serious.

I am moving to gray/blue tones in the rest of the house and I want this little room to be FUN. So I found my inspiration for the FUN – a painting the Bub painted for me for Mother’s Day:

I know, it’s brilliant. I know.

I love the colors in the painting, and I am determined to use at least a couple of them. Bear with me – it’s going to be good. (In my head it is.) There’s lots more going on in here I’ll tell you about soon, but for now I need to figure out the perfect paint color.

That’s where Sherwin Williams comes in. They wrote me about their new Chip It tool and I tried it out and was HOOKED. This thing is fun fun FUN!!

To use it on your computer, just drag this little button to the tool bar (on my computer it’s the area right next to the box for web addresses):

 Chip_It

It’s a lot like the Pin It button for Pinterest – it takes two seconds.

And then wherever you are online and find a photo you love and are inspired by, you can click that little button and “paint chip” it. They’ll give you five to 10 Sherwin Williams paint colors pulled from the photo. How cool is that?

IT’S AWESOME. You can upload personal pics, like I did using a photo from our recent vacation:

purple sunset

Or you can just use any photo you find while surfing the Net. This is one I found on Pinterest, and loved because of the colors specifically. The Chip It tool does all the work for you:

orange, blue, green playroom

I love the Navel, Parakeet and Lagoon colors! I have had SW paint decks for years, and I’ve never seen those colors once – funny how you don’t see how well colors work until they are next to each other. I absolutely LOVE them together!

So I used a photo of my son’s Picasso-like talent art to Chip It again – and it pulled out a perfect reddish pink color:

Sherwin Williams chip it

It’s the Fireworks color and it’s not too red, not too pink (this is a room the hubby and kiddo use after all). I’ll have to take a look at in the room to see how it works, but I thought the Chip It pulled some really pretty colors from the art.

Isn’t that fun? I’ve been using this tool for a few weeks now and am so excited to keep going – it will be PERFECT to use while surfing Pinterest. Can you imagine?!

So, do you think I’m crazy for the blue/reddish idea? I swear it will come together…I’m willing to place bets. ;) At this point, I’m just happy that after three years I have a bathroom that has a fan cover and looks presentable, at least at first glance. Don’t look too close, please.

I’ll update you soon on the rest of the plan for this room! I’m REALLY excited about it! :)

Tuesday, July 17, 2012

California, Like, Totally For Real!

After a bit of a cranky first day, we are having a fantabulous trip!  So much to tell, so little time.

Lots of time with BFFs, family, beaches, pools, skateparks, and Hollywood!


I will say the Honda Pilot is crowded MUCH--you know you have too much stuff when you start calculating the square centimeter-age of items you are considering donating to the dumpster at the next rest stop (you can't see it, but the kids are actually sitting  on a sleeping bag!).


Craziness update and more pics soon! 

Two best quotes of the trip:

1. Lizzy:  "Who needs leg room?  We can just cross our legs!"

2. Vu:  "Daddy's gonna be SO mad!"  Me:  "Why?"  Vu:  "Cuz his car is a MESS!!!" 

Knockoff sunburst mirror

Well hello! I’m so excited to share this little DIY project with you all (y’all? Can I be southern for a moment?) because it turned out JUST how I envisioned.

I told you back in this post how I tend to buck trends (decor and otherwise) – either I just don’t add them to our home or I do it reeeeeally late, well after they are cool. That is just how. I. roll.

Same goes for this project. I actually came up with an idea to create this gorgeous Ballard Designs sunburst mirror months and months ago:

ballard knock off mirror

I even bought the pieces to make it, figured out how I was going to make it, and almost started…but then it seemed like I was seeing them everywhere in blogland. Sunburst mirrors are fantastic, so I am not surprised they were all over the place.

But I’m annoying, so I waited. :)

When we had our big tall walls and stair case repainted a few weeks ago, I knew I wanted to change up the decor on the huge wall at the back of our stairs.

Soooo…I figured these would be perfect. I gathered all my materials (again) and started figuring out how I wanted to put it together (again). I began with cedar shims from my local True Value:

shims

I was psyched cause they carry the longest shims I’ve ever seen (about 14 inches I think?) so my plan was going to work out even better than I thought! Buwahahahaha.

I wanted to make the same shape the Ballard mirror had, so I laid two shims together, touching at the bottom, wider apart on top. Then I laid one more on top and glued it on to hide the open area:

how to make a DIY sunburst mirror

I used hot glue for the entire thing and it held great – wood glue works too, but you’d have to wait for it to dry and I have zero patience. :) I used a TON of hot glue, just to make sure everything was secure. (And that’s the reason the lovely kitchen towel is under every pic.)

The bottom of each trio of shims is hidden eventually, so you can use up those that are beat up a bit:

how to make a DIY sunburst mirror

Oh, and I made that one that goes on top stick up a little bit over the tops of the two, just like in the Ballard version.

Then I took a scrap board (you can find something similar in the wooden area at the craft store – for my second mirror I used a round wooden piece) and started gluing the sets of shims on. I started with four, then added four more on top, then an additional four on top of that.

It was all about filling in the open space:

how to make a DIY sunburst mirror

Then it was time to flip it! If  you use long shims like I did you need to finesse the flip a little. ;) When it’s turned over, just add single shims to fill in some of the empty space and glue them to the back of the entire thing:

make a DIY sunburst mirror

I could have kept going, but I liked having a bit of space between some of the wood.

I flipped it back over again, then glued another piece of scrap wood on top of everything:

how to make a DIY sunburst mirror

Then it was time to paint! This actually took more time than all the gluing, just because I tried to get in the little crevices. If you were smart you’d do this first, but I’m a stickler for the hard way obviously. :)

I mixed some of my sample of Annie Sloan chalk paint in Paris Grey with water and brushed it on. I didn’t want it to cover perfectly, since I wanted more of a rustic look. The mixing with water helped to give it a bit of a wash instead of opaque coverage. I picked the grey for a more neutral look, but any color would look amazing!

After the paint, I used a mirror glue (make sure to use the mirror version -- regular adhesives may eat away the back of your mirror) and gooped it up:

how to make a DIY sunburst mirror

I found 12 inch mirrors in the candle area at Hob Lob (half off!), centered them right on top and then let it dry for hours. A little hanger added to the back and they were ready to go!

I LOVE love LOVE how they turned out!!:

DIY sunburst mirror Ballard knock off

They hang in the two large squares I installed in our staircase eons ago:

DIY sunburst mirror

I was actually considering taking those down because they are NOT my best work. ;) They were one of my very first DIY projects in this house and up close they aren’t as good I as would like.

But for now they are staying! ;) I LOVE how well the mirrors work inside of them:

DIY sunburst mirror

I personally love the rustic look, and that you can see the varying textures in the wood:

DIY sunburst mirror

The make a HUGE statement for very little money. It is so hard to find huge art to fill a big space (that isn’t crazy expensive)!

You’ll notice my little quote on the gallery wall is gone – it had to go when we had everything painted:

DIY sunburst mirror

I left it open for now because I’m debating if I’ll put up something different or just rearrange the photos.

I seriously ogle them every time I go up or down the stairs:

So here’s the comparison side by side – the Ballard version that is 48 wide and $350, and mine that’s 34 inches and cost $10 each:

Ballard designs knock off mirror knock off sunburst mirror 

Hellooooo, that is AWESOME! The cost was $4 for two packages of shims from True Value, the $5 mirror from Hobby Lobby and the scrap wood for the base. I had everything else.

Sooo, I’m about a year late on the sunburst mirror trend, right? And I’m sure I’m not the first one to figure out how to make it this way – but I LOVE how they turned out! And I love figuring out how to save $340 on something I love. :) Best part, yes?


I was one of the bloggers selected by True Value to work on the DIY Squad. I have been compensated for my time commitment to the program as well as my writing about my experience. I have also been compensated for the materials needed for my DIY project. However, my opinions are entirely my own and I have not been paid to publish positive comments.