Wednesday, February 29, 2012

We’ve been framed!

Hey hey! How are ya?

I mentioned recently that we’ve had some actual progress happenin’ in the basement over the past couple of weeks. It is SO exciting!! The very first project was framing out the bathroom and storage room.

We did it that way because I was trying to figure out how big to make the laundry room. Initially I had planned to make it all one room – storage, exercise, craft stuff and laundry:

(It’s that room in the upper left corner.)

But as we looked at the space, we decided a smaller storage room would be a better idea. (I LOVE IT.)

I was still planning on fitting the exercise stuff into the laundry space, but I quickly realized it just wasn’t going to fit. And even if I did make it fit, did I really want to exercise in a teeny tiny room away from everyone else? It’s sad enough when I do it, who wants to make it worse? ;)

Sooooo…we ended up with a laundry room and only a laundry room:

basement love

(If you couldn’t tell, it’s the room with hearts in it.)

And I am SO EXCITED about it I could pass out. Seriously, Elaine Benes ugly dancing in the room excited.

It will be just for laundry and folding and hanging and dancing. Much dancing. I do believe I’m actually excited to do laundry. What the HECK?

We weren’t going to frame out the rest of the basement till next week, but a couple of weeks ago the guys who are doing most of the work called and said if we could do it last week they’d knock some of the labor cost off.

Heck to the yeah.

So now the lovely laundry room is ready for plumbing and electrical:

I’m still deciding where the washer and dryer will go. I’ve changed my mind three times now. Again, I’m thankful we’re doing this little bits at a time so I can figure this stuff out. ;)

The laundry room is slightly bigger than I had originally planned because at the last minute I decided that I wanted the door to be 36 inches wide:

framed basementWide enough for me to carry our big laundry baskets through without banging into the door frame. Hollaaaaa!!

The bathroom configuration changed a bit too, because of a support beam that was in a weird spot. Now it’s much longer than we had planned:

More than eleven feet long! I’ve already come up with a way to use some of that dead space though – the plastic shelves will be replaced with built ins and will hold our extra cleaning supplies, paper goods, all that good stuff.

We only paid our builder to rough in a partial bathroom down here – but they ended up putting in plumbing for a bathtub/shower too:

bathroom basement rough in

(The drain is covered because the only spiders I’ve ever seen down here were the week after we moved in and they were coming from there. That hole totally freaks me out. It’s been covered for eight years.)

I opted for a shower instead of a bathtub, mostly because I wanted as much room in the storage area as possible (and a shower is smaller). But also because, really, we don’t need a bathtub. Most likely the only people using it will be guests and I don’t see them taking a leisurely bubble bath down there. That would just be…weird.

A few of you have asked how we are dealing with the heat issue in the basement. When we moved in, they had vents open and we had them closed up (because we were never down there eight years ago and didn’t want any valuable heat wasted).

A couple weeks ago we got some vents from Lowe’s and cut new holes in the duct work to install them:

installing heat vent in ductwork

I used metal snips like these to cut it:

image

It’s not pretty under that vent but it got the job done. ;)

We would not have done this if we didn’t know the space would be finished soon. It’s already helped a ton, and we hear the drywall will help a bunch too. Someday we plan to add some kind of electric fireplace to the family room area as well.

So now I need your help! Next up is lighting – they’re coming by this week to find out how many lights and outlets we want. The outlets I’m pretty good on, but I’m struggling with the lights.

It’s a lot of pressure! I have a chance to do whatever I want and I’m kind of frozen. ;)

We’re doing mostly recessed lights of course, but from what I hear on HGTV lately (is it sad that’s my only resource??) the new thing is the smaller, four inch lights instead of six inch: image

I don’t really care because we have the six inch in our kitchen and family room and we don’t mind them all. But I do like the look of the smaller ones when I look at pics. I also like the idea of having some wash the walls with light too…

Now we’re thinking of adding the larger (six inch) lights in the main areas, and the smaller ones along the bulkhead. (We have one that runs the entire length of the basement.)

I’m also trying to figure out how many – I’m leaning towards a LOT. Can you have too many lights in a basement? I’d rather err on having too many than not enough. (Of course, everything down there will be on dimmers.) I wish we would have added a bunch more recessed lights throughout the rest of the house, so I don’t want to make the mistake of not enough again. We have the ability to add pretty much as many lights as we want -- we had a dedicated electrical panel installed so we wouldn't have to worry about over doing it.

There will be a couple rough ins for drop down lighting – over the craft table and maybe in the laundry room. The ceilings are less than eight feet down there so that will probably be it.

And switches – I want lots of them! ;) I love the idea of main light and then separate ambient lighting as well. The guys are going to love me when I tell them my plans. ;)

So that’s where we’re at right now. We need to give them a fairly concrete plan on how many and locations by the end of this week, but I can adjust details as we go.

I cannot WAIT to get more light down there! I think it will make just as much of a difference as the actual walls will. For years we’ve used random lamps everywhere to keep it bright, but this will absolutely transform the space.

If you have any advice on lighting (sizes, how many, task lighting, etc.) I’d really appreciate your thoughts! Like I said, this is one area I’m not quite as familiar with, so I want to make sure we’re making good decisions. (Thanks in advance!!)

Hopefully I’ll be able to show you a new bright basement in the next couple of weeks!

P.S. A few of you have asked what floorplan program I’m using and it’s this one. It was $5 but I’ve found it to be WELL worth the money.

Monday, February 27, 2012

Trimming out the drapes

Well hello! Hope you had a lovely weekend! I got a project done that’s been harassing me for months. Well, not really. It just seemed like the window in the living room that had been nekked forever was mocking me every time I walked by. And the extra fabric I bought six months ago to go on it was yelling at me to JUST GET IT DONE.

Sheesh. Chill out already!!

Anyway.

You might remember when I changed out the drapes in the living room. They absolutely transformed the room and brought it from the dark into the light!

Because I was trying to save some cost on the fabric, I ended up cutting each length of fabric in half and used the halves for the new drapes. (Instead of buying double the yardage, I just bought enough for one window and cut the fabric in half length-wise).

But the skinny skinny panels were starting to look pretty…well, skinny. Wordsmith, I know. ;) I hadn’t even lined them yet, so I waited on that to decide how I wanted to change them up.

I went back to Calico Corners hoping to find something that I could use on each side of the panels to beef them up a bit. I couldn’t find a solid fabric that worked, but I did find a stripe that matched perfectly:

Calico Corners fabrics

Every color in the stripes is in the fabric and I couldn't believe how well it worked! Although I must say it had me a bit out of my comfort zone. But I wanted to try a little something different so I went with it.

Six months later. ;)

Turns out my DIY craft table in the basement is a PERFECT sewing table! Up till now I’ve been sewing upstairs in the guest room because it has great light. But I use an ironing board and it’s not exactly the best set up.

This worked great!:

IMG_0213

I only got enough fabric for one window, knowing that I would cut it into four strips – two for each window. (There were exactly four sets of the stripes across the fabric.)

I thought sewing a straight line along straight lines would be pretty darn easy, but. no.

I’m here to tell you the lines that aren’t straight will NEVER be noticed after all is said and done. I promise. If the straight line eludes you and keeps you from trying to sew, please don’t let it!!

I sewed a strip of the stripe (huh?) on one side of print fabric, then lined them all (with lining I’ve also had forever).

I tried the stripe on the outside first, but liked it on the inside of the windows much better:

adding striped trim to drapes

All of the colors on the striped fabric were a bit too much at first, so I just tucked some of it behind and clipped it back there with the drapery rings. I was not about to cut them down and resew them. SO not about to.

I absolutely LOVE the bit of contrast along the insides of the drapes:

white bookcase

The dark blue green color pops, and the lighter green beside that kind of disappears in the light coming through the window.

I still can’t believe how perfectly the colors matched!

I wanted to add a little somethin’ to the windows and it turned out better than I had even hoped:

jacobean hardwood floors

I even notice them more now – that little bit of color made a big difference!

I’ve been changing things up in here over the past year, and there’s still a few more projects in the works. One BIG, one medium one and one kind of easy one. ;)

That’s what I say now anyway.

If you’ve been around long you know I love to look back. Early last year the room was dark with lots of black and red:

Wow, what a difference a year makes!

The room looks completely different now – and the wall color and the sofa haven’t even changed. I’m LOVING all the color in this room now!:

bright living room

The floors don’t hurt one bit either. ;)

Now I just need to find a stinkin’ rug that doesn’t cost a thousand stinkin’ bucks. I was thinking a large print at first, but now I’m leaning toward something very neutral. The colors in the drapes and accessories are plenty!

Stay tuned for more updates…hopefully it won’t take me another six months. I make no promises.

P.S. I’m honored that someone thought to nominate TDC over at the Apartment Therapy Homies!:

I don’t ask this often, but I would love your vote! You can go here to do just that if you want. :) THANK YOU!

Friday, February 24, 2012

My new favorite room

Happy Friday and how the heck are ya? I’m ready for a weekend of NOTHING because I’ve been working my tail off on the basement for the past week. Lots of good stuff has been happening that I can’t wait to show you!!

But I had to share the best first. It’s a little ridiculous how excited I am about this part of the basement. I’d be more than a little embarrassed if you had seen the happy dances I’ve been doing in this room over the past couple of weeks. ;)

But there have been many happy dances.

Welcome to my little piece of heaven…the storage room:

basement storage room

Isn’t it BEAUTIFUL? No? Well, I think it is. ;)

I wanted to share it now, before drywall, so you can see the whole thing. (I know you would be sad if you couldn't.)

That pic above is taken standing in our future laundry room. (I know many of you are curious about our reasoning on that, so that’s an upcoming post.) I am full of absolute JOY at the thought of a dedicated laundry room, but let’s talk storage for now.

This part of the basement was framed in last week, and we did this first so we could decide how to make the laundry room work. I’m finding I’m SO GLAD we are dragging this process out a bit…doing one step at a time has allowed us to figure out exactly where we want to put each wall, each outlet, each light. I’ve changed my mind where one wall was supposed to go three times, and the final result is perfect.

If we had done it all at once I am pretty positive I would have wished we had done something different. Because we’re taking it slow we get to live with it for a bit along the way and figure out exactly how we want things.

Anyhoo, her she is, the beauty, my “store”:

storage room with shelves

This room houses our drain and sump pump, so it will stay unfinished. There won’t be any drywall on the interior, no flooring, no finished ceiling.

But I think it’s beautiful. ;)

They weren’t even going to frame out the back wall, but I know I wanted to hang shelves everywhere, so I asked them to do that as well.

I wanted to maximize every bit I could, so I made a small bench that I put over the sump (tall enough to clear the pipes) and piled a few bins on top:

These are the only bins that don’t fit in the under the stairs storage. I am delirious. :)

I made the bench with scrap wood from the garage and extra butcher block from our kitchen island. (And all I gotta say to Stink Eye Sis is nannynannybooboo, told you I’d use all that scrap wood! Booyah!)

I got the wood at Lowe’s and cut it down, then hung the shelves with simple, cheap brackets:

I went as high as I could, knowing there wouldn’t be a ceiling going in. The tall stuff goes up there in between the rafters. Beams? I have no idea what they are:

And I had room to store all of my paint along the bottom:

Why does this make me so happy??? It does.

I used to tie back all of our drapes, so I have a ton of hardware left that I used. Years ago I came up with a way to use it for organizational purposes:

storage tricks

I hang them high and then put long, hard to store stuff across. Like curtain rods, cord hiders…whatever.

I’ve had this pretty pair for about ten years:

I got them on clearance at Pottery Barn, and have kept them all these years cause I think they are beautiful and I want to figure out a way to use them. For now, they hold more long stuff. ;)

Remember my craft area down here?

basement craft area

I’ve purged and reorganized SO MUCH. Most of the items on the shelf to the right are still in the basement, just in another spot. The next shelf was tools and all of those went up to the garage last year. The rest? PURGED. It used to take four sets of shelves (plus a small table for paint supplies) to hold everything.

Now it’s all in this six by seven foot space, neatly organized:

(Plus TONS of other stuff that was elsewhere!)

What’s even more awesome is that about a third of this will go up in the dining room when it gets the big transformation this year.

So there will be more space on the shelves so I can buy more stuff keep it really organized. ;)

Our house has always had plenty of storage space (hello, unfinished basement!), but it’s never had a storage room – a room with a door and walls that I can close off and not have to look at. THIS is what makes me giddy!

And seriously, if I’m this excited about a totally unfinished room, the basement is only going to get better from here, right? :)

This weekend I hope to get an actual pretty project completed. It won’t be as awesome as this (what else would be?), but pretty. (I hope!)

Hope you have a great one!!

Wednesday, February 22, 2012

In the air

white pitcher as vase

Hey there! Have you seen all the closet posts from earlier this week? You MUST check out those links! I’m truly inspired!

I took the dog out this morning (without a coat!) and couldn’t help but notice all of the buds on the trees and plants!! Uhh, am I wrong or is it still February? It has been the mildest winter for us, and I although I thought for sure we’d get a nasty dose of not-so-fast by now, so far so good.

It’s been so nice lately, I can’t help but get excited about spring. Normally that would be just cruel, but this year, it seems more acceptable. ;)

I love adding fresh flowers where I can in the house, but it’s usually in the kitchen, where we can enjoy them best. I have a couple places I love to keep flowers in there, no matter what time of the year. They just make me HAPPY.

I’ve shopped a few places over the years, and our local florist has an incredible selection, but they are not cheap. I always end up going back to Trader Joes – their prices can’t be beat! They make it easy to add some fresh around here.

For years I wasn’t great at arranging flowers, but over time I’ve figured out tricks that work. I started with a simple bouquet for only $4:

My first step is always to use the floral “food” they put in with the flowers. Although I’ve heard if you just crush up regular aspirin -- it inhibits the growth of bacteria and keeps them pretty longer.

I can usually keep flowers for about two weeks, and even then they are still looking OK, they just kind of start falling apart.

And 90 percent of the time, I’m a all one flower kind of girl – I think an arrangement of one type and color makes a BIG impact.

I used to just take them out of the package and plop them in:

But really, they don’t look too happy that way. ;)

So I start snipping (I hear cutting them at an angle under water is best) until they are the height I want. And I separate each stem so I can put each one individually:

tips for arranging flowers

I like to cut the ones in the middle a bit taller than those on the sides, so they make a nice mound of flowers. :)

I also pull off most leaves, at least those that will be under the water:

how to arrange flowers

I heard once that it helps the water from getting mucky and it works well for me.

A few minutes of cutting and fluffing, and you’ve got a perfectly lovely little arrangement:ball jar vase

But this time, I had some green mums I was going to use elsewhere, and decided they would look pretty perfect combined with the purple (say that three times fast):

green and purple flowersNow it’s even MORE lovely!

Obviously I changed out the vase to my white Target pitcher. (You can see how I started with a different DIY pitcher here and how that one eventually failed here.)

The $13 Target version has held up great:

butcher block island counter

I also picked up some forsythia at TJ’s, which I’ve never tried. I wanted a tall skinny vase for that one and remembered a cheapy one I’ve had in my stash:

floral vase redo

I think it came with Valentine’s flowers (thanks dear!) and I’ve always loved the lines of it. It just needed some updating.

I primed it once, and then used my gold Valspar spray paint from Lowes to give it a little makeover:

gold spray paint

I think the design is just the coolest!

I’m not sure how long it will take the buds to open, but you can already see the yellow peeking out a bit:

forcing forsythia

I’m hoping in a couple weeks it will look something like this:

for (source)

Have you ever tried forcing forsythia?

When it’s in the budget, a few flowers go a long way to making me and our space happier. ;)

It also helps when I clean off the MASSIVE PILE on the island too:

butcher block island

Just sayin’. And that’s totally free. Gah.

Another little trick I sometimes use is to put a plastic grocery bag down in the vase if the flowers are too short. It gives them something to “stand” on and makes them even fluffier. :) And I love me some fluffy flowers.

Do you treat you and your house to flowers every so often? Do you have a favorite?Any floral arranging tips? Do tell!!

And now let us all send good vibes to Mother Nature so she continues to be oh-so-kind. ;)

Monday, February 20, 2012

Show Us Your Closets!

Heya! Are you ready to show off more of your house? Some of you are totally ready for this party, and some of you will be hanging back checking out the links for some organization inspiration. I get you. ;)

This month I’d love to see your closets – anything closet related. A laundry closet, master closet, linen closet, pantries (big or small!), or closets you turn into something else to meet your family’s needs. Anything closet-y goes.

Why don’t I say closet one more time?

Closet.

OK, let’s move on. I’ve shared quite a few of ours over the years, but tonight I’m recapping my top three.

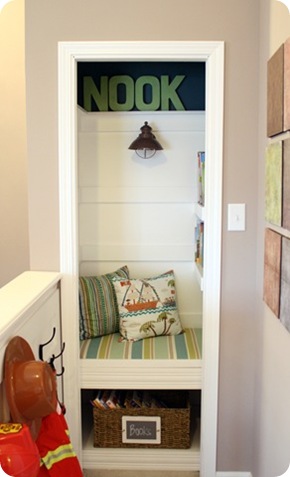
First up, of course, the linen closet in our loft that I turned into a book nook:

closet turned book nook   

I rearranged and purged the items in that closet, and by the time I was done it was pretty much empty. So I thunk up this idea. :)

We still love it and it’s so fun having a little nook in our very open house. If you’d like to see the how-to, check it out here.

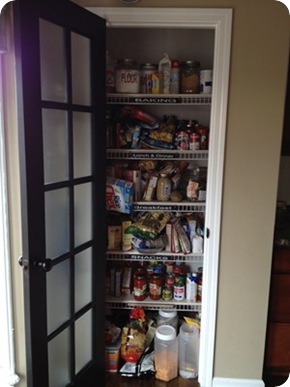
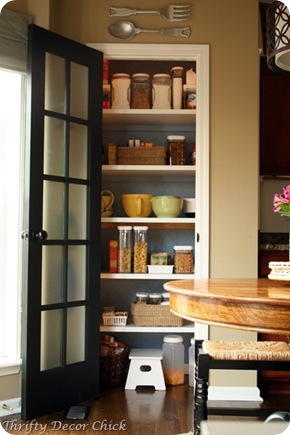
Next up, one I shared most recently – the pantry redo:

wire shelves pantrypantry redo

It’s only been a couple of weeks but so far it’s stayed organized. Many of you asked where all the dang food is, and it’s still there. ;) It’s mostly along the sides, since it goes back about a foot past the door frame on both sides.

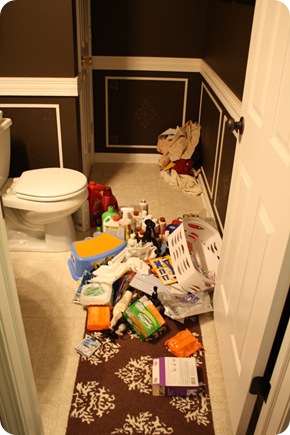
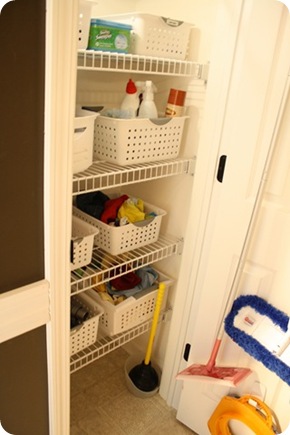
Finally, I shared the decrapification process I use when I go through and organize a closet (which is about once a year for each one):

cleaning out the linen closet organized linen closet

And…I just realized I must have saved “decrapification” in my spelling check, cause it didn’t flag it. That’s awesome. :)

Now it’s time to see yours! (Remember if you’d like to be featured later this month, be sure to link back to this post or the blog!)

Here’s a button I threw together because I’m a slacker and still haven’t had one made. I know.

Now link it up!!