Monday, October 31, 2011

53 Days

Hello and Happy Halloween! Hope you had a wonderful day and evening! :) We had a great time chasing a very excited pirate around the neighborhood. And I ate a LOT of food. I mean. Lots.

Well, it’s about that time folks. It’s now November…uhhh, well it will be when most of you read this…so I’m allowed to say the “Christmas” word. I’ve actually been talking and thinking about it for a good month now, but November 1st gives me the go ahead to hide it no longer!

I’m freeeee!!

I’m a Christmas fareeek, so bear with me. And yes, I know a little holiday called Thanksgiving comes first, but I’m thankful every day, so I don’t get as excited about that one. :)

This time of year I’m always thinking about the countdown -- I love checking out all of the advent ideas out there. Because many of us love to DIY, I thought I’d share a few of my favorites (old and new) now so you’ll have plenty of time to get crafty. (OR pull out the bank card and order one – I feel ya.)

Click the pics to see more about each one!

Pottery Barn never fails with the countdowns – this snowman advent is too cute!:

img14b

The price is not…but there’s gotta be some way to DIY this! I just can’t think of one right this second. My mind is a mush of Halloween candy. :)

This one is adorable and could be knocked off for sure:

Felt cut into stockings and glued on – love it!

This is an oldie but goodie, and SO doable. I searched for mini buckets last year to do this one and couldn’t find what I wanted (for cheap). I even asked the folks at Logan’s Roadhouse and they wouldn’t sell me some – boo!:

Anyone seen mini buckets at a good price?

I love this advent pillow at Ballard Designs:

And I know some of you crafty chicks could pull this one off! I on the other hand, am still working on the sewing a straight line thing.

I found this one at Meijer the other day:

It’s just a round metal sheet and there’s a magnetic glass piece that goes over the numbers and magnifies them. I think it was $10? Super cute!

I’m always blown away with the handmade ideas I see every year. I used cardboard boxes, paper and stickers from the craft store to make these years ago:

They have held up great! I used to fill each one with small toys or treats, but we need more itty bitty toys in this house like we need a poke in the eye.

So I loved these simple activity cards with holiday themes instead:

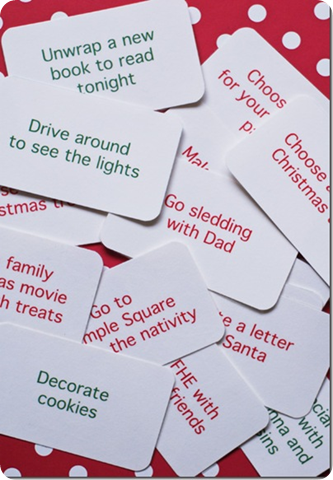
Sooo doing this! Along with a few treats and toys…just a few. ;)

I’ve found a few more ideas on Pinterest over the past few weeks – love these little felt envelopes!:

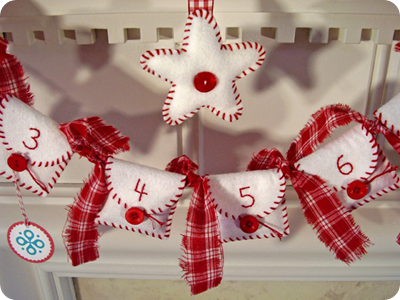
Oh, they are too precious!

These Christmas trees are something different, and would be SO easy (and cheap!):

Wouldn’t they be fun across a mantel, in all different sizes? They’d have to be up high in this house – little hands wouldn’t be able to resist peeking underneath. :)

This one is simple and lovely:

Just clothes pins glued to a board, decorated with a bit of ribbon. Clip the little treats up each day – too sweet! I may have to try this one.

But my favorite yet is this idea:

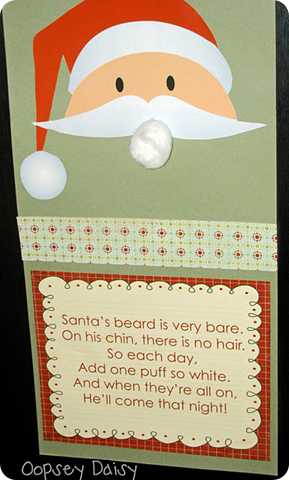
OH my…the cuteness!! This one WILL happen at our house. Just adorable. And it doesn’t involve treats or presents…just one-on-one crafting time with the kiddos for a few minutes a day. LOVE.

Do you have a favorite advent or Christmas countdown tradition? I’d love to hear! If you’ve blogged about about one, feel free to leave a link in your comment. And I promise not to mention the C-word again for at least 24 hours.

:)

Thursday, October 27, 2011

Halloween up in here

Ummm…people. It will be NOVEMBER in a mere days. What in the world? Less than two months till Christmas! And I still had my beachy vignette up till today. ;)

The new floors kind of put a wrench in the Halloween decor – most of it has been outside till today. But I finally got a little spooky display going with just days to spare!

My Craigslist buffet in the foyer was such a great find – and it’s so fun to snazz it up every season. I love having this space to decorate!:

paper bats on wall

I threw this together today – and when I say threw it together I’m for real. I had about a one spare hour today and was determined to get some Halloween out!

The Bub and I started with the bats:

bat cut outs on wall

Aren’t they AWESOME?!

We sat at the Silhouette machine for a while the other night cutting out meeellions of bats. (OK, so that part was already done. The rest of the throwing together happened today.)

To keep them from getting too serious, we added some googly eyes to some, some red sticky stones to others:

I did something similar last year, but I wanted to go big this year! I just put them up with sticky tacky stuff and made them “fly” up the wall. 

The vignette was put together with (mostly) items we already had, and just a couple new ones:halloween vignette

We found the black Halloween house earlier this season at HomeGoods. Soooo spooky!

The only other new purchase was the sparkly skeleton that I picked up at Meijer a couple weeks ago (on clearance). I love his bling! And his cute little feet:

 sparkly skeleton

The BOO letters were a craft from a few years ago, and the “art” usually sits on our mantel this time of year:

And of course, I had to bring back the little surprise on the lampshade:

halloween lamp shade

The spider webs and spiders are just black paper and I used little dabs of sticky tack to get them to stay up.

All of that adds up to one festive Halloween display!:

I smile every time I look at it, and the Bub is SO happy we finally got some Halloween inside the house. Just in the nick of time!

Do you decorate much for Halloween? Has the time gotten away from you like it has me?

Tuesday, October 25, 2011

Pumpkin Carving Party

Hey hey! I’m so glad you Squeezies are happy to see the mice again.

Well. Most of you. ;)

We hosted a little Halloween-themed shindig this weekend I wanted to tell you about in case you want to throw one together yourself this weekend!

I’ve wanted to have a Pumpkin Carving Party for years and always put it off because of the huge mess I imagined it would be. I didn’t really want to do it inside, and our back yard wasn’t really set up for it.

But with the addition of our our patio this summer we have such great entertaining space, so I wanted to take advantage of it! It was PERFECT for this little party!

I planned for this for months – I think I bought most of the stuff back in August. (Thank you, retailers, for bringing out the Halloween goodies so early!) I know myself and know I wanted to be as non-stressed as possible when it came to putting this together. I wanted it to be fun for the kids and the moms – including this one. ;)

So I planned early and made it VERY low-key.

The drinks were soda and water for the moms and Ghooooul-Aid for the kids. (How fun is that?) I added some Halloween ice cubes from Crate and Barrel:

ghoulaidcrate and barrel halloween

I just served it as a punch in a bowl from Target:

The kids LOVED the black drink. OH so spooky. :)

The food was crazy easy – on purpose. I made my little cookie sandwiches with Halloween icing and ready to bake cookies:

Pillsbury ghost cookies

You just sandwich two together with icing, then roll the sides in sprinkles:

They are SO yummy. I especially love these with the sugar sprinkles (for a little crunch), but I was using what I had.

The rest of the food was Halloween-themed snacks in individual bags:

I got two big boxes of these at Target and Walmart – I think they were $5 each? One box had cookie bags and one had chips and Cheetos.

This was not a healthy Halloween party. :)

The bowls, plates, napkins and cups were all from the Dollar Tree – can’t beat that!

It was all set up on the DIY potting bench Dad and I made this summer:

The table cover was a few yards of fabric from Hobby Lobby, on sale back in August. Score! (I even threw it in the wash after and it held up great!)

I didn’t plan any games or activities for the kids (other than the pumpkins). I was a little worried they would be bored.

But what am I, crazy?? They just…uh…played and had a blast!:

Imagine that. :)

We set up the pumpkin carving on the deck. I picked up carving tools here and there on sale over the past couple of months, but asked people to bring some if they had them:

Other than that, the only thing I had guests bring were their pumpkins.

I plan to do this again next year and may have smaller pumpkins for the kids to paint and decorate on their own, because of course the Mommas did most of the carving work:

Eww. :)

The hit of the party was this “gutter” I got at Walmart:

pumpkin gutter for drill

It attaches to the drill and makes quick work of getting the goo out of the pumpkin – it rocked! (Click the photo above to see it at Amazon.)

The party was low stress and BIG fun. :) We ended up with some cuties:

pumpkin carving party

(Some of the pumpkins didn’t make it into the pic, but they were all super cute!)

We had such a great time and I can’t wait to do it again next year! I only invited a few close friends this year, but when we do it again I hope to invite even more and put up additional tables so everyone can spread out.

The best part was that I wasn’t running around like a crazy woman beforehand – I was (mostly) chill. ;)

Do you host a Halloween-themed party? Is it for the big kids or the little ones? What do you do to keep it low key and easy going (for YOU)?


**Don’t forget I am answering any and all DIY questions over at the True Value Facebook page this week!

Monday, October 24, 2011

They’re Baaaack!!

taking carpet of stairs

Well, you knew it had to happen…the mice are BACK baby!!

Technically, I think they’re called rats:

That’s what Martha Stewart calls them anyway. Or maybe they are mice? Who knows.

I just LOVE THEM.

I know they give some of you the heebs, but I’m quite taken with them. Look away my friends, look away.

I got a little, teensy more creative with them this year…a couple of them are checking out the kids:

And a few are rocking some sparkly witch’s hats:

I cut the hats out with my Silhouette, but they’re looking a little more like floppy beach hats then witch hats. Oh well. I still dig ‘em.

A few of you have asked if our stairs match the new floors:

mice silhouettes on stairs

No, not well. :)

The stairs are Bombay Mahogany (red) and the floors are Jacobean (brown). But I’m not complaining! I still love them both so much it hurts. ;) Someday I’ll have the stairs sanded down and restain them, but for now, I’m good.

Of course, I wanted to add a little glow to the fall stairs, so I added some DIY votives. I had picked up some cheapy light covers at True Value this summer to do an outdoor project, but the warm season got away from me.

Since I already had them, I decided to make them work for this season:

They are the glass covers that go on light fixtures and they cost $2-something each. They’re nice and lightweight, which gave me another idea, so I got a few more today for an upcoming project. We’ll see how it goes. :)

I filled them with cutie acorns I picked up at Meijer weeks ago:

They look like acorns roasting on an open fire, but the candle is really just an LED light. I’m obsessed with these things. I love how they flicker like real candles. (You can find them just about anywhere anymore, but I’ve gotten most of mine at the dollar store.)

I still say, for $50, this stair redo was the best DIY project I’ve ever done:

martha stewart mice silhouettes

Cause now I can put rats mice on our stairs and that makes me silly happy. I love these little buggers.

I was going to put little teeny pumpkins by their little mice holes (like it’s their front porch…get it???) But I decided I should probably calm down and reel it in Sarah!

The sparkly witch hats are plenty:

pumpkins on stairs

(The pumpkins and votives are tucked under the railing so they aren’t a trip hazard.)

I can’t wait to get them all dressed up for Christmas!! (Don’t freak out. I don’t keep 12 rats mice on my stairs at Christmas. Just a couple.)

If you haven’t seen – the Dollar Tree has a TON of silhouettes this year – mice, crows, owls – bunches of them! The Martha Stewart mice are only $5 at Michaels (for 12) and I think I got mine on sale for even cheaper.

Can you even BELIEVE it will be November next week? I feel like it was June just yesterday. Crazy.


I was one of the bloggers selected by True Value to work on the DIY Squad. I have been compensated for my time commitment to the program as well as my writing about my experience. I have also been compensated for the materials needed for my DIY project. However, my opinions are entirely my own and I have not been paid to publish positive comments.

Winners, Haven and Q & A!

Well hey there! I’m back with a quick post to announce a few goodies!

First of all – the winners of the last three giveaways! The lucky winners are:

- $75 to Attiser:  Samantha at Samanthacwatson (at) hotmail (dot) com
- $100 to Pick Your Plum:  Teri at kleinsmith5 (at) charter (dot) net
- $100 Lowe’s gift card from Hometalk:  Susan at splw222 (at) yahoo (dot) com

Congrats ladies! Please send me an email and I’ll get you hooked up with your fabulous stuff!

Next up, I wanted to let you know that this week I’ll be answering all of your burning DIY questions over at the True Value Facebook page:

true value blog squad

When you get over there, just click that little “Ask the Blog Squad” button and ask away! It’s a great opportunity to pick my brain…which can be a very dangerous thing. :) You can also see questions and answers from other Blog Squad Q and A’s as well!

Finally, we’ve got some awesomesauce stuff going on with the Haven Conference next summer:

haven conference 

We’re SUPER thrilled to welcome some of our latest sponsors, like a little place you may know of:

home depot logo

The Depot! Whoo!

We’ve secured a few other sponsors as well, and you can see them here. Many more are coming and we are so thrilled with the response!

Next up, the session topics have been ironed out and we are so excited to be able to share these with you! The conference is open to bloggers and DIYers alike– it doesn’t matter if you’re one or the other, (or both!) we think you’ll find it worthwhile!:

DIY track:

  • Brave it Off Auto: Photography Workshop
    Pimp Your Photos: Photo Editing and Styling
    Laminate, Wood, & MDF, OH MY: Furniture Painting Tips for Beginners
    Beyond the Basics: Advanced Furniture Painting Techniques
    Go Ahead & Let Your Slip Show: Basics of Slipcovering
    Frugally Fabu-less Decorating: Introduction to Thrifty Shopping
    Power Tools for Divas: An Introduction to how to properly and safely use power tools like a pro.
    Just Build It: Introduction to Carpentry and Woodworking with Ana White!
    Build-a-Room: Basics in Room Design

Blogging track:

  • I Like Big Blogs: Tips on Growing your Blog
    Meet Me at the Water Cooler: The Importance in Using Social Media
    Hobby Gone Wild: How to Take Your Blog from a Hobby to a Business
    Walking the Tightrope: How to Achieve Balance in Family & Blogging
    Show Me the Money: The Ins, Outs, and Ethics of Blog Advertising

We’re also pleased as punch to announce some of our speakers for the event! John and Sherry from Young House Love will be joining us, as well as the lovely Ana from Ana White and the dashing Rashon from Mr. Goodwill Hunting! I can’t wait to see them all myself. :)

We are SO excited and of course can’t wait to see all of YOU there as well!

Tickets are still available – click this box to find out more:

    haven conferenceWhew! So much fun I can barely stand it. ;)

    I’ll be back later tonight to show you the return of some of my little friends…any guesses?

    Thursday, October 20, 2011

    Let there be light!

    Well HEY! Thanks for all the kind comments on our new floors! I tell you what -- I am more thrilled with them each day. I swear these floors don’t show anything! I so wish I could say I’m the I-want-to-see-the-dirt-so-I-know-when-to-clean type…but I’m just not. Sorry. ;)

    Anyhoo, I told you the new floors have spurred on some new projects. One in particular I wanted to take care of before they moved the furniture back in. It involved the roman shades in the family room, so I wanted to take care of it while the sofa wasn’t in the way.

    I showed you here how I’ve fallen in love with bamboo shades. We used to have two-inch blinds throughout the house, and slowly but surely, I transitioned all the windows to bamboo shades instead.

    They are SO easy to install:

    Over time, I’ve been craving a little more light though. So I decided to try hanging them up higher instead of inside the window. When you install roman shades, you need to decide if you want them hung inside the window frame, or outside:

    image(source)

    I’ve always hung ours inside, but I got the I-need-more-light wild hair and decided to try the outside mount.

    I didn’t get photos of the process (because I was trying to get it done before the furniture was moved back in), but it’s pretty easy. You just take the bracket and hang it above the window, instead of inside the window frame:

    That pic is looking up underneath the roman shade.

    Make SURE that you either use anchors or get your screws into a stud or the header over the window when hanging them. You want to make sure the brackets have a good grip!

    I started moving them up and decided everything would need to go up, so I moved the drapes as well. Now everything is hung right up under the crown:

    And I have to say, I LOVE it! It raised the bamboo shades about ten inches, so it lets a TON more light in the room.

    The only thing I didn’t consider…that the blinds don’t cover the entire window anymore:

    oops :)

    Whoops. ;)

    In my defense, our upstairs shades have a ton of extra at the bottom, because I buy the 72 inch length for every window. So I just figured I’d have enough extra at the bottom. I don’t. :)

    The only other thing that is different is the space between the shades. At the right angle, you can see between them:

    outside mount roman shades

    Not a big deal, but I like it totally closed off at night. :)

    A new set of shades will fix these issues though – I’ll just get wider and longer bamboo shades. I’ll move these upstairs when I have the budget for new ones, but until then, I can deal with these little issues.

    I figured the short shades would be hidden by the sofa, and they would have been if I hadn’t decided to move things around a bit. :) When they brought the furniture back in, I had the sofa and IKEA sofa table placed back about a foot. You can see the before on the left, now on the right:

    Funny how one foot makes a HUGE difference! To me anyway. I love little changes like that! And you can see the difference in the shades and drapes in these pics too.

    We need the extra space in the family room, not in the kitchen, so it works SO much better like this. But now the sofa doesn’t cover the entire window.

    No biggie. I’m trying not to develop the heebs at night because of it. ;)

    The best part – it made our windows and ceiling feel even taller AND lets in more light…for FREE!

    Here’s the evolution of the family room drapes…very early on I went with the tan drapes on tan walls hung immediately over the window, with no blinds at all:

    Then I moved on to the DIY drapes with blinds:

    I still love those brown drapes!

    And then I flipped the drapes and the bamboo obsession started:

    roman bamboo shades

    And after stealing the dining room drapes and raising everything up, (and OK, a few other changes) here’s where we are today:

    drapes and shades hung high

    Again with the cloudy, rainy day. This needs to shape up for my photos!! ;)

    You can’t see the molding I installed around the windows now, but I don’t mind it – I’ll take natural light over that any day! This certainly has me thinking about moving more shades up around the entire house.

    See how one thing turns into another around here?

    So do you hang ‘em high? It’s an old decor trick that certainly works! I think it works best when the shades and curtains are both hung high – so the window really looks taller. Sometimes I think just hanging the drapes higher can make the window seem even shorter.

    P.S. Check out my FAQ page to find out where I find my bamboo roman shades.