Friday, March 30, 2012

Winners! (And computers hate me.)

Please, someone PLEASE hold me back from throwing the computer in a lake. I’ve fought with one computer all week and now I’m on our archaic one and it’s power cord is jacked so it shuts down randomly while I type.
…like just now.
Technology hates me.
Anyway, I hope you’ll understand the reason for this brief post tonight, and I hope to be back shortly (maybe even this weekend if I can get one computer working) with a new post. :)
I wanted to make sure to announce the four lucky winners of recent giveaways!
The two $50 winners of the Rusted Chain giveaway are:

1. Holly at Hollyprobably AT hotmail DOT com
2. Megan at megankrous(at)yahoo(dot)com
And the two winners of the Antique Farm House giveaway are:

1. Dawn from Dabble with Dawn
2. Kristi at kgirl418(at)gmail(dot)com
…OK I’m back. Shut down again. :)
Whew. I’m not pushing my luck anymore – I am outtie. ;) I hope you have a lovely weekend and may your computers be nice to you.

Wednesday, March 28, 2012

It's a spray paint party!

Hey hey! We’ve been dealing with a blue screen of death around here tonight – but Hubs saved the day. :) And then Live Writer decided to hate me...so this post looks a little different because I'm publishing in Blogger. Because I’m getting this up later than I had hoped, this will be a quick post, so you all can get to linkin’!
I'm just glad to have it GO UP. 

Today’s party is the last in the Spring Fling linkies we’ve been hosting over the past couple of weeks:
So today’s project is pretty much as basic as it gets, but it’s a goody. :)

I’m on a mission to have every one of you try spray painting, and hopefully this will convince you.
I’ve been wanting a much taller lamp on our foyer table for ages now. I found one at Goodwill a few weeks ago, brought it home but the light it didn’t work. ARGH.
 
Found this one the other day, and it’s almost identical:
It was super tall, very heavy and substantial and all kinds of brassy goodness. ;) AND $10 -- is Goodwill getting more expensive or is it me?

I love these older brass lamps because their lines are just beautiful – I think it’s hard to find them like this anymore.

I took it outside to the garage (on an old sheet) and gave it a quick prime:
I used the Valspar version till I ran out, then used the BIN. But I usually only use the BIN primer on something that will get lots of wear and tear, like a chair. It’s mega expensive (for primer), so don’t worry about that for most projects.

Then I gave it a quick coat of brushed nickel spray paint:
And people…that. is. it. 
For all that is good, go get some spray paint!! ;)

I grabbed a lamp shade that’s been in the family room for about a year now:
 I found it at HomeGoods and LOVE IT. It’s so funny though, because the grey spots used to be blue – the sun has bleached them out. So the grey color is a PERFECT match to the new lamp:
It was meant to be. ;)
Actually, I’d rather the shade be a bit taller, but I’m not complaining, since I was using what I had!

It looks SO much better than the shorty glass lamp I had there before:
 So there’s my latest spray paint transformation for ya:
My quick do’s for spray painting:
DO use short, quick sprays.
DO shake the can really well, and here and there throughout your project
DO spray paint in the garage (with the door open) or outside
DO use eye protection and a mask if you are concerned about fumes!
I hope that helps if you are just trying out!

Now, let’s see your spray paint projects! I would appreciate a link back to this post, and if you want you can add this pretty button:


Monday, March 26, 2012

A spring welcome

Hello there! How the heck are ya? Hope you had a GREAT weekend! I thought the Hunger Games was awesome – I felt like an idiot cause I knew what was going to happen (duh, read the book!), but I still was jumping out of my seat one minute, nervously covering my face the next, moving around in my seat with anticipation…it was just ridiculous. But it was GOOD. :)

Anyway, today we are partying up with Rhoda for her part of our Spring Fling – spring door decor:

I showed you the grassy, fluffy wreath I made last week:

It was up on the front door, but I tried it in our foyer instead and LOVED it.

Too darn cute!

So I needed to fill the front door, and have had an idea I’ve been wanting to try for a while now.

It involved the Southern Living bucket I’ve used on our door forever. I LOVE the thing and have had it for about eight years – I sold Southern Living (now Willow House) as a second job when we were saving up for this house. :)

I’ve always filled it with lots of goodies during fall, and it looks amazing. For the rest of the year, I use faux stuff -- but I wanted to try something LIVE this time.

We have this bush on our property that I planted a long time ago:

It’s been so long, I have no idea what it is. All I know is it does great in part sun and it grows FAST.

And it bursts with these ahhhhmazing blooms every spring:

And they smell absolutely divine. I walk by it and take in big fat whiffs cause it smells like SPRING.

Anyone know what this is?

Anyway, I have to trim it up big time every summer, and since I knew I was going to do that anyway, I decided to take full advantage of these beautiful blooms right now.

I have never tried to put anything live in the door bucket, so I didn’t know if it would hold water. I ended up sticking a couple plastic cups down in there and filled them with water. Then I just stuck a bunch of the cut branches in:

OH MY, I love it!! I love how full and beautiful it is!

On a side note, I also love the natural patina on that bucket. :)

We’ll only have these blooms for about a week, so I have a wonderful few days of this gorgeous door decor, courtesy of Mother Nature:

It was in the 80’s all last week (a couple all time record breakers for central Indiana), so today’s temps in the 50’s felt positively frigid.

But the Bub and I didn’t let it stop us! We found a couple super easy hanging baskets at WalMart for the front porch:

I don’t feel like I do a great job mixing flowers in my pots and flower boxes, so this was a welcome change – it was all done for me! I love how they trail down the sides of the planters.

I also love the little white blooms that are so similar to those on our door:

Tonight the flowers will come in for what I’m hoping will be the last cold evening for a while. Tomorrow I need to pull out the American flag and get that back up! I feel like the front of our house doesn't look right without it. :)

Best part of this door hanger project was that it cost me nothin’:

My goal as we continue to plant around our home is to use bushes and plantings that will make for good cuttings I can use throughout the seasons. I did it at Christmas and loved using the fresh clippings!

Are there specific plants you love for cuttings in flower arrangements? Do you have any idea what my pretty plant is? :)

Don’t forget to link up your spring door decor up at Rhoda’s tomorrow morning!

P.S. I painted our front door red last year -- you can find out more about the paint color and process here.

Friday, March 23, 2012

Home Decor Giveaway!

Hello hello! I’m ready for the weekend because the weekend means the Hunger Games movie! So psyched! (I swear I’ll stop talking about it after this weekend. Probably.)

I haven’t been this excited for a movie in…well, ever. And then Titanic comes out in 3D in a couple weeks! Hubby isn’t quite as excited about that one. ;) (Although I think he secretly loves it.)

But first, one of my favorite decor sites is back with another great giveaway this weekend!

Antique Farm House carries a whole slew of beautiful vintage and antique-inspired decor. They have new sales “events” every week or so, and it’s like walking into a (different) fabulous little shop every time!:

antique farm house

Here are just a few of my favorites up on the site right now!

I love that they carry smaller decorative items as well as furniture pieces, like this cute wood table and chalkboard bins:

chalkboard crates

How fun! And it would work perfectly in a mud room, with the table as a bench and the crates for shoes or mittens!

Speaking of crates, I loved these – they are very similar to a set we got from AFH:

 wood crate 

As you can see, one works perfectly to hold the wood on our patio. Inside they’d be great for newspapers, magazines, toys, throws…anything!

So many of their accessories look like they’ve been around for hundreds of years. This wood caddy has endless possibilities!:

wood caddy

You could use it for napkins and silverware when entertaining, put Ball jars in each section with flowers, fill them with Easter eggs and grass in spring, leaves in fall…told you, endless. ;)

This little wicker caddy is too cute too!:

wicker caddy

It would be super adorable sitting on the table filled with salt and pepper shakers.

I REALLY like this piece and may have to get it for our (future) mud room:

wall calendar

Not only does it offer daily organization, but hooks as well! Perfect!

I’m smitten with dough bowls lately, and these are extra long, which are hard to find! I used a similar one in our living room bookcase:

dough bowl 

I think those long ones are especially lovely down the middle of a kitchen or dining table. Again, they are easily changed up for any season!

Subway signs are still all the rage and I don’t see them going away any time soon:

subway art

They even have one with Indianapolis on it! Whoo!

I think no matter what their style, just about anyone could find something they love at Antique Farm House. My style is all over the place so of course I always see numerous things I want on there. :)

You can stay up-to-date on the latest listings over at AFH and know when they’ll go live by subscribing to their emails here! That means you’ll get first dibs. Which is important, cause (most of the time), when an item is gone, it’s gone for good.

Here’s the best part of the post -- the lovely folks at Antique Farm House are giving away $50 to spend as you wish on their site to TWO of you! Yessss!

Here’s how to enter to win $50 towards goodies at Antique Farm House:

1. Leave a comment here. Are you Hunger Games crazy like me? Have you read them? Going to to the movie?

2. Visit Antique Farm House here. Check out the beautiful pieces and find one you love. Come back here to let us know what it is.

3. Visit their Facebook page and “like” it here. Come back and let us know you did in another comment.

* You can enter one, two or three times – it’s up to you! All three options are not mandatory to win.

* Remember if you comment anonymously or you have a private blog, please include your email address in each entry, and spell it out with “at” and “dot” to avoid any spammy emails coming your way.

This giveaway is open to the contiguous US only. It will be open till this Monday, March  26 at noon EST.

Thursday, March 22, 2012

The grass is greener on the door

No need to adjust your computer screen – yes this is two posts in one day. ;) Blogger had some issues last night and I couldn’t the post up, so it went live this morning.

Today I’m sharing a fun little craft project I’m linking up to Kate’s spring crafts party as a part of our Spring Fling linkies:

spring fling linkies

Soooo…I had a total blogger brain fart and forgot to mention Layla’s mantel party on Tuesday.

I suck.

I actually showed you our spring mantel in February (cause that’s totally appropriate):

And it hasn’t changed since. Honestly, it probably won’t change again till Christmas. ;)

Go link up your vignettes and mantels at Layla’s here!

So, onto the craft at hand…this one is super simple, it’s just time consuming. But mindless time consuming, so that’s good.

I saw this idea on Pinterest a couple months ago and have been planning on recreating it since!

I started with my new go-to wreath form – the pool noodle:

I’ve used one for a wreath before and it works GREAT! And wow, it’s cheap. The dollar store has them for…uhh…a dollar.

This one was a bit too long, so I cut it down with scissors, (it cut very easily) then used duct tape to secure the ends together:

pool noodle wreath form

Sorry, I didn’t clean for you. ;)

See? Perfect wreath form!

Because the pink was oh-so-bright, I got some green felt and hot glued it around:

You’ll see why I wanted green in a bit. :) It took four pieces of felt and I didn’t worry at all about it being perfect, obviously.

Then grabbed my “fur” yarn:

fun fur

I got two of these, which I needed. I used about one and a half for the whole wreath.

Then you wrap. And wrap. Check your watch. Watch a soap. Wrap some more.

Stretch your sore right arm.

Wrap:

This yarn is very thin, so it took a while. I think maybe an hour total? But again, mindless. I like mindless.

Perfect project for vegging on the couch. :)

I found these cutie paper flowers at Michael's:

And you may be getting the idea…I “planted” them in the “grass” on the wreath:

I think it is stinkin’ adorable:

grassy spring wreath

It’s perfect for spring! Very whimsical and I LOVE it.

Get ready…here it comes…

It’s so FLUFFY!!!!!

The Bub told me numerous times today how pretty it was. But it actually sounded more like “pwetty” when he said it. Melt.

I just took some ribbon I had and hot glued it to the top of the door – no wreath hanger needed. ;)

It looks great against the newish red door:

Obviously this wouldn’t be the best option for a door that is exposed to the elements. Our porch is tiny but I can hang just about anything on the door and it’s fine.

Total cost for me was about $10 – for the yarn and flowers (all on sale). Not too shabby!

I forgot a totally cute addition that was in my inspiration wreath:

(source – the incorrect site was linked before, so please refer to this one!)

I may have to add that little sign. ;)

We’ll continue the linkies next week with Rhoda on Tuesday and the spray paint party here on Thursday!

Wednesday, March 21, 2012

We have (basement) lights!

Well HEY! Today was a bit crazy because we’ve had some last minute progress on the basement, and I spent the day reading the second Hunger Games book all in one day as well.

I’ve been both super productive managing the basement process and crazy unproductive reading like mad. So confusing. I’m as hooked on this one as I was the first!! Only about 20 more pages, so this post may be quick. ;)

Anyway, I wanted to share the latest (completed) step in the basement finishing process. We started with figuring out where we wanted walls and then having them framed, and more recently had the lighting done.

Because the basement is kind of a mess of progress right now, and because pictures of lights are pretty much impossible, I’m showing you the placement via the floor plan. It’s a tad be more interesting than horrible pics of ceiling lights.

It won’t seem like it, but I swear it is. ;)

I mentioned before that I wanted TONS of lights down here, and after talking to our electrician, I realized that yes, it may be possible to have too many lights. The guys took me to a basement they had recently completed and I realized we probably don’t need 50 lights in the family room area. ;)

But by the time we were done, I did add a few more here and there. Here’s the layout and an idea of where the lights were installed (those would be the round dots):

basement love[4] 

Almost all were recessed lights – all but five. I mentioned before that I wanted to use some smaller lights – maybe mix up the standard six inch cans with some four or five inch versions.

Well, I didn’t realize how much those smaller lights cost. ;) It was a bit ridiculous, especially considering they are SMALLER, so therefore you’d think they’d cost LESS. Nope.

So, we went with all six inch recessed lights, everywhere. ;)

In the storage room and laundry (the one with hearts), we did one simple overhead light:

I was afraid the one in the laundry wouldn’t be enough, but considering whatever we hang up there will have at least two bulbs, I think it will be OK. And we’ll most likely add a small lamp on a counter or something.

Overall, the bathroom has a crazy amount of lights considering it’s size, but if you’re gonna have too many lights, the bathroom is the place to do it:


There’s a shower light and one at the entrance on one switch, a fan with a light on another and two sconce lights next to where the bathroom mirror will go (on another switch).

Whew. I told you, lots of lights. :)

But the fact that they are operated independently makes them less surface-of-the-sun-ish and more task lighting-ish.

In the family room, most of the lights are recessed. There are a couple on one switch over what will be a fireplace (someday) in the bump out:

lights2

And then there are a couple pendant lights roughed in over what will be the bar area (on another switch).

There’s one drop down light over the craft table on yet another switch.

The rest of the (12) lights in the family room and hallway are on three different switches – one for the bank when we come down the stairs, one for the lights in the bulkhead, and one for the rest of the room.

WHEW!

So, in the end it ended up being what I set out for in the beginning. A lot of freakin’ lights. :)

But, they are on a bunch of switches (I have learned I love bunches of switches) and ALL will be on dimmers. I luuurve me some dimmers.

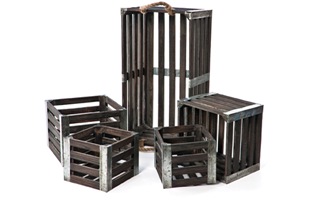
Now that everything is done electrical-wise, I’ve been perusing the lighting aisles at every store I visit. I love these two options for the laundry room:

Whatever we use in there will need to be low profile, and have at least two bulbs. I love both of these, but I’m leaning toward the wider, flatter one.

I dig these pendants for over the bar:


I am leaning toward the cubey one or the one in the middle – it is a bar so we can go a little sleeker in that spot.

I loved these for the sconces in the bathroom:

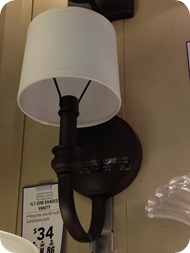
I like the finish on the last one, but the look (and price) of the middle one, so I may just get those and spray paint them.

Nothing escapes my spray paint trigger finger! Buwahahahahahaaaa.

Last time we talked about lighting, I mentioned I wanted to try to put sconces up elsewhere in the basement, but as I thought about it, I knew they may hinder the furniture arrangement/wall art ideas. So we skipped them.

It’s definitely been a learning process, that is for sure! Trying to do what we want, but staying within a budget takes some give and take. I’ll tell you more about the budget in a future post, but I’m happy to say that overall, the whole basement finishing process will cost WAY less than we thought it would. I have a number I’m trying to stay under and so far so good.

I’m not going to say what that number is yet cause when I say things out loud I tend to jinx them. ;)

Next up, finishing up the rest of the before-drywall stuff (which I’ll post on soon), and then drywall! WHOO!!! So exciting!!

So, which lights would you pick for the laundry, bathroom and bar from up above? My options are still wide open. I will probably purchase and install all of those last, so if you have other ideas, feel free to link to them!

Thanks again for coming along on this process with us!!

P.S. I think I said “switch” 65 times.