Wednesday, September 28, 2011

Paper Fall Wreath

Well hello!! Thanks so much for all the wonderful comments on our deck and patio over the past week or so. We are just pinching ourselves – everything turned out so beautifully and we couldn’t be happier.

I am so not worthy of the awesomeness. :)

The next party on our Autumn Linky list is the Door Decor shindig over at Rhoda’s!

image

I had an idea for a couple DIY fall wreaths this year, and the last one turned out to be a total pain in my booty. I thought the second one would go much faster.

Well. It was. Kinda. ;)

No really, it was much faster. It was still time consuming, but the fact that it cost less than $5 made it totally worth it.

Can I get a WHOO?!

I didn’t have a form for this wreath, so I improvised. I saw a little trick on Pinterest (sorry, I don’t think I pinned it so I don’t have the source) where someone took a pool noodle and taped it together:


It worked like a CHARM. In the photo I saw, they cut the noodle at an angle at both ends and then taped it together, but I just put end to end and taped it with duct tape.

Cost = FREE. ;)

And if you don’t have one, they cost about a buck at the dollar store (although I’m not sure if there’s any left right now).

I found some fun fallish fabric at Hob Lob a few weeks ago, and just got a bit of it. I cut it into strips:

And wrapped it around, just to give it a pretty backdrop:

Cause a blue pool noodle doesn’t exactly scream FALL. :)

Then I grabbed my hole punches:

And my scrapbook paper (also from Hob Lob, half off!), an started punching.

Punch punch punch:

I used red, yellow, orange and brown – all warm luscious fall colors of course!

Using the end of a pencil, I wrapped each cut out around the eraser end:

Then dabbed the back with hot glue and stuck them on everywhere.

I LOVE it:

IT’S SO FLUFFY!!!!!

You’ll notice that the density changes throughout the wreath. ;) I started on top and made them really tight next to each other. I realized very quickly it way going to take EONS if I kept that up, so I started spreading them out a bit more.

Then half way in I realized using more of the larger circles and less of the smaller ones meant it would go even faster, so you can see how I used more of the large ones on the right.

Whatever.

It adds interest and dimension. That’s my story and I’m sticking to it.

I took a few hours total, most of which were spent sitting in front of the TV, so I’m not complaining. If you used bigger circles it would go even faster!

You can see here that I didn’t do the sides – that’s why I wrapped it:

Now, our porch is covered and the front door gets NO rain – so keep that in mind if you try something similar.  Obviously this wouldn’t stand up to the elements. I think this would look AWESOME over our mantel as well!

I’m not sure which what decor will go on the door for the rest of the season – it could be my felt wreath:

Or my beauty from last year – the dollar store wreath:

I love my Southern Living at Home container stuffed with fall fillers:

And here’s a couple more ideas from a couple years ago:

So many choices!

I am leaning toward my square wreath or the paper one, just because of their beautiful fall colors:

I can’t wait to show you the porch next week at my party! I have a few changes in store. Buwahahahaaaaa!! Not sure why I just buwaha’ed you – but I’m pretty excited. ;)

Can’t wait to see your fall door ideas at Rhoda’s place tomorrow!

Monday, September 26, 2011

Our new backyard!

travertine outoor hearth

Well, I’m kind of cheating. I’m not really showing a fall mantel for Layla’s party. Just a fall fireplace.

An outdoor fireplace. ;)

I figured I can show you the indoor mantel any time – but the final touches on the backyard and the new patio were made today, so I just couldn’t wait to show you!!

Is this allowed Lay? :)

I hope so! Cause it rocks my world!!!

OK, there are a serious amount of pics on this one, so bear with me. (And I thought the deck post had a lot – HA!)

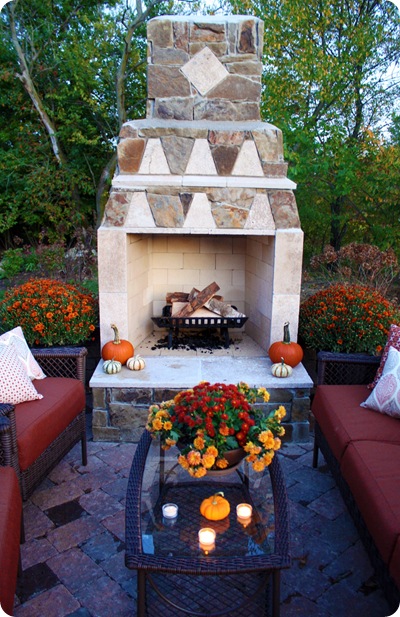
Let’s start with the piece de resistance – the outdoor fireplace:

outdoor stone fireplace

We almost didn’t add this – at first it was just going to cost too much. But our landscaper worked with us and we figured out a way to make it happen.

And we are SO GLAD we did. It just makes the whole space – it’s the focal point, no doubt!

They used a travertine stone on the hearth and for the details on the front, instead of the brick on the sample we saw. He wanted to pull the colors from our house, and it does just that!

The stone works with the house too, and has some bits of grey and red tones that work with the patio:

stone patio with fireplace

It’s been raining on and off for days, and finally today it was just beautiful! As soon as I pulled out the camera, the sun went behind the clouds, again. (Some of the stones on the patio are wet – that’s why they are darker.)

Let’s check out the before and after shall we?:

IMG_6210  

AWESOMESAUCE!!! ;)

We got all of the furniture on clearance at Menards and I LOVE IT:

red outdoor sofa

I think it looks SO much more expensive than it was – all four chairs and the sofa (we have a outdoor SOFA?!), were less than $800:

outdoor firepit

We got the fire pit at Menards as well (on clearance – notice a trend here?) a couple years ago.

All of the pillows are placemats from World Market – I also used them as placemats (who would have thunk it?) on the table set on the deck:

outdoor pillows placemats

I adore the colors and the designs – and that I can flip them around for a different look.

Here’s a little tour of the backyard – the before on the left, the after now:


We are trying to bring the grass back – it was covered with the deck furniture (while they stained) for so long, it pooped out. We had the drain spout put under the ground – which makes hubby VERY happy. He moved that thing every single time he mowed. ;)

They planted a winding row of burning bushes, which I LOVE, between our trees, and then a couple large arborvitae at the end for privacy. They are so tall and thick – I love them!

You can see how the patio looks from the yard from this angle:

I love all the thought they put into the design of the walls – it could have easily been a plain wall and we would have been happy. But they look so custom with the bullnosed detail around the bottom.

We planned all along to put the grill down on the patio, but in the end hubs wanted to keep it up on the deck. So I put the DIY potting bench there instead and now I think it’s the perfect spot!:

DIY pottery barn potting bench

That big black bucket is actually for fireplace ashes, but I keep my potting soil in it. :) Hopefully it will hold up outside – I may spray it with some kind of sealer.

Have the potting bench there couldn’t work better, because my plan all along was to use it for entertaining as well – now it will be a great spot for food, drinks, ice buckets, whatever.

You can see the fireplace from the back here:

It’s hard to see, but on each side of the fireplace are pee gee hydrangea trees. I got them for half off at my local True Value and I’m SO excited about them. Hopefully they will look something like this eventually:

image(source)

Isn’t that gorgeous??

Next summer they will frame out the fireplace perfectly. Can’t wait! :)

We especially love how the landscaper used the natural stone throughout the space – like in the landscaping above, and the stepping stones through the mulch:

And the “steps” up to the patio are large stones:

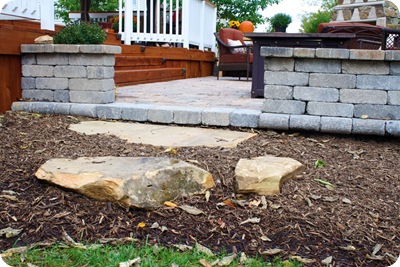
They make it feel like everything has been there forever!

Here’s a before and after from the other side:

IMG_6213

You’ll notice the garden is gone. It was a very, very sad day. I’m not kidding. They had to rip the cucumbers from my clutched fists.

OK, OK, it wasn’t that dramatic, but it was hard.  ;) I don’t know yet where I will put it next year, but I have a couple spots in mind.

You’ll also notice that there’s not many plants in the ground. That is simply because we just had to stop! (Our bank account was starting to freak out a little. OK, a lot. ;) ) We’ll budget for that next year. I can’t wait to plan all of the landscaping – I think the plants will make it even more of an oasis!

At first I wasn’t sure how to set up all the furniture on the patio, but I searched “outdoor fireplace” online and noticed most of them had the chairs set up like this:

I didn’t want the back of anything to be facing out, so this works great. 

And there’s still plenty of room to get around them, to the potting bench on one side, the firewood on the other:

The lovely folks at Wuslu.com sent these baskets too me, and this one was the largest. It’s just LOVELY as a firewood holder. :)

The massive mums were a STEAL – my BFF and I found out one of the local fruit farms offers $5 mums if you dig them up yourself. We got HUGE plants for so cheap – usually this size would cost (at least) $30! I plan to plant them later and we’ll see how they do next year.

I just love mums. I just love fall. Sigh. :)

Today the landscaper came out and cleared out a TON of the brush in the back – we didn’t think he would do that till next year, and it opened up our backyard SO MUCH:

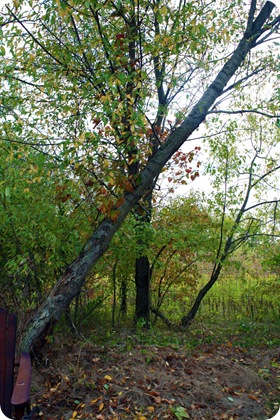
I mentioned here that our next phase will be to clear all of this out, plant more trees along the back and mulch most of it.

This land is why we built our house here and it’s one of our very favorite parts of our home – if not our favorite. We have been so spoiled by all the green space and privacy. I absolutely love it, and now we have another 20 feet of yard to explore, now that we can get back there!

Since the last minute touches were finished up today, we celebrated by lighting a fire this evening:

It’s no surprise that the evening is the best time to enjoy this space. :)

We grab cold drinks, warm blankets, light the fire, listen to the crickets and look up at the stars:

And it really does not get any better than this.

I feel so lucky I could burst. I don’t know what I did to deserve this, but I sure do appreciate it. :)

I hope you enjoyed the tour of our new backyard! And I need to give a HUGE shout out to our landscaper and his staff – Bill at Eagleson Landscape did an incredible job. They did such an amazing job and took such pride in everything they did – especially the guys who put the stone on the fireplace. We were so pleased with every bit of it! If you are in the Indy area and need anything done outdoors – give them a call!

Be sure to link up your fall fireplace (mantels?!) at Layla’s – I can’t wait to see all the goodies! 

image

I’m such a rebel. :)


I was one of the bloggers selected by True Value to work on the DIY Squad. I have been compensated for my time commitment to the program as well as my writing about my experience. I have also been compensated for the materials needed for my DIY project. However, my opinions are entirely my own and I have not been paid to publish positive comments.

Sunday, September 25, 2011

I want to hug my fridge

Hey hey! How was your weekend? We had a wonderful time in southern Indiana in a cabin with my family – we had such a blast!! Indiana in the fall is my very favorite place to be! Well, it’s my favorite place to be any time of the year, but you get it. :)

Well, it’s been a month since our fridge died on us and caused water damage in the kitchen. We’ve since gotten the island installed and put back together, and a couple of weeks ago we got our new fridge.

And it’s beautiful. I mean it people:

kenmore elite 31.0 cubic feet

Excuse the plywood. :)

Wait…hold on.

It’s more like this:

For reals. We had to wait two weeks for it, since it was out of stock, but it was worth the wait! I knew I wanted the French-door style refrigerator and it does not disappoint. When we went shopping, there were a ton to choose from, and at first I was looking at the counter-depth versions like we had before.

But then I saw this one. Hearts were fluttering out of it, even in the store. ;)

(Duh. I thought I had mentioned the brand! It’s a Kenmore Elite – you can find out the deets here.)

The basic measurements of this one are the same – but the space inside can’t be beat. It’s got 31 cubic feet of space inside. That means 31 cubic feet of AWESOMENESS:

And when you open the doors, there’s singing. I can’t pinpoint where it’s coming from, but it happens.

Wait, maybe coming from my head. Whatever.

It’s HUGE. Part of the reason it holds so much is that the ice maker is in the door:

freezer in the door fridge

It makes the cutest ice too. Really. Our old ice was long, these are square-shaped. It really doesn’t take much to make me happy.

It’s got the basics:

IMG_7060IMG_7061

And some fun stuff like extra deep door storage:

The bottom drawer inside is my very favorite thing. It’s wide and huge and it is great for flat, wide stuff. And you can open one of the doors or both – which I think is brilliant. So often we’re just grabbing milk or whatever, and I like that we can still just open one door if needed.

The only difference in size is that it isn’t counter-depth, which means it comes out further than the counter. It sticks out about four more inches than the old fridge. We kept the old fridge in place and moved it out for a few days to make sure we wouldn’t mind it.

We didn’t. :)

And we have the same issue with this one that we had with the old one – the right door doesn’t open all the way:

There’s nothing we can do about that, so I’m not bothered by it. (We’re used to it anyway.) And actually, because this fridge sticks out a bit further than the old one, the door opens more than before.

I was pleasantly surprised to find that ALL of the drawers (even the long bottom one) still pull out completely, even when the doors don’t. SMART.

Our old fridge was a side by side, and it always drove me crazy. I felt like the older refrigerator we had long ago (like, eight years ago) was more spacious. We couldn’t fit much at all in our freezer in the old one, and it especially bugged me that we couldn’t buy frozen pizzas.

I know, my life is rough. ;)

But what really sold me on this one were the THREE drawers in the freezer:

Most French-door styles have two freezer drawers and this extra one totally sold me. Now our meat has it’s own drawer. Love that! And the meat is happy too. I’m guessing. ;)

You’ll notice the freezer and fridge aren’t full – it’s because we’re slowly refilling it all. I had no idea how much food we had in our fridge (that went bad) and how much it would cost to replace it all. It’s crazy! The insurance company will cover some of it, but not all, from what I understand.

The insurance claim did not cover the new refrigerator, which is about the only thing they aren’t covering.

Many of you have asked how I keep our stainless so clean, and I’ve tried just about everything. The best I’ve found is my Shaklee basic cleaner:

shaklee stainless steel cleaner

It’s all I use on the fridge anymore!

So far the only thing that has slightly bothered me about this new style is that there’s not much room for all that stuff we used to keep in the door – you have to keep it out in the open part of the fridge. This isn’t a big deal because there’s SO much space, but I like having that separate spot for all that little stuff. It’s the organizer in me. ;)

But it’s not a big deal all, at least to me. Overall, I’m LOVING it so far.

And I think we’ll finally see some progress on our floors this week – I’m meeting with the flooring guy to work on stains tomorrow. We’re going the finished on-site route, for reasons I’ll explain soon!

So, do you have this new style? Love your side by side? Traditional freezer on top? (I liked it more than the side by side!) It makes me wonder what they’ll come up with next – but I think this is the best design yet!


P.S. I need to get my fall mantel going, because our first fall linky party is this Tuesday over at Layla’s place! Get your fireplaces and mantels ready!!