Saturday, November 9, 2013

Karen


When I was growing up we lived out in the country.  We only had one close neighbor with kids; I remember Tim and Karen so well.  Tim was a pain, but Karen was so much fun!  We loved playing house and dancing together!  I so clearly remember Karen singing and dancing in her livingroom, belting out "Raindrops Keep Falling On My Head," and "Downtown!"  She was so loving and happy.

It wasn't until I grew older that I even realized Karen had special needs.  I could write a whole book on the truth of being young and innocent, and the parallel of God's love.  I will always have a huge heart for kids with Down Syndrome.  Karen went to heaven at an early age due a heart defect related to her Down Syndrome, but I was so privileged to be a part of her life.   This poster made me think of my childhood friend. 

Square foot gardening

Hello all! Since school is back in I’ll be going back to my posting schedule of four posts a week – at least most of the time. :) Some weeks get crazy but for the most part you’ll see one more post a week again.

I know, calm down. Awesome.

I should have really talked about this earlier this summer but the months just got away from me. I did want to mention it so you can prepare for next year if you are interested in gardening.

Thing is, we used to have way more of a backyard, but even then it was kind of odd, with a big slope. So we didn’t have a great spot to put a large garden. When I blogged about my desire to grow a garden years ago, many of you were so helpful and I learned a ton.

So a few years ago I started a small garden – I used the square foot gardening technique – loosely. I say loosely because I didn’t segment the garden out like a true square foot garden. I just kind of planted stuff in there and hoped it would do well.

And it did. :) That’s when I learned that you don’t have to have a large, perfect spot to make food grow. It needs water and light and the space doesn’t matter as much, in my opinion.

Since then we had the patio put in so a couple years ago I moved the garden to the only good spot we had left – right next to our air conditioner:

square foot garden

It wasn’t ideal and I didn’t know how everything would do. Before this everything had been in full sun. This area gets morning and some afternoon sun, but not the super hot late afternoon sun and it’s actually done really well.

I could have DIY'd the garden set up, but it comes in a kit at most hardware stores and it was super easy to put together:

square foot gardening

I have taken it apart and put it away for the winter and I’ve left it out – it’s cedar so it holds up fine to the elements – at least for the next few years.

We back up to land with woods and a creek so we get a lot of wildlife. TONS of bunnies. Because of that I knew I wanted something to deter them from eating everything and I use that lattice stuff. I found it in the dumpster at hubby’s high school years ago. (I didn’t DIVE in the dumpster – just picked it up off the top.) ;) And I’m kind of surprised but it works great. They don’t nibble on anything. I actually think having it by the air conditioner may help too – the noise maybe?

So there’s some things I’ve learned over the past years that I thought I would share. I’m not an expert by any stretch but I’m learning more every season.

I planted a strawberry plant and blueberry bushes years ago – blueberry bushes need to be planted in multiples because they cross-pollinate. But the bushes didn’t do well – we needed to move them and never replanted them. Each one only produced a few blueberries total. Now I know I should have been more patient -- I think they just needed a few years to get established. I mean, we have a farm nearby that we pick blueberries at that has hundreds of big blueberry bushes, so I know they can do well.

And the strawberries are one of those I think I’ll just keep going to pick somewhere else:

strawberry plant in garden

By this time of year the plant is big and kind of sprouting out – I didn’t realize strawberry plants did that. It shoots off and plants itself in another spot, so I think in a warmer climate it would kind of take over. But for years now it’s only produced maybe a handful of strawberries each year. I know that would increase over time too, but I’d rather use the space for something else.

I like my garden foods like I like my flowering plants – producing all season instead of once. Strawberries produce for one month and then they’re done. I’d rather have more room for my beloved cukes:

growing cucumbers

Isn’t that funky? I don’t know what kind I got this year but they are long and skinny. I prefer a chunkier cucumber but these still taste great. A few folks warned me years ago about the cucumbers – they said they would take over the garden and they are right. :) But I love my cukes so I insisted on having them. Thing is, they are vine plant, so yes, they do go everywhere, but they don’t hurt anything. At least in my experience – they mix in with the tomatoes and stuff but not too bad.

I lean some of the lattice up against the house so they can work into that, but they prefer to stay low. It’s kind of cool to see how they grab on to stuff:

cucumber vine

They do pretty well in this spot but I think they prefer full sun. My first year growing them it was out. of. control. there were so many. It was awesome. :) Then the first year I planted them on this side of the house I didn’t get one cucumber – but it was a super hot summer and it turns out it had something to do with the bee population. Crazy, but they weren’t being pollinated by the bees so they never produced.

This year they are doing much better, just not producing a ton like that first year. I don’t know if it’s having less sun or just the version I got.

My other favorite garden plant is tomatoes. This year I did three versions – regular tomatoes, romas and cherry:

growing cherry tomatoes

The cherries always do well for me and this year they are mad crazy good. Like, I can’t even keep up. But I use them all the time – salads, in my eggs, for caprese salad…I love them.

The romas are doing incredible too – they just started maturing a couple weeks ago and they are coming so fast I can’t keep up:

growing roma tomatoes roma tomato plant

My only disappointment this year is my regular tomatoes – I got a container plant this year to try to fit more into the garden and I should have just done a regular plant. I got two little bitty tomatoes off of that all season. There aren’t even anymore coming – kind of a bust. Next year I’ll just go with a regular plant.

There are seasons to what you plant too – early summer crops and late summer. If you love lettuce you’ll want to grow that early. It does better in the less intense heat of the early summer months. I’ve done a few different lettuce varieties and they all do well – almost too well. When they start to mature they do so fast so it’s kind of hard to keep up.

I planted three arugula plants this year and with all of the rain we got in May and June they exploded – I didn’t even get that much off of them because they went to seed so fast. (That means they grew flowers, which often will change the taste and make them bitter. Same goes for many herbs like basil.)

Some of the late summer bloomers are melons – this year I couldn’t find any watermelon so I went with cantaloupe:

growing cantaloupe

I looked for weeks to see something and finally a few weeks ago this showed up. Man, these are sloooooow. It hasn’t grown much in the past week or so. But I’ll keep an eye on it – I’m not sure it’s going to get much bigger really. :)

In my little garden (I think it’s about four by four feet?) I’ve had ten plants growing this summer. As I mentioned, the arugula is now gone but everything else is still there. This year I planted my herbs in a smaller container by the back door so I’d have more room here. I do have my rosemary planted in the bigger garden though, and even with the cucumber vines all around, it does great.

A few years ago I picked up this book after many readers recommended it to me:

square foot gardening book

If you are new to gardening it is a wealth of information! Before I heard of this method I thought I needed a huge spot to grow my own food, but it’s so not the case. Many plants you can grow in containers too and they will do really well (tomatoes, strawberries, herbs), so space shouldn’t hold you back! My garden isn’t pretty, but it produces. That’s what matters!

As far as keeping them alive – just water them when they look hot and wilted. Other than watering I don’t do any upkeep with my garden at all. I don’t even mulch which I probably should. Pretty low key, just how I like it!

Do you garden? Do you use the square foot technique? What’s your favorite thing to grow?

Outside mount bamboo shades

Hello hello! I’m back today to share a quick DIY project and a couple new tools I’ve started using lately. It’s been Christmas decor 24/7 around here and I gotta be honest, it was great to get something off the DIY list and use a tool for a change. (Insert tool man (woman?) grunt here.)

If you’ve read for a while you know I’m a lover of bamboo shades. Over the years I’ve switched over from our blinds to the bamboo and I just love them. I think they offer more privacy and light filtering (depending on the kind you get), they let more light in (when you want it) and they are just pretty. :) I told you more about our bamboo shades here.

I mentioned the privacy/light thing, and there are some that are a lot more tightly weaved than others. I recently replaced a couple on our main level that weren’t as tightly woven (less privacy) so I had one of the old ones available to install in our guest room upstairs:

This window has been nekked forever and I always feel bad for our guests who sleep in here. This is easily the brightest room in our house – which I’m sure is just lovely first thing in the morning for those who sleep in here. :)

And yes, the walls are still blue, pink and purple. At least there’s a bed in here, OK?

Because this shade is 72 inches long, for our longer, main level windows, it’s way too long for the upstairs window, which is shorter. This allowed me to do one of my new favorite fixes – hang the shade outside the window instead of inside the window frame.

I gathered my tools:

hanging bamboo blinds

I did end up needing a drill too, more on that in a bit. If you install a shade inside your window frame, you probably won’t need any anchors – just screws. The framing around the window is enough for the screws to bite into.

And if you decide to do an outside mount, like this one, if you go right above the window you’ll probably catch something. Because my shade is so long, I went way up, and luckily caught a stud up near the ceiling:

hanging bamboo blinds

I used my stud finder to find out where my studs were. Just for fun, stick one on your husband and let it beep. Hilarious. ;)

Once I knew where I could safely hang the brackets (without them eventually crashing down), I marked where the holes needed to go:

hanging bamboo blinds

If you like to have extra peace of mind, you can put all four screws in. Anymore I only do two or three and they hold up fine.

You’ll want to drill in with a bit to give yourself a good start for your screw:

hanging bamboo blinds

This also helps to determine if you’ve hit a stud or not. If the bit goes right through the drywall, you’ve missed the stud and will need an anchor. If not you’ll feel the resistance of the wood as you drill.

Here’s where my first new “tool” comes in – I found this at my True Value months ago and I LOVE IT:

hanging bamboo blinds

It’s this magnetic arm band thing and you wrap it around your arm with the Velcro. This True Value has an end cap with all this “as seen on TV” stuff on it and this was there. I think it was $20? Twenty bucks of awesome, I tell you what. Especially on jobs like this, I am ALWAYS dropping screws or wing nuts or whatever. This keeps them right where I can reach them and they don’t go anywhere.

And it’s soooo fashionable too, be sure to let all the cool people see you in it:

That’s my attempt at a tough face. Failing.

I have a thing with as seen on TV stuff by the way. I have an odd fascination with all of it. No snuggie here yet. You? :)

Next up, you’ll need to drill your brackets into the wall. For this I used my next new tool, the Master Mechanic Swift Driver Ratcheting Screwdriver (say that three times fast):

ratcheting screwdriver

The True Value folks sent me one to try out earlier this year and I have thoroughly enjoyed using it. It is SO much easer than a screwdriver people! I actually find it easier to use than a power drill sometimes – it’s hard to get control of a drill at times -- even I still have it skip out and I dent the wall with the bit. Once or ten times.

This one is a great in between the power drill and a screwdriver – you use your hand to just ratchet it so it turns the screw for you. It’s hard to explain so I took a quick video:


Master Mechanic is the brand name for True Value and I have at least three tools from this line and love them all. Really pleased. The only thing is I wish this screwdriver was magnetic so the screws stuck on it on like my drill.

It made quick work of putting those brackets up:

hanging bamboo blinds

I hope you can see from this picture how the brackets are on the wall for an outside mount installation – you want the the metal part that the nut screws on to to be pointing down. Much like an inside mount, but facing out. (For an inside mount I put them sideways.)

Once the brackets are up it’s easy! Just slide your shade on them and use the wing nuts to secure them:

hanging bamboo blinds

And there you have it – a shade on the window, finally!:

hanging bamboo blinds outside mount

Here’s the thing about hanging window treatments and shades really high – I love doing it because it gives the illusion the window is taller than it is. And I wanted this one high because this particular shade is still pretty thick at the top, even when pulled all the way up. So if it’s hung inside the window frame, it blocks a fair amount of sunlight. This way it doesn’t block any.

But I find that when just drapes are hung SUPER high, like to the ceiling, and the shades (if there are any) are hung lower, it can look kind of off. Like you’re trying to make the window look bigger and you can tell. You shouldn’t be able to tell. ;)

Once I get drapes up here it will really make that window look much taller than it is and will block out even more light for my lovely guests. :)

One more thing off the HUGE to do list, it feels good! The list for just this room is a page long…2013 is the year of the guest room, I can FEEL it.

Are you a bamboo shades person like me? Inside or outside mount? Or are you loving your blinds?


I was one of the bloggers selected by True Value to work on the DIY Squad. I have been compensated for my time commitment to the program as well as my writing about my experience. I have also been compensated for the materials needed for my DIY project. However, my opinions are entirely my own and I have not been paid to publish positive comments.

Friday, November 8, 2013

DIY nautical oar art

HEY there! Thanks SO much for all the lovely comments on the powder room post! I’m working on answering your questions so stay tuned if I haven’t gotten back to you yet!

I wanted to show you how I made over one of my favorite parts of the room (there are a lot of them) – the boat oar I found at a vintage mart a few months ago:

vintage boat oar redo

I first showed it to you in this post and as of a few days ago it still looked like that. :) This little redo seriously took about 20 minutes, and that was with paint drying!

I started out by wiping it down to prep it for paint:

vintage boat oar redo

I let it dry and then mixed some white paint (I used my CeCe Caldwell stuff, but regular white paint would do just fine. Flat may work better for this particular look.) with a little bit of water:

vintage boat oar redo

I didn’t want the oar to be covered completely – I wanted it to have a “wash” kind of look and this did it:

paint mixed with water for a wash

The nice thing is when it’s watered down a bit it takes even less time to dry. :)

I let it dry about ten minutes, and then used my delicate FrogTape to start marking where I wanted my stripes:

vintage boat oar redo

That one was on the handle -- I just searched striped boat oar images and kind of winged the design.

I taped off each section, painted and took the tape off immediately. I did that just because I knew even though the paint was dry to the touch it wasn’t cured and the tape may remove it. I take my tape off right away whenever I do stripes anyway so I get a really sharp line.

I moved on to the wider part and did a little stripe first:

vintage boat oar redo

When I pulled off that tape it did pull up a little bit of the paint, but I actually liked the look so I didn’t worry about it. I didn’t want it to look perfect anyway. ;)

Then I made a wider one in the middle:

nautical stripes boat oar

You can see there that I cut the FrogTape down the middle for skinnier pieces. Since I was working so fast I didn’t want to put the tape down over the red paint I had just done – this allowed me to keep working quickly. :)

I did all the red stripes, hung the oar in the bathroom and then realized I wanted to pull in some of that blue tone in the room. I had it over at the vanity/sink, but everything around the toilet was red.

So I grabbed the blue paint I used on this post (it worked perfectly!) and added a few more skinny stripes:

nautical stripes boat oar

I gotta be honest…I squealed a little when I saw how it all finished. ;) It was so stinkin’ cute!:

nautical stripes boat oar

I think adding that little bit of blue was a good call – it ties the whole room together!

To hang it I just nailed a picture hanger thing to the back of the handle at the top.

In the real life you can see much more of the bottom of the oar because you see it from higher up than in the pics:

wood planked wall bathroom So that’s how the cutest little oar art came to be! It was super fast and I used paint I already had – the oar itself was $10. Love it!

The room isn’t exactly nautical themed but I think it still works – you don’t need to follow a specific theme to make something you love work in a room!

Thanks again for all the sweet comments my friends! Have a GREAT weekend!

Is this your dream house?

Hey hey! How are ya? I’ve been dealing with some computer problems this morning, hence the late post. I thought those weren’t supposed to happen on a Mac?? ;)

Anyhoo, the other day I caught the last few minutes of the HGTV dream house special and was pleasantly surprised with the bits I saw. Every year there are definitely parts I love and some I not-so-love. I found a little of both when I went to the site to see more of the house.

Have you seen it yet? I’d love to hear your thoughts too!

It’s absolutely beautiful from the outside, looks like a tree house to me:

HGTV dream home 2013

The front porch is amazing, and those shingles look like cedar but are really made of PVC:

HGTV dream house 2013

Wild huh?

And you KNOW I love that front door with the glass! (We discussed the potential for glass in our front door in here – so many of you had opinions on that!)

I love that they created a little relaxing nook in the entry here:

HGTV dream house

I don’t imagine I would lay down for a nap in the foyer, but whatever, it’s cute! ;)

I have mixed thoughts on the family room space:

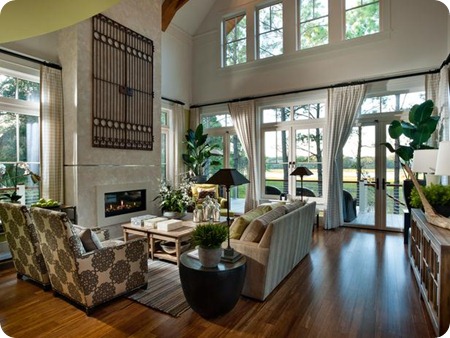
I LOVE the tall ceilings, all the windows, the floors!

But the fireplace feels out of place to me with the contemporary look and I’m not a fan of the sofa fabric…like, at all:

HGTV dream house 2013

It just looks so heavy and out of place to me for this room. I expected something a bit lighter. And there is a TON of green in this house. Lots. Some pops of a few more colors would be beautiful!

I LOVE this console, with it’s paneled glass doors:

HGTV dream house 2013

Love the simple accessorizing too – I’m kind of obsessed with that huge crane. Duck?

But take a look at this photo – is it me or are there two of those consoles in this pic?:

HGTV dream home 2013

Am I losing it? There’s one in one pic, two in another right? Oh well, I love them both. ;)

The kitchen I’m not digging as much as some of the other spaces. This house looks like it would have such a lovely, traditional kitchen, and this one leans more modern -- it surprised me (maybe that’s the point!):HGTV dream home 2013

I love the base cabinets, even love the color. And I’m a fan of painted ceilings (I’ve painted most of ours, the blue one in my office is my fave), but that saturated green feels SO heavy to me:

HGTV dream house 2013

I do love that they used the open shelving in what would be an awkward spot for cabinets next to the fridge!

The dining area was more of the same tones – I think a different color for the chairs would be lovely but I love those rattan ones at the ends of the table! I dig the lights too:

HGTV dream house 2013

Love that rug too!

The powder room showcases how the green continues through the house:

HGTV dream house 2013

I guess I’m just surprised – I expected a bit lighter color palette for a “beachy” type of home like this.

The bunk room was more along the lines of what I expected -- I LOVE the combo of blues and green:

HGTV dream home 2013

How FUN!

This room was more serene and more monotone:

HGTV dream house 2013

I wonder if they just put the dining room rug in here for the shot? ;) Although this one looks like it has some more green to it.

I thought the guest room was just lovely:

HGTV dream home 2013

The posters on that bed are amazing!

I’m obsessed with that deep blue/grey color on the armoire right now:

HGTV dream house 2013

It’s similar to what I used on the backs of our built ins.

The rafters in the loft are AMAZING:

HGTV dream house 2013

And I love that deep blue color on the walls!

I think my favorite room in the house is the master bedroom:

HGTV dream house 2013

I’m toying around with replacing our four poster bed and this makes me rethink it.

Love the rug and the pattern on this chair too:

HGTV dream house 2013

I also like that the two sides of the bed aren’t identical. There’s a small dresser on one side and a desk on the other:

HGTV dream house 2013

Really love that! This year I’m going to try to to break of out of my need to have everything symmetrical – it hurts me a little but I want to try. :)

There were a few more little things that I noticed in the house as well. This bright green vanity in a light blue bathroom was one:

HGTV dream house 2013

Love that they installed the vanity lights right into the molding around the mirror in that bathroom and this one:

HGTV dream house 2013

I like the addition of a towel rod at the end of the cabinets in the dining area:

HGTV dream house 2013

It’s the little things for sure. :)

I adore the fluffy blooms on this plant!:

HGTV dream house 2013

They called it a pandanus – I don’t think I’ve heard of this or seen one before!

I love that they used a long floating shelf in place of a console or dresser in a hallway:

HGTV dream house 2013

If you don’t have enough room for a piece of furniture, this would be a great option! My only question would be how do you hide the cords?? ;)

The pantry wasn’t your typical food closet, but I love how they made skirts out of some fun fabric to hide the stuff underneath:

HGTV dream house 2013

And really? A wine fridge in the pantry wouldn’t suck. ;)

I was so taken with these pretty ice cream cups in there too:

HGTV dream house 2013

Could be because I could eat a waffle cone for breakfast, lunch and dinner. Could just be cause they’re cute. ;)

What do you think of this year’s dream home? Do you enter every year? I stopped trying a few years back. And then every year when they announce the winner I get a tad excited that maybe it could be me and remember I never entered. Dang. ;)

All photos were taken from the HGTV site here and you can see details about paint colors and the products there too.

**Don’t forget the first Before and After Party of 2013 will be this Monday! I’ll be back to DIY and normal posting next week! Have a great weekend!