Showing posts with label ballard-designs. Show all posts

Sunday, September 8, 2013

DIY tufted headboard tutorial

Hello all! I’m so excited to share more about how I made the new headboard in our bedroom. I shared more about the start to this room redo, the new bed and the headboard earlier this week.

I’ve made my own headboards (and for friends!) for years – even before blogging. It’s seriously one of the easiest DIY projects you can do and you will save SO MUCH money doing it on your own.

The headboard part I was used to – but I was totally intimidated by the tufting part. I’ve never tufted one because it seemed like it would be hard…but it is not a big deal! For real, it wasn’t bad at all.

So here we go – I new the shape I wanted the headboard to be for awhile, but I just found out the other day that it had a name:

different shapes of headboards

I wanted the Belgrave look, which was totally easy to DIY. First up, Dad came down and we used his truck to pick up a big piece of mdf at the hardware store – it was a big four by eight foot piece and the Lowe’s Guy cut it down for me:

DIY tufted headboard

I wish I would have taken pics of how I cut the corners out, but it was so quick. Dad and I just searched the garage for something round (and used my bird food holder). I held it up on the corner and figured out how big of a cut out I wanted, then did some quick measurements to make sure it was even on both sides. Then I traced the bottom of the can and cut one side out with the jigsaw. That first piece is all you need to make the second one – just flip it over and place it on the other corner, trace, and you’ve got a mirror image.

I hope that makes sense – it was so fast I didn’t even think to take pics.

Dad helped me take the board upstairs where I went to work! I showed you how I made the headboard in the Bub’s room and this was nearly identical till I got to the tufting part.

Like that one, I used mattress pads instead of foam from the craft store:

foam mattress for upholstered headboard

Why this instead of regular foam? One word – cheaper. ;) Foam is a petroleum based product, so it goes up with the price of gas. Which means it’s just going up and up over time. I haven’t even check the price lately but for three inches of foam for a nearly 80 inch headboard wouldn't be cheap. The size was another reason – I would have had to use numerous pieces of foam to cover this and when you use the mattress pad you can get one big piece.

I had one I had picked up on clearance years ago (look for the XL twin sizes after back to school – you can find them for cheap!) but it was too small for this headboard. So I ended up with a bigger size (queen I think?), then ended up going back to get another one to do two layers because I really wanted it super soft.

One of the things I grew to dislike about our old headboard was how hard it was. I mean, it was wood, so yeah. And it had a curve to it so our heads never fit against it. First world problems. This time I made the headboard tall and cushy that we could comfortably lean against it.

Once the foam is down, you want to secure it with a layer of batting or thin fabric. I used batting first just because, again, I wanted this super soft. And I already had some, so that helped too:

DIY tufted headboard

Then I used a piece of muslin I had in my stash too, to cover everything again. This just secures all the foam and gives you a nice base for the final fabric.

Speaking of that – after all that I was ready to finish it up – and because I was feeling lazy and didn’t want to drive the extra 15 minutes to the fabric store, I actually shopped the drapery aisle at Target:

I wasn’t sure exactly what color I wanted so I grabbed a few. ;) The two on the left were $17 for a panel – which compared to a couple yards of upholstery fabric is pretty good.

Problem was we weren’t crazy about any of them when we tried them out. One was too light, one was too blah and one was too dark.

Soooo…the next day I went to the darn fabric store. ;) I needed the stuff to tuft the headboard anyway (at first I wasn’t planning on tufting. Scared, remember?) so I took a quick look through the fabrics and found one I LOVED in the suit fabric aisle.

Before I used that I figured out where I wanted my tufts and drilled the seven holes:

DIY tufted headboard

I just wanted it to be a simple design and some of the tufting I see is just too much for me. So when I did my math I decided to just do three across the top and four under that. That’s it – anything lower would always be covered by pillows or the mattress so I didn’t even worry about the bottom.

After the holes were drilled I added the final fabric:

DIY upholstered headboard

By the way, years ago I tried the electric stapler you can find at the hardware store (about $30) and it is kind of a pain in my butt to use. It gets jammed and the staples don’t go in evenly no matter what I do. I always revert back to my regular stapler (above) – it takes more muscle but that’s good for ya. ;)

Sometimes the corners can get tricky, so I’ve always used a simple method – start with the middle, then each side, pulling tight each time:

upholstering corners of headboard

For the curved corners I just grabbed the fabric and stapled as best I could:

upholstering curved corners

Remember…no one will see this part. Seriously, the back doesn’t matter. Do what you gotta do!

Here is is in it’s (almost) finished state:

DIY upholstered headboard

Getting there! The suit fabric is like a gray linen and looked so good. Way better than the drapes I picked out – I returned those.

Now the part I dreaded…the (shiver) tufting. So not hard. At all. All the stuff I needed was in the same section at Joann’s. I picked up this waxed thread and it rocked:

wax thread for tufting

It made this SO easy. More on that in a minute.

I grabbed some buttons too – it’s so easy to make your own fabric-covered buttons:

DIY buttons

I just used scrap fabric to make them all. Making buttons is fun.

So the tufting was a breeze – I couldn’t believe I had put it off all this time! I did poke myself a couple times, but overall, easy. :) First up, I threaded one of my long upholstery needles and made a little knot at one end, then stapled it to the back of the headboard:

how to tuft a headboard

Then I pushed the needle through the headboard, threaded the button on, and pushed it back through to the back. This is where the waxed thread comes in super handy – it kind of held the button where it was while I secured it to the back. Regular thread would slip and be hard to keep where you want it. This worked GREAT.

I would just put a staple in the back of the headboard, but wouldn’t push super hard on the stapler, so it didn’t go all the way into the wood. Then I was able to wrap that thread around it a few times, then hammer it down to secure it. (Pic on the right.)

I didn’t pull each button super tight – I didn’t want it to be a deep tuft. Just a little bit of tuft. And there is an easier way to do this by the way – you can just thread both ends of the thread on the needle with the button already on it, then put it through from front to back and then secure. But that method didn’t work for me because the waxed thread was so thick.

I was THRILLED with how it looked! I finished it up with some nailhead trim along the sides:

The particle board I used to make the headboard was 1/2 an inch thick and I went that size on purpose – so these would have something to grab onto. Any thinner and it would have been hard to get them in well.

I’ve never used the connected nailhead trim (I usually just do them individually) but wow, this made it so simple! The nailhead stuff is $21 for five yards, but I had two coupons so I got it for about $10. :)

I hung this up the same way I did in the Bub’s room – I just used picture hanging jobbies:

hanging a headboard

I figured out where the studs were and screwed into those in first, then that determined where I put the hangers on the back of the headboard.

When we got it hung I was so dang happy with how it turned out!: diy tufted headboard

You can see the nailhead trim better in that pic. From the front you don’t see it as much, but it’s a great little detail when you get up closer. I love it!

You can see there why I didn’t add any buttons any lower too – they’d just be covered.

Many of you have asked about the new bedding – I found it at HomeGoods earlier this year:

It’s by Hillcrest and it was a duvet cover and shams for $40. I had been looking for new bedding for months and just happened to find this, new sheets (they aren’t on now – they are darker and I’ll put them back on later in the fall) and the small pillow on the bed all in one trip. None of them are supposed to go together but I think they work well!

So far with what I made on the old bed, I’ve still got about $300+ to spend – I think I may make money on this redo! That’s what I’m talking about.

You can find upholstered and tufted headboards all over the place, but I promise you they are not hard to make on your own! It does take some time so just be patient with it. But you will save tons if you DIY this one -- the Pottery Barn bed on the left is $1000 for a king (gulp), the Ballard Designs on the right is $500+:
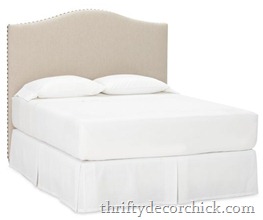
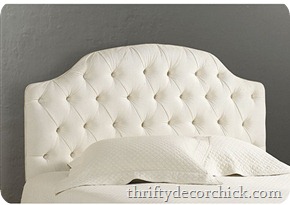
 Pottery barn upholstered headboard ballard designs camden headboard

I think mine looks pretty darn good for less than $100:

DIY tufted headboard

Here’s the break down on cost:

Wood: $15
Foam: $45
Fabric: $8
Buttons, nailheads, etc: $25

Total was $93! Aww yeah. And I have wood, foam, nailheads, buttons and thread left over to use on future projects.

If you went with one layer of foam/egg crate that will go down about $20. I had the batting and muslin but only one of those is really needed and they are both cheap. Of course of you skip the tufting that will help too!

Overall I’m so happy with how it turned out. And it is SO much more comfortable than our old headboard. Have you ever made your own? Did you find it easy to do? Have you ever attempted the tufting? Are ya sceered? 

Tuesday, November 13, 2012

42 sleeps

Well, I blame this post on you lovelies. Well, some of you. And my neighbors. I was going to hold off of any more talk of Christmas for now, but then one of you (Andrea!) had to go and tell me in the last post that you’ve already got all your decor up. And so many of my neighbors have taken advantage of the weather we had over the weekend and started putting up lights…so I will avoid resisting for a day and just go with it.

Don’t freak out people! This will be the last of the Christmas talk…for a while. A little while.

Every year I love to share some of my favorite Christmas advent calendar ideas! I do this early in the season so you have time to put one of your own together if you wish.

Of course there are the stand bys if you just want to buy one – Pottery Barn never disappoints because they ALWAYS have one that involves buckets:

Pottery Barn Galvanized Metal Advent Calendar

(source)

There’s something about those buckets! I’ve heard you can find small ones at the dollar store in the wedding supplies if you want to try your own.

And I swear this one is in the PBK catalog every year, or a version of it. And every year I say I’m going to make one just like it:

Pottery Barn Telluride Advent Calendar

(source)

I mean, it can’t be that hard, right? Green felt, some pockets. Not sure how I’d do the numbers. Maybe it is hard? Well, we’ll probably never find out because I doubt it’ll happen this year either. ;)

One I don’t ever have to worry about DIYing is the Lego advent calendar:

lego advent calendar

(source)

The Bub is Lego-obsessed, so for the past three years this is one we don’t miss. I actually had to hide it so he would QUIT ASKING to open up the doors. ;) Torture for a little man.

Of course, what I love most about blogland is seeing the creative versions you all come up with this time of year.

Lucy’s bright, fun version made me smile BIG: 

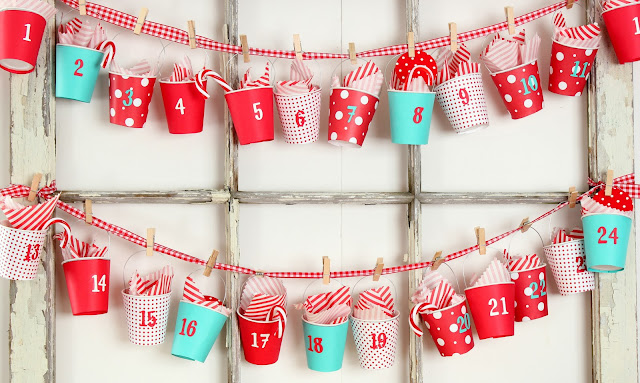
diy bucket advent calendar

(source)

They look like buckets don’t they? Nope! Dixie cups! Brilliant!!

I loved the simple version Chris made, and instead of trinkets inside it’s activities you can do over the season:

matchbox advent calendar jar

(source)

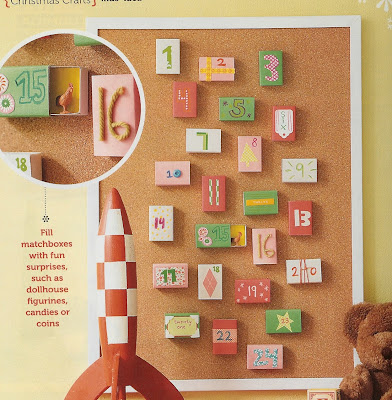
This one from Women’s Day mag is similar, but just vertical instead:

matchbox advent

That would be such a fun little project for the kids to help with! They would LOVE it.

I saw Melissa’s idea years ago and just the other day decided I’m going to do it this year:

wrapped Christmas book advent

(source)

She wraps up Christmas books for the nights leading up to Christmas. Doesn’t matter if they are old or new – the kids will LOVE opening them up! Can’t wait to do this one!

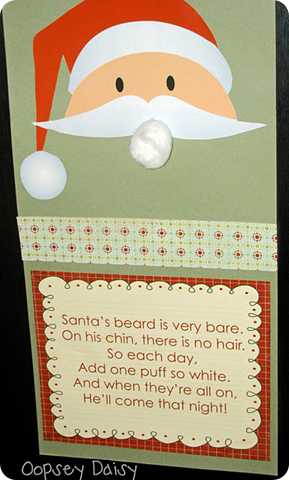
I was SO planning to do this cutie advent craft last year and just ran out of time – I have grand plans for this year!:

Santa beard advent

(source)

LOVE it! You add cotton balls to Santa’s beard throughout the month. What a cute idea to make and give to friends and family with kids.

Roeshel’s idea was so simple, I couldn’t believe I hadn’t seen it before!:

soda crate advent

(source)

She just used an old soda crate (already had 24 spots) and stamped small boxes for inside. Uhhhh…why don’t I think of these things? I have a crate that would work perfectly for this!

Beckie came up with a DIY version of the Ballard pillow I highlighted last year:

advent calendar pillow

(source)

It looks identical to the Ballard Designs one! Love it!

And I can’t get enough of the mitten advent idea, especially when it’s no sew:

mitten advent calendar

(source)

Yep, Sarah had me at the “no” part. ;) This is so dang cute – and another one the kids would love helping with I bet!

Today’s post was perfect timing because the latest House of Fifty online magazine was published today:

House of Fifty holiday cover I’m thrilled to be inside sharing one of our traditions – my handmade advent calendar we’ve used for years! You can see more of this beautiful issue here.

If you’ve made your own advent, please feel free to leave it in the comments! I’d love to see them!

Monday, June 4, 2012

June before and after Party!

beforeAndAfterButton

Helloooo! It’s that time again! Another month has come and gone and we’re here again to show off your before and afters. I can’t wait to see what you’ve come up with this month. :)

First, as always, I want to share a few of the awesome projects from last month’s party. It’s always so hard to narrow the highlights down to just a few – I’m always blown away by your talent!

We’ll kick it off with yet another fantastic kitchen makeover, this one at Aimee’s – here’s the before:

And the after:

white kitchen redo

Just beautiful!! Wow. That is a big transformation. And those are the same cabinets – see how they made over this space here.

I have a thing about penny floors and counters. I just think they are the coolest. So I let out a little squeal when I saw Ashley’s countertop:

penny countertop

I think that is so fun!

Another kitchen redo that I love is Cassie’s – I love her dark cabinets and gray backsplash!:

dark kitchen cabinets gray backsplash

You can see more details of her kitchen here.

Beth made some very simple changes to her front porch to get it ready for spring:

spring porch

I especially love how she did that cute mat! See how she did it here.

I have laundry rooms on my brain lately. Once I finish up the baseboards in the basement (almost done!) I’m starting on the laundry room. WHOO! So I was pretty excited to see this Ballard Designs drying rack knock off:

ballard designs drying rack

The instructions are detailed and I’m thinking I’m going to have to try this one out. :)

Cristina’s thrifty bathroom makeover is one of the best I’ve seen:

orange aqua bathroom

She used touches of orange and aqua just perfectly – it’s a beautiful room!

Finally, I had to share Ashleigh’s sweet painted vases in all of their pretty colors:

painted vases

Aren’t they beautiful? You can see her how-to here.

Wow, awesome stuff, I tell you! (As always, please go to the specific blogs if you’d like to pin a project!)

Now it’s time to see what you’ve been up to! If you’d like to be considered for a highlight, please link to TDC using this button:

<div align="center"><a href="http://www.thriftydecorchick.blogspot.com/" title="TDC Before and After" target="_blank"><img src="http://www.homestoriesatoz.com/wp-content/uploads/2012/03/beforeAndAfterButton_thumb1.gif" alt="TDC Before and After" style="border:none;" /></a></div>


And go ahead and link up your post here!


Monday, October 31, 2011

53 Days

Hello and Happy Halloween! Hope you had a wonderful day and evening! :) We had a great time chasing a very excited pirate around the neighborhood. And I ate a LOT of food. I mean. Lots.

Well, it’s about that time folks. It’s now November…uhhh, well it will be when most of you read this…so I’m allowed to say the “Christmas” word. I’ve actually been talking and thinking about it for a good month now, but November 1st gives me the go ahead to hide it no longer!

I’m freeeee!!

I’m a Christmas fareeek, so bear with me. And yes, I know a little holiday called Thanksgiving comes first, but I’m thankful every day, so I don’t get as excited about that one. :)

This time of year I’m always thinking about the countdown -- I love checking out all of the advent ideas out there. Because many of us love to DIY, I thought I’d share a few of my favorites (old and new) now so you’ll have plenty of time to get crafty. (OR pull out the bank card and order one – I feel ya.)

Click the pics to see more about each one!

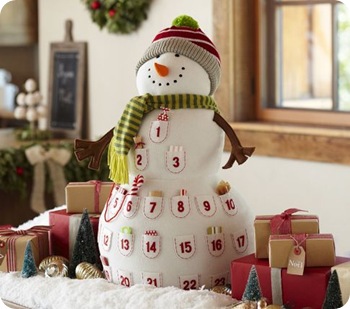
Pottery Barn never fails with the countdowns – this snowman advent is too cute!:

img14b

The price is not…but there’s gotta be some way to DIY this! I just can’t think of one right this second. My mind is a mush of Halloween candy. :)

This one is adorable and could be knocked off for sure:

Felt cut into stockings and glued on – love it!

This is an oldie but goodie, and SO doable. I searched for mini buckets last year to do this one and couldn’t find what I wanted (for cheap). I even asked the folks at Logan’s Roadhouse and they wouldn’t sell me some – boo!:

Anyone seen mini buckets at a good price?

I love this advent pillow at Ballard Designs:

And I know some of you crafty chicks could pull this one off! I on the other hand, am still working on the sewing a straight line thing.

I found this one at Meijer the other day:

It’s just a round metal sheet and there’s a magnetic glass piece that goes over the numbers and magnifies them. I think it was $10? Super cute!

I’m always blown away with the handmade ideas I see every year. I used cardboard boxes, paper and stickers from the craft store to make these years ago:

They have held up great! I used to fill each one with small toys or treats, but we need more itty bitty toys in this house like we need a poke in the eye.

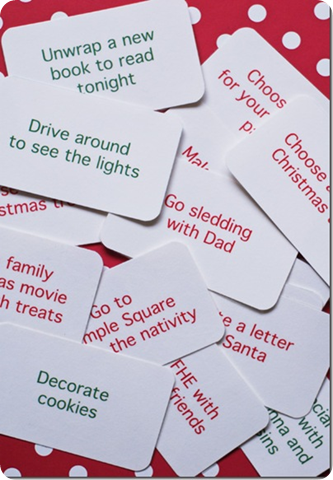
So I loved these simple activity cards with holiday themes instead:

Sooo doing this! Along with a few treats and toys…just a few. ;)

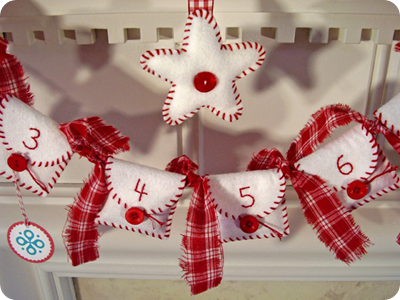
I’ve found a few more ideas on Pinterest over the past few weeks – love these little felt envelopes!:

Oh, they are too precious!

These Christmas trees are something different, and would be SO easy (and cheap!):

Wouldn’t they be fun across a mantel, in all different sizes? They’d have to be up high in this house – little hands wouldn’t be able to resist peeking underneath. :)

This one is simple and lovely:

Just clothes pins glued to a board, decorated with a bit of ribbon. Clip the little treats up each day – too sweet! I may have to try this one.

But my favorite yet is this idea:

OH my…the cuteness!! This one WILL happen at our house. Just adorable. And it doesn’t involve treats or presents…just one-on-one crafting time with the kiddos for a few minutes a day. LOVE.

Do you have a favorite advent or Christmas countdown tradition? I’d love to hear! If you’ve blogged about about one, feel free to leave a link in your comment. And I promise not to mention the C-word again for at least 24 hours.

:)