Showing posts with label always. Show all posts

Sunday, September 22, 2013

My favorite new gadget

Hello all! How is your week going? It’s been a slow one for me…it feels like molasses or something. I’m continuing on Decrapification 2013 (yeah, I named it) and it’s going really well. Our whole front room is a pile of stuff and I’ve decided I may leave it all till I’m totally done, just to get the full effect of how much I’m purging. It feels goooood.

Today I’m sharing a gadget that I LOVE. Let me introduce you to my little friend(s) – these things have changed my life!:

how to caulk

OK, maybe that’s a bit of a strong statement, but they sure have made my life a lot easier. Throughout the basement finishing process I took on a bunch of the projects myself in order to save some money (like all the painting and installing baseboards), but I’m not always so good on the finishing touches, like caulking the trim.

I have baseboards and crown in this house that I installed years ago that are still not caulked. I don’t know what my deal is, I just get that trim up and call it done. But the thing is, the caulk makes a much bigger difference than you think. It hides all the imperfections and gaps and stuff and makes it look pretty, clean and finished.

I used a TON of it on the DIY built ins:

DIY built ins kitchen cabinets

I found those little caulking tools above last year and tried them out on all the little gaps near and on the built ins. I have to say, I was pleasantly surprised – that rubber wedge makes it SO much easier and less messy.

I used it everywhere:

how to caulk how to caulk

I’ve shown you how I caulk before and how much I rely on caulk and spackle to finish up projects. They hide a multitude of sins, let me tell you.

That little corner had gaps everywhere (every house will have not perfect walls, angles, etc.) and after the caulk you wouldn’t even know:

how to caulk

I was doing some laundry last night and noticed the awful gaps behind the baseboards down there. I grabbed my caulk and little blue tool (no idea what the call it) and it was done in no time flat. See how the base is snug on one part of the wall and has a bit of a gap (mind the gap!) at another part?:

IMG_4989

Well, it’s annoying. I happens with crown occasionally too. And yes, I went from laundry to sitting on the floor caulking, that is how I roll.

Oh look, a butterfly!

Anyhoo, here’s the thing, always use paintable caulk. ALWAYS. Did I mention always? Always. You may think you won’t need to ever paint over it and then the day will come you want to and you’ll be screwed. I speak from experience (it’s not fun):

how to caulk caulking tool

I just use regular tape to close up my caulk between uses, it works just fine. Just make sure it’s air tight.

It’s hard to get a picture of using this tool (I guess I did above) but you just put a bead (or line) of caulk down the trim, then instead of your finger, you run the corner of this tool right down after it:

caulking tool

It’s BRILLIANT!! I can’t tell you how much easier it makes this process. And cleaner, so much cleaner. I take a wet paper towel and do a quick swipe afterwards to pick up any leftover caulk, but that’s it.

It takes half the time and look Ma, no gaps!:

how to caulk

Here’s a good before and after shot for you:

how to caulk how to caulk

See what I mean about making it look so much more finished? It’s such a little thing but I think it makes a big difference. I still need to paint these, but one thing at a time…

It’s a little easier and quicker on projects where the white caulk is going down on white trim. When we built the bookcases in the dining/library I was a little concerned about the caulk showing on the butcher block, so I tried out this little trick I saw on a DIY show awhile back:

how to caulk

You just lay down some painters tape – I used my green FrogTape obviously. Then you put the bead of caulk down, then swipe it (I used my blue goodness):

how to caulk

And when you’re done (I pulled it up when the caulk was still wet), you have a loverly clean, perfect line of caulk:

how to caulk

Ahhh, so nice! I used this method on every support on the bookcases and it worked great. It would be a bit of a mess to caulk on a darker surface like this without that tape laid down first. So much better!

I love sharing new tools that actually work (I guess you could call this a tool?) – I got this from a hardware store and it came with four (or five?) of the blue jobbies. It was only a few bucks if I remember right. SO worth it in my opinion.

Have you found a tool or gadget that makes life easier for you? Honestly, now that I have this one caulking isn’t that bad – dare I say almost enjoyable? It’s kind of a relaxing, therapeutic thing for me. And it’s instant gratification, which I love. :)


Saturday, September 7, 2013

February Before and After

Hey hey! It’s that time again – this first Monday of the month ALWAYS sneaks up on me, I always forget to remind you about this party. Dang.

I LOVE looking through all your posts and picking out some to share with the group every month, and yet again you did not disappoint. Let’s see what you’ve been up to…

Pam shared how they made and installed sliding barn doors for their basement family room:

DIY barn doors

Isn’t that awesome? And I’ll take that beautiful stone fireplace too…whenever.

The lovely Roeshel hit it out of the park with this chair makeover:

painted upholstered chair tutorial

First of all, you have to go check out how they started. Secondly, this brave woman PAINTED these chairs – and they look amazing.

Julie shared her kitchen before and afters here:

white kitchen sink window

I love the whole space, but this shot of that beautiful window, the rich wall color and bright cabs is my fave. :)

I guess I shouldn’t be surprised that I was drawn to so many light and peaceful spaces this month – I always ooh and ahh over them this time of year. Lisa’s room is so serene and pretty, and I love how she updated that metal art above the sofa:

white slipcover

Aren’t they beautiful? You can see how she did it here.

I don’t decorate specifically for winter, but I loved Julie’s “winter” mantel:

winter mantel

She shopped her house and used what she had and it’s so fresh and pretty!

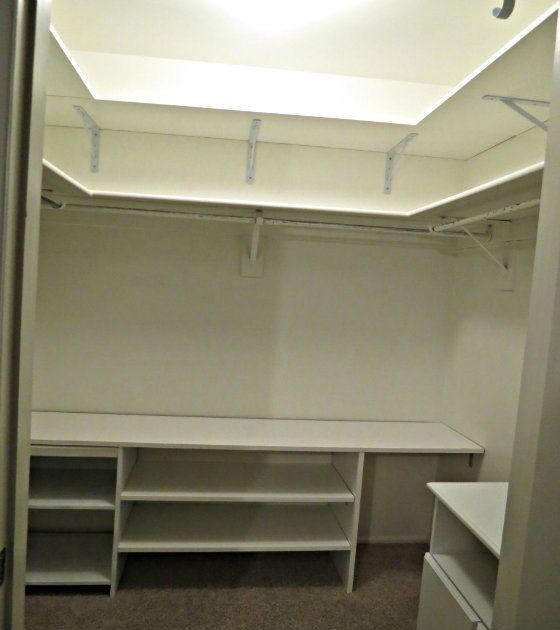
I HAD to include some organization, of course! I was inspired by Lena’s closet makeover. They used what was already there and added on to it to make the space more functional:

closet organization

I like this because they didn’t gut the room, they just made some simple changes. Our closet is such a disaster and I keep putting off making it work better because I feel like I need to start all over. This proves some simple changes will make a big difference.

I was smiling over Jessica’s simple change to her kitchen:

taking doors off cabinets

She took the doors off some cabinets and painted the back a fun, bright color – I LOVE it! And that chalkboard is adorable too. 

And finally, but certainly not least, because I have mud rooms on the brain, I loved Bette’s before and after in her laundry/mud room:

mudroom storage

All of that storage makes a girl just plain GIDDY. Ugh, I LOVE IT.

Now I can’t wait to see what you’ve been up to so far in 2013! Please, only link up projects that you have completed, not inspiration posts. And if you’d like to be considered for next month’s round up, please link back in your post. You can copy and paste this code for a quick link:

<div align="center"><a href="http://www.thriftydecorchick.blogspot.com/" title="TDC Before and After" target="_blank"><img src="http://www.homestoriesatoz.com/wp-content/uploads/2012/03/beforeAndAfterButton_thumb1.gif" alt="TDC Before and After" style="border:none;" /></a></div>


Let’s link it up! If you have some cute Valentine’s ideas, I’d love to see them! :)


Saturday, July 6, 2013

When money is tight

I don’t know about you, but there have been times in my life when money was T.I.G.H.T. I mean, on the floor of the car, reaching under the seats, trying to find a dollar in change to get enough gas to get me home or to work. (That’s when gas was cheap!) ;)

I learned a few BIG things over those years – one, not having money is one of the scariest, most unsettling feelings ever. It makes you feel completely out of control of your life. But I realized there were certain things I could do that would make me feel like I had control again and doing those things would help tremendously.

Although things are different for me now, there are certainly still times when cash is low – we are adjusting to a definite change since my hubby has retired from teaching. We planned for it and know things will even out so it’s not a scary situation, but it’s easy for those feelings of fear creep back in. It’s silly because my situation is completely different from years ago, but when the bank account goes low and the budget is spent for the month, I can’t help but feel that again, just a little. I will for as long as I live – you just don’t forget that feeling. :)

There are a few things that I’ve always done at times like that – and each of them gives me a sense of having control over my life. The first one may sound a little unusual – but it’s always worked for me.

I clean my car. :)

Now, my car is the thorn in my organizational side. It is just a space that easily gets messy and full of STUFF and I let it get out of control all. the. time. My husband does too. Maybe it’s the creative side of us? ;)

car disaster

Back in the day it was my mom’s car that I would do this with, but I would gather up change from around the house (or the car!) and drive to the car wash place and use their vacuum. I know you can do this at home and save a couple bucks, but for me it’s always getting out and driving there that helps too. When you don’t have any cash you’re not getting out as much so the drive was usually much needed.

I did this the other day and it ALWAYS makes me feel better – just throwing trash away, vacuuming the whole thing – it seriously works! If you are extra ambitious you can get even more detailed with it and maybe clean the outside (at home with the hose). But I’m rarely that good. ;)

It’s just a little thing but to this day it makes me feel better!

Depending on the state of your car, the next one goes hand in hand, and it’s to purge. Or decrapify as I like to say. If you’re like me you’re not always totally on top of stuff around the house when you’re feeling down about something. And again…I think what’s most important when money is tight is to feel like you have control over your home and life.

Going through the closets, the cabinets, the clothes and losing a few pounds of stuff feels SO GOOD. I cannot stress how amazing it feels when you see a pile ready to go out the door:

purging stuff out of the house

Maybe this is just me? All I know is it makes me feel so accomplished, so light and ready to conquer the world.

I wrote a post years ago about what to do with all that stuff too – you may just make some cash from that pile! I break it down into a few different areas – consignment, donation and recycling.

And finally, one that goes hand in hand with purging – organizing what’s left. Like decluttering, it won’t cost you anything! I mean, of course you can always add pretty baskets or organization, but most of the time just reassessing what you already have is enough: 

messy coat closet organized coat closet 

You can get creative with scrap wood, shoe or diaper boxes – whatever! Make labels with your printer or paint chips or scrapbook paper – it doesn’t have to be fancy!

Next month my plan is to get the house decluttered once again! I want to get it done before school gets going in full gear and before the birthdays and holidays later this year. I’m so motivated right now – I don’t know why but I feel like it’s spring instead of late(ish) summer. I have this desire to clean out and organize the whole house!

So what do you do when funds are low? Do you have any go to projects like my car clean out? Like I mentioned, I learned over the years that, for me, the way to fight the fear that comes with financial stress is to figure out something that makes me feel like I have power over my life – and all of these things do that for me, whether money is tight or not!

Have a GREAT weekend!!

Monday, September 5, 2011

September Before and After: A New Light

Well HEY! Hope you had a great weekend! We did a lot of bumming around and being productive – a little of both extremes. :)

Tonight’s before and after is brought to you by the continued science fair that is our kitchen. I showed you the mess the water damage has created, and last Friday, the madness continued.

We had noticed a few weeks ago that the framing around our back door was rotting away. We thought it would be a quick fix, and our handyman did too. That is until he started removing trim and found massive amounts of water damage – separate from the mess in the rest of the kitchen:

That’s a hole in our kitchen floor. For a brief moment in time we had a fabulous source of natural light in the basement. ;) I try to look at the bright side.

I told him to just tear out the floors cause they were going anyway -- thank GOODNESS we discovered this before replacing the floors!! (And no, there’s still no movement on that – hopefully this week.)

The folks who built our deck made it too high – so for six years the water has been flowing into the door frame every time it rained. That eventually ate away at the trim, the subfloor and the threshold.

Anyhoo, our awesome handyman worked from 8:30 a.m. to 6 p.m. and got it fixed up and did a few little changes that will keep this from happening again. LOVE HIM.

So…there’s been a little change I’ve been wanting to make to the kitchen for a while now, and this weekend I decided to do it. Because I needed to do something to the space that would make me feel in control again.

Or maybe I just wanted a pretty new light. Who knows. ;)

Recently something has been bugging me about light over the kitchen table:

oil rubbed bronze chandelier

I love it! But it felt too light…I don’t know, just not substantial enough. Once I realized what it was that was buggin’ me, I couldn’t get it out of my head. I just wanted something that was a bit more dramatic to fill that “space” in the room.

Enter the Portfolio light from Lowes:

portfolio light, lowes

I think it was $140? It was LUUURVE at first sight. I think I gasped just a bit when I saw it in the store, cause I knew it would look so good over our table.

I installed it the other night (with very little daylight to spare – I forget the sun sets so much earlier already!) and I couldn’t be happier with it:

pendant light, lowes

It adds a little contemporary flare to the space:

pendant light over kitchen table

I love it combined with our antique claw foot table. :)

I think what I love most is that it sends all of the light down to the table – it is SO much brighter under there now:

And of course I have it on a dimmer switch so it looks fab down low or up high. I love it!!

I thought about spraying it black for about two hot seconds, but I think we have enough black going on. (And at night it looks black anyway.) I’m working on some ways to bring some more color into this side of the kitchen, but for now, I love how this has changed it up a bit:

pendant light with drum shade

And look how calm our kitchen looks from this side (although you can see where I covered the torn out flooring by the door with the rug).

This side tells the real story of the past week:

mess

This is what happens when your pile spot (your island) is in the office. ;)

So here’s my before and after for this month –- the previous chandelier on the left, the new pendant on the right:

Typically your fixture should hang about 28 to 32 inches above your table and I always end up cutting my wires too short when I install. ALWAYS.  This one hangs 32 above the table, which I’m now happy about because any lower would have been directly in the eye line (for me anyway). As it is we can see under it well.

I found an old photo of the light after I installed it last year and it’s fun to see the changes since then:

Including the addition of a cute (rascally) dog. ;) And the removal of a floor. Gah.

So let’s see your projects! Link them UP!

I’d appreciate it GREATLY if you could link back to this post or at least my blog in your post. You can use this button if you’d like:beforeAndAfterButton