Tuesday, May 15, 2012

Show us your kids rooms!

Hello there! It’s time to share another space in your house! I can’t wait to browse through this party, because this month we’re showing off the fun and pretty spaces that are all about our schmushy faces – the kids:

Both nurseries and older kids spaces are welcome! I’ll kick it off with another little trip down memory lane -- the Bub’s nursery was an absolute joy to create:

*wipes a tear

It was so serene and peaceful and one of my favorite parts of the room were the stripes:

The were three different tones of an apple green that I just fell in love with. My Dad and I did a lot of work on this room together when I was pregnant so it has especially special memories for me. :)

A few years ago I knew it was time to change it up, cause darn it, the child was growing. I was surprised at how much I enjoyed transforming the space:

I am so not a primary colors kind of girl, but it just felt classic and timeless and right.

The walls are navy blue, but all of the white trim keeps it from getting too dark:

That’s a cat in the window, not a stuffed animal. He loves the room too. ;)

Not much has changed in here, I love it that much. We added a duvet cover and the Legos have started to make their way in here too:

Recently I took the rocker out of there to make more space, but I can’t bring myself to get rid of it quite yet. For now it’s in the playroom. :)

It did free up a ton of space by the window, so the window seat is finally going to happen! I can’t wait to get that started:

You can see more about the nursery (sigh) here and much more about the Bub’s airplane-themed space here.

Now let’s see your munchkin’s spaces!

I’d love a link back to this post or TDC, especially if you’d like to be considered in a highlight post!:

Show Us Your House
<div align="center"><a href="http://thriftydecorchick.com/" title="Show Us Your House" target="_blank"><img src="http://www.homestoriesatoz.com/wp-content/uploads/2012/03/image34.png" alt="Thrifty Decor Chick" style="border:none;" /></a></div>


And here’s the schedule for the rest of the year:


June (outdoor spaces), July (bathrooms), August (family rooms), September (basements/rec rooms), October (bedrooms, guest or master), November (foyers), December (mud/laundry rooms)


Monday, May 14, 2012

The Laundry List

Hey all! I hope you had a lovely weekend! Mine was jam-packed – we fit in a baseball game, strawberry picking, a Costco trip for the moms (and some kids), a couple naps, two ice cream trips, eating out (uhh, a LOT) and a trip to Lowe’s and the nursery for my Mother’s Day gifts. Oh yeah!

I am slowly but surely filling in the landscaping around our patio and I’m really excited about it. I’ve actually been completely focused on the outside all spring – very little has happened inside lately. Sorry. ;) I’m getting to it, I swear.

I’ll show you the landscaping progress soon, but for now, I wanted to update you on my to do list I wrote about here. I’m doing pretty good with it. Well, OK. I think I've knocked about seven things off the list. It’s been almost three weeks. I’d say that’s pretty good. Or…not?

;)

Well anyway, one of the biggest (and most expensive) projects was one in the laundry room. I’ve wanted to replace those metal utility doors forever:

black beadboard

I don’t have a great pic of the before but they were just awful. I’ve loathed them for eight years now. They were cheap, scratched up, loud and there was a huge gap at the bottom and the top of the doors.

Our HVAC system is inside, so every time the air or heat ran they would rattle. Annoying.

So they needed to go. They were on a track at the top and bottom:

The builder went wild and crazy with the molding too. Sooo fancy. ;) (That will be replaced soon.)

And another reason I didn’t care for those doors was the track on the bottom collected all kinds of dust and yuck. I picked up a couple new doors at Lowe’s with the hope I could just use the track that was already there, at least on top.

But when I assembled the doors and tried it, I quickly realized that wasn’t happening. Of course.

And I realized another issue – the doors were the exact same size, but because the hardware was different, the new doors were way too short for the space.

So I had to grab a couple 1 by 6’s (primed thankyouverymuch) and cut them to size to go right over the ones that were already there on top and bottom:

Please excuse the massive amounts of dust. I don’t clean in there. Or many places lately.

This made the vertical space just a skosh smaller, so the doors would fit. 

I grabbed some drywall screws:

And screwed them in on top and bottom:

The flat head on drywall screws are perfect for something like this because they sink into the wood. I filled each spot and now there’s no sign I did anything:

Other than the unsanded wood filler. Oh well. I’ll just add it to my list. ;)

I installed the new hardware, which is just a track at the top for each door and one little bracket at the bottom, so it’s much cleaner looking.

The doors came with two knobs, but I wanted something a little nicer so I grabbed a few more of the pulls I used on the kitchen island redo:

Because all of the HVAC stuff is back there, we had to go with louvered doors.

I do think I’ll paint the doors when the room gets painted:

Probably the same color as the walls? I’m not sure yet.

It is a HUGE improvement aesthetically, and they are easier to operate and they don’t rattle. Bonus!

louvered utility doors

This project was a total of about $160 – I think each door was $70 and the pulls were about $20 total. It was the most expensive item on my list, so I’m glad to have it out of the way!

This is another check off the laundry list for the laundry room. (Get it? Laundry list? Laundry room? OK, forget it.) Once we get the washer and dryer moved out, it will officially become a mud room, (hurrah!!) and I can get moving on painting, baseboards, built ins.

At this rate this will happen in 2019. So many projects to do first!

Here’s an update on the to do list I wanted to complete before the end of May:

1. Candelabra in master bath
2. Drapery hardware in master bath
3. Paint second handle on stairway
4. Paint baseboard by fireplace
5. Install small quarter round by fireplace
6.
Fill holes in quarter round on stairs
7.
Clean up around house – wood, flowers
8. Paint beadboard by fridge in kitchen
9. Paint trim around chalkboard in kitchen
10. Prime dining room
11. Get carpets cleaned upstairs
12.
Sand and reoil butcher block
13. Repaint corbel in kitchen
14. Hem (and line?) family room drapes
15. Fill holes and paint spot on loft wall
16. Rehang Bub photo in office
17.
Replace doors in laundry room
18. Change out last brass doorknob upstairs
19. Paint trim/fix drywall by back door
20. Figure out how to make powder room presentable.
21. Hang roman shade in guest room
22.
Go through shoes in laundry room
23. Fix trim under back door
24.
Trim burning bushes
25. Fill holes and seams in crown in family/kitchen
26.
Fix chair in kitchen
27. Add trim around basement door casing
28. Paint trim around laundry door casing
29. Paint cabinets in dining room
30. CLEAN LIKE I’VE NEVER CLEANED BEFORE

It’s not going as fast as I had hoped, but it feels good to get some of these things DONE.

The bushes no longer attack visitors when they walk up to the door:

burning bush

And the holes in the molding on the stairs are filled:

It only took two years.

You’ll notice the majority of projects I have left to do are PAINTING projects. I would really appreciate it if a gaggle of elves would show up overnight and get that taken care of.

Umkay.

So are you surprised at my progress? In a good way? No? ;) I know many of you made lists when I did – how are yours coming along?

I have gotten a ton more done than just those items crossed off, they just weren’t on the list. And now I may hit pause on it to work on a BIG project in the family room. After I plant a tree and six more plants in the backyard.

I. am. crazy.

And I love it!! :)

Friday, May 11, 2012

Giveaway Weekend!

**This giveaway is now closed!

Congrats to winners:

1. hazelhatcher1(at)aol(dot)com
2. Michelle (carpoolmch(at)aol(dot)com


Well peeps, this is probably the most special giveaway I’ve ever done, because it involves one of the most special people in my life – my BFF. :)

And when I say BFF, I mean, my real, true, I’ve known her for 25 years, best friend. (And I had to count that out a few times because, really, there is no way we’re old enough for it to have been 25 years. Yipes.)

I’ve got lots of women I consider to be my best friends – some from high school, some from college, some from work.

But Erin and I have been best friends since 6th grade and have been through everything together. From our undying love of NKOTB since then back then, to marching band rehearsals in high school, her family taking me in and loving me like their own, college years spent hours apart but still close, marriages, babies, the very good and the very bad, she’s been my one:


BFFs

She’s one of the best people I know and one of the hardest working. Erin has been an elementary teacher for about 14 years now and if you know a teacher you know the special kind of person that requires. She’s an ahhhhmazing mommy, an awesome wife and the BEST friend anyone could ever hope for.

She took on a second job last year (told you – she works her tail off) and that’s why we’re here today. :) Erin has been an advisor for Lia Sophia for almost a year now:

I LOVE this jewelry, and now it’s an awesome perk that she sells it. ;) I’ve accumulated quite a few of their pretties and wanted to share a few that I have and a few I may have to add to my collection.

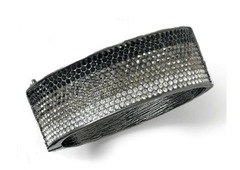
They have EVERYTHING – really. I’ll share a few of the basics -- these bracelets are all super fun (as always, you can click on each pic to get to the item):

I especially love the aqua and magenta ones for summer! How fun! And sassy!

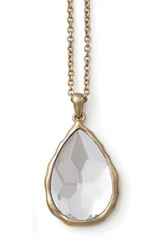
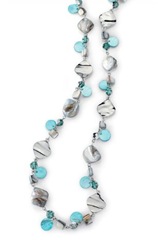
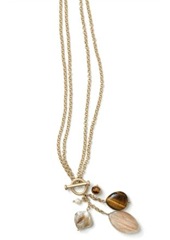
They have a HUGE selection of necklaces – these are just a few of my favorites:


I LOVE that As You Wish pendant on the upper left! I have the Natural Charm on the middle bottom (love that you can wear it long or toggle it to wear it short) and the Reflection on the bottom right is so FUN and dainty and sparkly.

And of course, there are the earrings. I’m an earrings girl – I can go out with next to no makeup, but I at least like to have earrings on. I’m weird.

I own each one of these:


One is for a night out, one is a little more demure and one is just a good hoop. Everybody needs a go-to hoop, don’t you agree? :) (About half of my earrings are hoops, I can’t get enough of them.)

Well because my BFF rocks, we are giving away TWO $50 credits to her Lia Sophia shop this weekend! Yes, I know. She is the bees knees.

How perfect for Mother’s Day! I know it’s too late to arrive as a gift, but ummm, hello? The best gift is sometimes the one you buy for yourself, am I right? So you new mommas, seasoned mommas, grandmommas, soon-to-be mommas, wifes or if you are just plain FEMALE, you deserve it. :)

I said so. So it is true.

There’s an awesome special running this month – if you buy two items (anything!), you get a third half off. And that half off comes off the MOST expensive piece of jewelry. AND, if you take advantage of that offer, you can also get up to three more bracelets or necklaces for half off.

Whooty HOO, that is awesome! If you have any questions, please feel free to email Erin – you can contact her here or using her email that is listed at the top of the web page. (You may need to click on “browse our jewelry” when you first get to the site, then enter “Erin Merrill” to look up the hostess. From there you are able to order easily.)

Here’s how to enter to win $50 to spend as you wish at Lia Sophia:
1. Leave a comment here. What do you have planned for Mother’s Day weekend?

2. Visit the Erin’s Lia Sophia site here. Check out the jewelry by clicking “by catalog” or the type of jewelry on the left. Take a look around, then come back here to let us know the item you love the most. **Again, if it asks you to enter a party hostess, enter “Erin Merrill.”

* You can enter one or both times – it’s up to you! Both options are not mandatory to win.

* Remember if you comment anonymously or you have a private blog, please include your email address in each entry, and spell it out with “at” and “dot” to avoid any spammy emails coming your way.

This giveaway is open to US residents only and will be open till this Monday, May 14 at noon EST.

I hope every one of you, mothers or not, have an absolutely lovely Mother’s Day!!

Thursday, May 10, 2012

Easy peasy banana bread

easy banana bread

Helloooo there! I’m back today with a very quick, YUMMY, very easy recipe – and I just had to share it because for years I thought it was way harder than this.

I love when I think something is difficult for so long and then do a quick search on the net and realize it’s not hard at all. Or maybe I hate when that happens, because I’ve denied myself of awesome all that time.

Whatever. This one is scrumptious and easy.

I had some bananas that were overripe, so before I threw them out I grabbed my phone and searched “easy banana bread recipe.” This one on Simply Recipes popped right up and I just had to share!

Can you believe I’ve never made banana bread? Ever??

It seriously took five minutes to mix everything:

banana bread ingredients

(I took this after I had already mashed the bananas, these are not quite ripe yet.)

You’ll need:

  • 3 or 4 ripe bananas, smashed (I used four)
    1/3 cup melted butter
    1 cup sugar (they say you can easily use 3/4 cup, I went with a cup)
    1 egg, beaten
    1 teaspoon vanilla
    1 teaspoon baking soda
    Pinch of salt
    1 1/2 cups of all-purpose flour

I love that the ingredients are so basic – I had everything I needed on hand. How often does that happen when you want something specific?

First mash up the bananas (I used a potato masher), and then add the melted butter:

YUM, banana goo!

Then mix in the sugar, egg, and vanilla:

On a side note, I’m a put-away-as I-go kind of cook. Do you put ingredients right away or wait till the whole shebang is done at the end? Leaving them out kind of gives me hives. :)

Add the baking soda and salt and mix:

Add the flour last, bake at 350 in a preheated oven for one hour and you’re done!

I added a bit of cinnamon at the end too, just because cinnamon is good in just about any baked item. In my opinion.

I don’t care for nuts in banana bread, so this recipe was perfect for me. If you like them in your nanner bread, I’m guessing about half a cup would be perfect.

The recipe specifies an 8” by 4” loaf pan, but all we have is a 9 by 5. Because of that I baked it for about 50 minutes instead of an hour.

It came out perfect:

easy banana bread recipe

I may or may not have eaten about five a couple pieces by the time I took this picture. :)

It is SO good. Especially yummy warm from the oven, with a little butter…  Ohhhh…um, what was I saying? I may add a few raisins in my next loaf – I think that would be amahzing.

I thought banana bread was much more complicated than this, and when I realized it wasn’t (and it was GOOD), I just had to share! Have you discovered an easy recipe you thought would be more difficult?

Now go forth and bake!!

Tuesday, May 8, 2012

Privet House at Target

**This giveaway is now closed.

Congrats to the winners!:

1. Kristina A at janhander(at)yahoo(dot)com
2. Lisa at
A Cottage to Me
3. Jen at Lily Atlantic
4. Kelly at hargrave1695(at)yahoo(dot)com

Please email me at thriftydecorchick(at)gmail(dot)com so I can get you connected with your goodies!

Hey all! WOW – more than 400 projects linked up already at this month’s before and after party! Check it out here!

Well…you know how much I love Target. I’ve expressed it in words here and I express it with my wallet waaaaay too much. I mean, really. Ask my husband.

Imagine my delight when they wrote and asked if I wanted to give away some of their new goodies to YOU.

Oh. yeah.

If you’ve been in a Target or seen the commercials lately, you know about their new initiative, The Shops at Target. I absolutely LOVE this concept -- Target will partner directly with the shop owners of specialty stores and boutiques around the country to co-create affordable, limited-edition collections for customers.

And today I get to share more about the home decor shop that is in stores now:

privet house at target

Privet House opened in 2008 in Connecticut and boasts an international collection of antique and vintage furniture, artwork and mirrors for the home and garden.

Their site is FULL of gorgeous eye candy:

The Privet House at Target line features a signature line of décor and accessories for the home, garden and table reminiscent of the shop’s charming aesthetic. I checked out some of the items at my Target this week and fell in love!

To celebrate The Shops at Target kick off, they are offering some of the new goodies to you!

FOUR lucky readers will get one of each of the following:

Privet House at Target Stationery and Rubber Stamp Set ($12.99)
Privet House at Target Apothecary Jar Scented Candle ($15.99, not pictured)
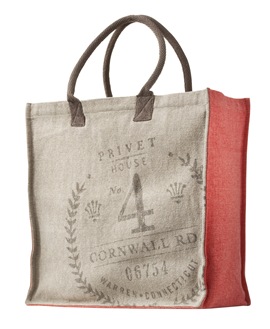
Privet House at Target Canvas Tote Bag in Coral ($19.99)
Privet House at Target Wire House ($24.99)

Privet House at Target Stationery and Rubber Stamp Set  Privet House at Target Canvas Tote Bag in Coral   Privet House at Target Wire House That’s $75 worth of Target goodness people! WHOO! Are you excited? I’m excited!

Entering this one is pretty simple – leave a comment here and tell us what you love most about Target. The clothes? The home decor? The popcorn? (That’s one of mine. Yum.)

This giveaway will be open through this Thursday the 10th at 5 p.m. and is only open to US residents. Good luck and have fun! :)

Monday, May 7, 2012

May before and after party!

It’s that time again! It’s almost summer, can you even BELIEVE it?? I can’t. Today we kick off May (I know it’s already been around for a week, whatever) with this month’s before and after party!

First, some of the awesome projects linked up last month!

Rasha updated her IKEA sofa with a little somethin’ and it looks fantastic!:

nailhead trim on sofa

I’ve had the supplies to the do the same and this has inspired me! Check out her post here.

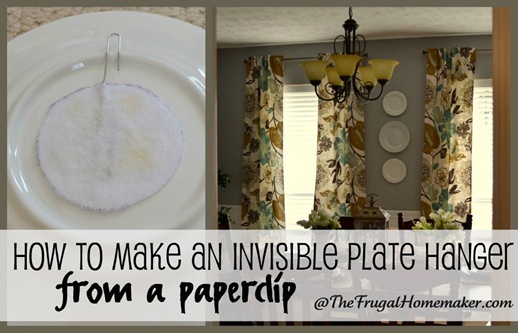
Christina came up with a way to hang her plates and it is brilliant!:

plate hangar from paperclip

Go here to see more. (Totally a DUH moment over here – wish I would have thought of that.)

I loved Alicia’s art project and what she used to make it!:

 DSC_0154

I planned on using those exact napkins from Cost Market for a project and then they sold out! I LOVE them.

I love how Kelly transformed dollar store plates into something pretty and special:

P1060600 diy song lyric plate

Go to this post to see how she did it!

Lori’s huge Pottery Barn knock off mirror is spectacular!:

diy eagan mirror

And so is the price -- check out her great step-by-step instructions on how she did it here!

Lynda is a girl after my own heart. She loves NYC as much as I do and I remember drooling over her awesome spaces years ago (before blogging) over at the Rate My Space page. That’s where all of us bloggers hung out pre-blogs. ;)

She recently moved and wanted to dress up their rental bathroom. Check out how she created a beautiful space here:

RENTAL BATHROOM BEFORE RENTAL REDO SM BATHROOM nyclq (1) 

Isn’t that amazing? It’s gorgeous!

And I’ll wrap it up with Megan’s living room because it’s such a fun, pretty, bright space!:

I LOVE the pops of orange she has in there – check out this post to see more.

OK! It’s time to see what you’ve been up to! Like always, please don’t link up a post you’ve linked before and I’d LOVE a link back, especially if you’d like to be highlighted like these lovely ladies.

You can use this button to do so:

<div align="center"><a href="http://www.thriftydecorchick.blogspot.com/" title="TDC Before and After" target="_blank"><img src="http://www.homestoriesatoz.com/wp-content/uploads/2012/03/beforeAndAfterButton_thumb1.gif" alt="TDC Before and After" style="border:none;" /></a></div>


Alright! Link it up! Can’t wait to see what you’ve created this month!